🧢 Beautiful ✨ Detailed πŸ’ Adorable

Paris At Night Shawl Pattern

Paris At Night Shawl Pattern
4.8β˜… Rating
5-7 Hours Time Needed
1.2K Made This
βœ‚οΈ

Beginner Friendly Level

Perfect for those just starting their crochet journey, with clear instructions and simple techniques

⏱️

Weekend Treat

Takes 5-7 hours, making it an enjoyable project to finish over a couple of days.

🌟

Elegant Drape

Soft flow with graceful movement, designed to flatter all body types with sophisticated comfort.

About This Paris At Night Shawl Pattern

This pattern creates the 'Paris At Night' triangular shawl worked from the top down using a single 4ply/sock skein. It is embellished with small size 6 beads and finished with a hand-made fringe for a glamorous look. The design is written row-by-row with no charts and is suitable for knitters wanting an easy introduction to working beads.

Paris At Night Shawl Pattern crochet pattern - detailed view of completed project

The shawl uses only one 100g skein (approx. 400m) and 188 size 6 beads in the sample. The pattern includes full finishing instructions for blocking and adding the fringe.

Why You'll Love This Paris At Night Shawl Pattern

I absolutely love this pattern because it takes a single delicate skein and transforms it into a stunning, wearable statement piece. I enjoy how the bead rows catch the light and add subtle elegance without requiring complicated techniques. The fringe gives the shawl personality and movement β€” it feels dramatic yet refined. I also love that it is accessible: the pattern is written row-by-row so you can follow along easily while learning to add beads. Making this shawl always feels like creating a small piece of evening glamour.

Paris At Night Shawl Pattern step 1 - construction progress Paris At Night Shawl Pattern step 2 - assembly progress Paris At Night Shawl Pattern step 3 - details and accessories Paris At Night Shawl Pattern step 4 - final assembly and finishing

Switch Things Up

I love to change up colourways to create very different moods; try a soft neutral for daily wear or a deep jewel tone for an evening look.

For a chunkier, warmer version I would use a thicker yarn and larger needles, which also gives a bolder fringe.

If you prefer no beads, simply omit the pb instructions and carry on with the eyelet pattern for a simpler lace effect.

To make a mini version, choose a finer yarn and smaller needles and reduce the number of repeats in middle sections.

I often swap bead colours to contrast or blend with the yarnβ€”metallic or clear beads give a different sparkle than lustred tones.

You could vary fringe length for a playful or minimalist finish; trim all strands evenly after attaching for a neat edge.

Try grouping two or three strands per tassel for a fuller fringe if you want more weight and movement.

For wearable texture, I sometimes add a simple crocheted border instead of fringe using a matching or contrasting colour.

If you want more drape, use silk-blend yarns like the sample; for a matte finish choose pure merino or wool.

I also like to personalize by adding a small knitted or crocheted motif at one corner for a signature touch.

Common Mistakes & How to Fix Them

βœ— Skipping the stitch markers will make it difficult to keep track of the centre spine and pattern repeats; place markers exactly as instructed and move them as you work. βœ— Forgetting to work the bead onto the presented stitch can cause beads to sit on the wrong side; slide the bead up your yarn to the needle and catch it when you knit the stitch so it sits correctly. βœ— Not blocking the shawl will hide the eyelet lace and make the fringe sit unevenly; block the shawl to open the eyelet section before adding fringe. βœ— Cutting fringe strands unevenly or too short will give an unbalanced finish; cut all fringe strands to the recommended length (approx. 23cm) and even them after attaching. βœ— Over-tightening yarn when placing increases or working the centre spine can distort shaping; maintain even tension, especially when making M1L and M1R increases. βœ— Not checking your stitch counts after each section can lead to incorrect shaping later; refer to the bracketed stitch counts after each section and correct any errors immediately.

Paris At Night Shawl Pattern

Make a delicate triangular shawl from a single 4ply/sock skein that sparkles with small beads and finishes with a fringed edge. This pattern guides you row-by-row with clear instructions and simple shaping to create an elegant accessory you will love to wear or gift. Perfect for knitters who want to try beadwork and a decorative fringe on a lightweight shawl.

Beginner Friendly 5-7 Hours

Materials Needed for Paris At Night Shawl Pattern

β€” Main Fabric

  • 01
    4ply/Sock weight yarn suitable for 3.75mm needles - sample uses Green Tea Yarns, colourway Bush Berries on White Cloud base
  • 02
    1 x 100g skein (approx. 400m) 50% silk 50% merino (sample)
  • 03
    Overall yarn used approx. 400m
  • 04
    Beads size 6 - sample used 188 Smoke Gray Lustre by Green Tea Yarns (quantity as required for bead rows)

β€” Tools Required

  • 01
    Knitting needles 3.75 mm (US 5)
  • 02
    2 stitch markers
  • 03
    Size 6 beads (example: 188 Smoke Gray Lustre)
  • 04
    Small crochet hook (for attaching fringe)
  • 05
    Scissors
  • 06
    Tapestry/yarn needle for weaving ends
  • 07
    Blocking mats and pins (for blocking shawl)

Progress Tracker

0% Complete

β€” Set Up :

Round 1 :

Cast on 6sts

Round 2 :

K2, pm, k2, pm, k2

Round 3 :

Slp1, kfb, m1r, sm, k2, sm, m1l, kfb, k1

Round 4 :

Slp1, yo, k3, m1r, sm, k2, sm, m1l, k3, yo, k1 (14 sts)

β€” Main Pattern :

β€” Section 1 :

Round 1 :

Row 1. Slp1, yo, kfb, (yo, k2, pass yo over the k2) repeat the bracket to the marker, m1r, sm, k2, sm, m1l, (yo, k2, pass yo over the k2) repeat the bracket to the last 2sts, kfb, yo, k1

Round 2 :

Row 2. Slp1, yo, k1, purl to the marker, sm, k2, sm, purl to the last 2sts, k1, yo, k1

Round 3 :

Repeat these 2 rows another 4 times (26.2.26)

β€” Section 2 :

Round 1 :

Row 1. Slp1, yo, kfb, (yo, pb, k2tg) repeat the bracket to the marker, m1r, sm, k2, sm, m1l, (k2tg, pb, yo) repeat the bracket to the last 2sts, kfb, yo, k1

Round 2 :

Row 2. Slp1, yo, (k2tg, yo) repeat the bracket to the marker, sm, k2, sm, (yo, k2tg) repeat the bracket to the last stitch, yo, k1

Round 3 :

Row 3. Slp1, yo, kfb, knit to the marker, yo, sm, k2, sm, yo, knit to the last 2sts, kfb, yo, k1

Round 4 :

Row 4. Slp1, yo, k1, purl to the marker, sm, k2, sm, purl to the last 2 sts, k1, yo, k1

Round 5 :

Row 5. Slp1, yo, kfb, (yo, k2tg) repeat the bracket to the marker, m1r, sm, k2, sm, m1l, (k2tg, yo) repeat the bracket to the last 2sts, kfb, yo, k1

Round 6 :

Row 6. Slp1, yo, (k2tg, yo) repeat the bracket to the marker, sm, k2, sm, (yo, k2tg) repeat the bracket to the last st, yo, k1

Round 7 :

Row 7. Slp1, yo, kfb, knit to the marker, yo, sm, k2, sm, yo, knit to the last 2sts, kfb, yo, k1

Round 8 :

Row 8. Slp1, yo, k1, purl to the marker, sm, k2, sm, purl to the last 2 sts, k1, yo, k1

Round 9 :

Row 9. Slp1, yo, kfb, knit to the marker, yo, sm, k2, sm, yo, knit to the last 2sts, kfb, yo, k1

Round 10 :

Row 10. Slp1, yo, k1, purl to the marker, sm, k2, sm, purl to the last 2 sts, k1, yo, k1

Round 11 :

(46.2.46)

β€” Section 3 :

Round 1 :

Row 1. Slp1, yo, kfb, (yo, k2, pass the yo over the k2) repeat the bracket to the marker, m1r, sm, k2, sm, m1l, (yo, k2, pass the yo over the k2) repeat the bracket to the last 2sts, kfb, yo, k1

Round 2 :

Row 2. Slp1, yo, k1, purl to the marker, sm, k2, sm, purl to the last 2 sts, k1, yo, k1

Round 3 :

Row 3. Slp1, yo, kfb, k1, (k2tg, yo) repeat the bracket to the last stitch before the marker, kfb, sm, k2, sm, kfb, (yo, k2tg) repeat the bracket to the last 3 sts, k1, kfb, yo, k1

Round 4 :

Row 4. Slp1, yo, knit to the marker, sm, k2, sm, knit to the last stitch, yo, k1

Round 5 :

Repeat these 4 rows another 3 times (78.2.78)

β€” Section 4 :

Round 1 :

Row 1. Slp1, yo, kfb, (yo, pb, k2tg) repeat the bracket to the marker, m1r, sm, k2, sm, m1l, (k2tg, pb, yo) repeat the bracket to the last 2sts, kfb, yo, k1

Round 2 :

Row 2. Slp1, yo, (k2tg, yo) repeat the bracket to the marker, sm, k2, sm, (yo, k2tg) repeat the bracket to the last stitch, yo, k1

Round 3 :

Repeat these 2 rows another 12 times (130.2.130)

β€” Section 5 :

Round 1 :

Row 1. Slp1, kfb, yo, knit each stitch twice to the marker, yo, sm, k2 twice, sm, yo, knit each stitch twice to the last 2 sts, yo, kfb, k1

Round 2 :

Row 2. Slp1, yo, k1, purl each stitch twice to the marker, sm, p2 twice, sm, purl each stitch twice to the last 2sts, k1, yo, k1

Round 3 :

Repeat these 2 rows twice more (142.2.142)

β€” Section 6 :

Round 1 :

Row 1. Slp1, yo, kfb, knit to the marker, yo, sm, k2, sm, yo, knit to the last 2 sts, kfb, yo, k1

Round 2 :

Row 2. Slp1, yo, knit to the marker, sm, k2, sm, knit to the last stitch, yo, k1

Round 3 :

Repeat these 2 rows another 3 times (158.2.158)

β€” Section 7 :

Round 1 :

Row 1. Slp1, yo, kfb, (yo, k2tg) repeat the bracket to the marker, yo, sm, k2, sm, yo, (k2tg, yo) repeat the bracket to the last 2sts, kfb, yo, k1

Round 2 :

Row 2. Slp1, yo, knit to the marker, sm, k2, sm, knit to the last stitch, yo, k1

Round 3 :

Repeat these 2 rows another 3 times (174.2.174)

β€” Section 8 :

Round 1 :

Row 1. Slp1, yo, kfb, (yo, k2tg) repeat the bracket to the marker, yo, sm, k2, sm, yo, (k2tg, yo) repeat the bracket to the last 2sts, kfb, yo, k1

Round 2 :

Row 2. (k4, pb) repeat the bracket across the row removing the markers

Round 3 :

Row 3. Knit across the row

Round 4 :

Cast off all stitches

β€” Finishing :

Info :

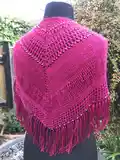
I have blocked the shawl to open, in particular, the bottom eyelet section.

Info :

To create the fringe edging you need to cut pieces of yarn approx. 23cm long and then using a crochet hook and two strands, make a tassel through each of the bottom eyelets along the edge, adjusting any of the beads that have slipped to the wrong side as you work.

Info :

Finished dimensions are approx. 128cm wingspan by 42cm excluding the fringe

Info :

The figures after each section in the brackets refer to the number of stitches you should have either side of the centre spine.

Info :

Gauge if you wish to use is 12sts x 15 rows using the stocking stitch pattern.

Assembly Instructions

  • Block the completed shawl to open the bottom eyelet section before attaching the fringe to ensure the eyelets sit correctly.
  • Create the fringe by cutting yarn pieces approximately 23cm long and, using a crochet hook with two strands, make a tassel through each bottom eyelet along the edge.
  • Adjust any beads that have slipped to the wrong side as you attach the fringe so beads remain on the display side.
  • Cast off all stitches and weave in ends securely before blocking and attaching fringe.
  • Measure the finished piece to confirm dimensions are approximately 128cm wingspan by 42cm excluding the fringe.

Important Notes

  • πŸ’‘Please read through the pattern instructions fully before starting your work to familiarise yourself with the repeats and bead placement.
  • πŸ’‘Use stitch markers as instructed to mark the centre spine and pattern repeats for accurate shaping and ease of working.
  • πŸ’‘Block the shawl to open the eyelet section and to set the finished dimensions for an even, professional finish.

This elegant shawl was designed to transform a single 4ply skein into a glamorous evening wrap with delicate beading and a playful fringe. It works beautifully for special occasions or to add a touch of sparkle to everyday outfits. Make one for yourself or as a thoughtful handmade gift that will be treasured. 🧢✨

You ask,

we answer.

FAQs

What size will the finished piece be?

The finished shawl measures approximately 128cm wingspan by 42cm excluding the fringe when using the recommended yarn and needles.

Can I use different yarn weights for this pattern?

You can use different yarn weights, but this will change the final size and drape; adjust needle size accordingly and check your gauge before starting.

Do I need experience working with beads?

No advanced bead experience is required; the pattern explains how to present the bead on the yarn and knit it into the stitch, making it suitable for beginners with some experience.

How long does this project typically take to complete?

Most knitters finish this shawl in about 5-7 hours, though time will vary depending on experience and whether you add fringe and beads.