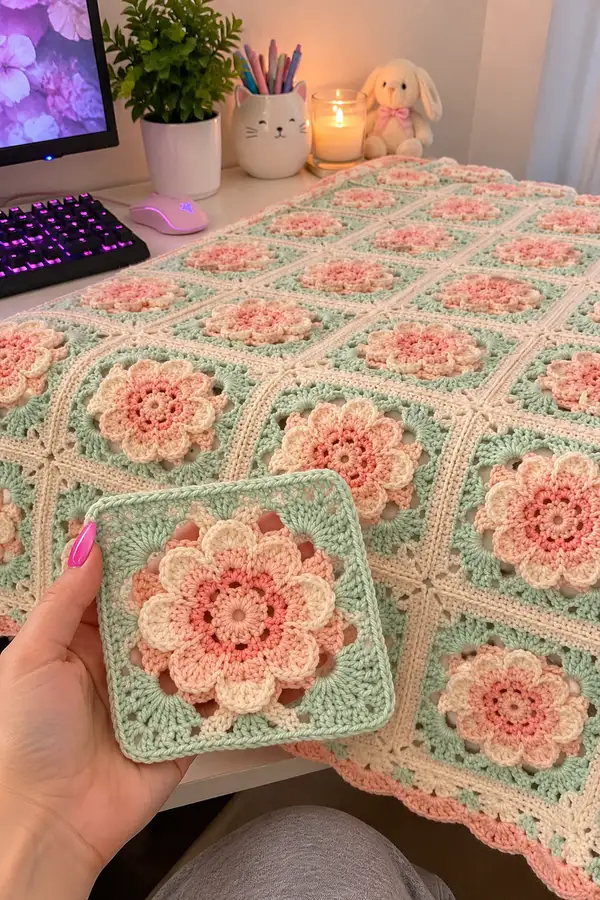
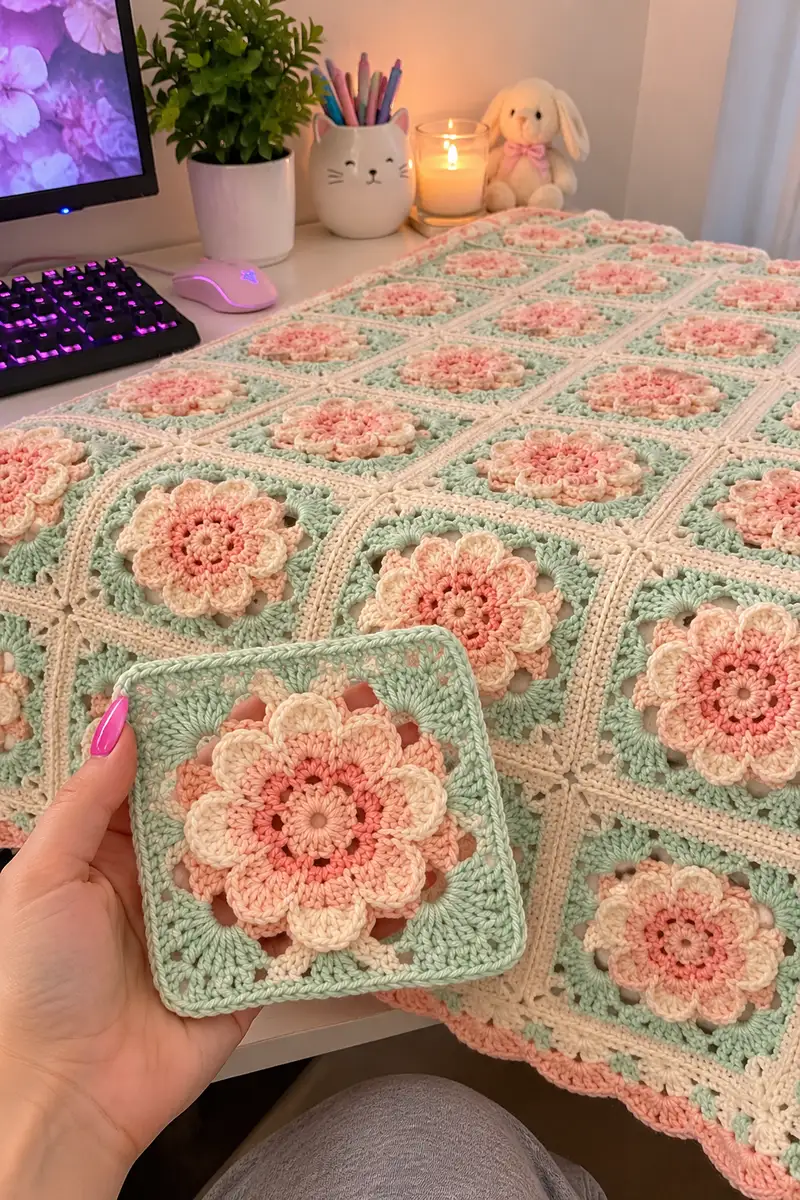
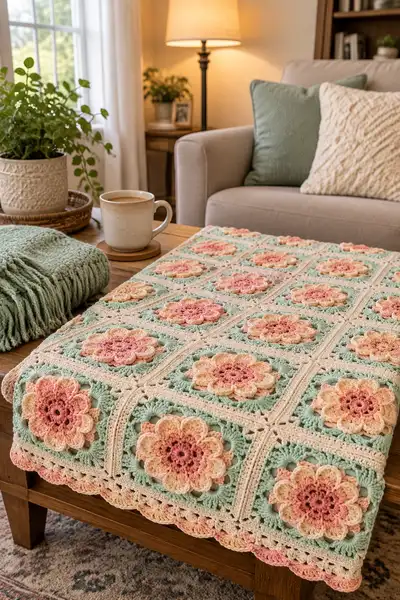
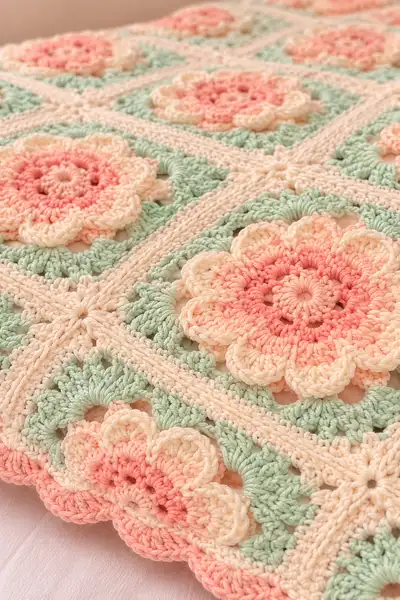
A charming bedspread made from layered peach flowers set in soft mint frames and joined with a warm cream border. Each square features a raised 3D flower with two peach tones and a creamy outline, assembled into a delicate pastel blanket. The pattern includes step-by-step instructions for the flower motif, square frame, join-as-you-go technique and the scalloped edging. Ideal for a decorative throw or full bedspread when repeated to your desired size.
Progress Tracker
0% Complete
— Notes & Gauge :
Info :
Gauge for one finished 12cm (4.7in) square is approximately 12 sc x 12 rows in cream joining rounds using 4.0mm hook. Adjust hook if your squares are larger or smaller. Each motif pictured measures ~12-13cm (4.7-5.1in) unfinished. This pattern is modular—make as many squares as required for your bed size.
Info :
Puff stitch used = yarn over, insert hook, yarn over pull up loop (repeat 4 times total so 9 loops on hook), yarn over and pull through all loops, ch1 to close puff unless specified. Make puff stitches consistent in loop size for even petals.
— Flower Motif (Make one motif—repeat for desired quantity) :
Round 1 :
With Peach B (deeper peach), make a magic ring, ch1, 8 sc in ring, sl st to first sc to join (8)
Round 2 :
Ch2 (counts as hdc), 1 hdc in same st, (2 hdc in next st) x8, sl st to top of ch2 to join (16)
Round 3 :
Ch1, *sc in next st, ch2; rep from * around to create 8 ch2 loops, sl st to first sc (8 ch-2 spaces + 8 sc)
Info :
These ch-2 spaces become anchors for the first ring of petals. Keep tension relaxed so the ring lays flat.
Round 4 :
Change to Peach A (lighter peach). Join with sl st in any ch-2 sp, ch2 (counts as first hdc), work (hdc, ch1, hdc) in same ch-2 sp to form a small petal base; *(hdc, ch1, hdc) in next ch-2 sp; rep from * around for 8 petal bases, sl st to top of ch2 to join (8 petal bases)
Round 5 :
Ch1, in each petal base work: sc, ch1, [puff stitch over same petal base] ch1, sc to finish petal. Work this in each of the 8 petal bases for 8 full puff petals. Sl st to first sc (8 petals)
Info :
Puff stitch used here is 4-loop puff: yarn over, insert in petal base, yarn over pull loop — repeat 4 times (9 loops), yarn over pull through all loops, ch1 to close. Keep each puff even. Block lightly if petals curl.
Round 6 :
Ch2, 2 dc in same st, *3 dc cluster in ch1 space between petals (3 dc in same space), ch2, sl st in between petals base to anchor cluster; rep from * around to create a ring of tall stitches behind petals. Join with sl st to first dc (8 cluster points, 32 dc approx total counting cluster sets)
Round 7 :
Ch1, sc evenly around working 3 sc in each ch2 corner space (if any) and 1 sc along each dc where applicable to tidy the round; aim for uniform edge with total stitch count approx 40 sc around. Sl st to join (approx 40)
Info :
Round 7 evens out the base for the next layer. If your stitch count differs slightly, adjust with additional sc evenly spaced so the next petal layer sits neatly.
Round 8 :
Change to Peach B. Ch2, in next st make (2 dc, ch1, 2 dc) to form first corner-like petal base; *(2 dc, ch1, 2 dc) in every 5th st around to create 8 larger petal bases; join with sl st to top of ch2 (8 larger petal bases)
Round 9 :
Ch1, in each larger petal base: sc, ch1, make 5-loop puff stitch into base (yarn over, insert, pull loop 5 times; yarn over pull through all loops), ch1, sc. Repeat for each base to form 8 large puffy petals. Sl st to join (8 petals)
Info :
Use the 5-loop puff for the outer petal layer so petals have volume and definition. Keep the ch1 between to let petals breathe and form slight separation.
Round 10 :
Ch1, sc around petals working 3 sc in each ch1 space between petals to secure shape; sc evenly around petal bases with total about 56 sc. Sl st to join (approx 56)
Round 11 :
Change to Cream (light cream). Ch3 (counts as dc), *skip next st, 7 dc grouped cluster worked into following st or small space to form a round of tall stitches that will help square shaping; ch3 between clusters; rep from * around for 8 clusters, sl st to top of ch3 (8 clusters)
Info :
Round 11 begins to build a pseudo-circular-to-square transition. Clusters with ch spaces provide corners later when framed.
Round 12 :
Ch1, sc in each st and in top of each cluster and in ch-spaces to tidy; aim for even 64 sc around. Sl st to join (approx 64)
Round 13 :
Ch2, *hdc in next 7 sts, (hdc, ch2, hdc) in next st to start corner; rep from * around to form 4 corner ch-2 spaces for later squaring. Join with sl st to top of ch2 (approx 4 corner ch-2 sps and ~72 hdc across sides)
Info :
At the end of Round 13 you should see 4 corner ch2 spaces evenly spaced. Count sides—aim for 18 hdc between corners (adjust if necessary to keep symmetry).
Round 14 :
Change to Mint. In corner ch2 spaces work: (2 dc, ch2, 2 dc) to form a square corner. Along each side work 18 dc (or adjust to match your count) into the side hdc stitches from previous round. Repeat for all four sides; sl st to join (approx 4 corners + 72 dc sides)
Round 15 :
Ch1, sc in each dc across sides and in corner stitches working (sc, ch1, sc) in each corner ch2 to keep corner flexibility. Total sc around approx 80. Sl st to join (approx 80)
Info :
Round 15 creates a firm base for establishing the mint frame. Keep counts even so square remains true; if you have a couple extra stitches, add them equally to opposite sides.
Round 16 :
Ch3 (counts as dc), *skip next st, (2 dc, ch1, 2 dc) in next st to create staggered corner shells; 1 dc in each of the next 8 sts across the side; rep from * around to form decorative shells at each corner and tall stitches on sides. Join with sl st (approx counts: 4 shells + 32 dc sides)
Round 17 :
Ch1, sc in each st around; work 3 sc into corner shells to anchor; total sc approx 96. Sl st to join (approx 96)
Info :
This round firms the mint frame and prepares for the cream joining rounds. Make sure petals still sit centered; if petals are pulled, ease them outward toward mint frame before final rounds.
Round 18 :
Change to Cream. Ch2, (hdc in same st), *hdc in next 11 sts across side, (hdc, ch2, hdc) in corner, rep from * around to create defined corner ch2 spaces and even sides. Join with sl st (counts will approximate 3 hdc per side groups producing about 96 hdc total)
Round 19 :
Ch1, sc around in each st and in corner ch2 do (sc, ch1, sc). Aim for a tidy square edge with approx 100 sc. Sl st to join (approx 100)
Info :
Round 19 is your final motif frame tidy; fasten off cream if you prefer to join with separate yarn tails, or carry if joining immediately. We recommend leaving long tails if you will seam by whip stitch instead of join-as-you-go.
Round 20 :
Optional: With Mint, add one more decorative round: ch3, 2 dc in next st, dc along side (about 18 dc), (2 dc, ch2, 2 dc) in corner, rep for all sides, sl st to join. This round gives slightly larger mint frame to match sample square size. Join and fasten off. (approx 4 corners + side dcs)
Info :
At this point you should have a finished 3D peach flower centered in a mint framed square with cream tidy rounds. Make as many motifs as required; sample bedspread pictured uses a 6x6 arrangement (36 squares) for a small double/throw size. Adjust counts and repeats to match your required size.
— Join-As-You-Go & Joining Squares (Working in Cream) :
Round 1 :
With cream, attach at a corner of your first completed motif with sl st into corner ch2 sp. Ch1, sc, ch1, sc into same corner to build a joining corner base (counts for starting corner on join row)
Round 2 :
Working along the first side: ch3 (counts as dc), then dc in each st across side until you reach the corner ch-sp of second motif (if joining to a pre-made adjacent square, instead of dc in next st, align and sl st into corresponding side stitch of adjacent square to join; continue pattern across side, making dc into next st on your square and sl st into corresponding stitch on the already-joined square). Continue working around the first square until you have one side attached to another square. Join with sl st to beginning ch3 when side is complete.
Info :
Method: join-as-you-go (JAYG) - when you reach a spot where your current square meets a finished square, join by working sl st (or sc for firmer join) through both loops: yarn over, insert hook through both pieces' stitch, pull up a loop and complete stitch in the usual way. Use this to assemble rows and columns without sewing later.
Round 3 :
Once first side is attached to second motif, ch1 and work sc evenly across next side until you reach next corner; if the next adjacent motif already present, join in the same manner using sl st across corresponding sts (sc for a more visible seam). Finish the second side with (sc, ch1, sc) in corner ch2 of your square. (Counts vary by motif perimeter)
Round 4 :
Continue around the square using sc in each st and joining to neighbors at appropriate points until all required sides are joined. If you are joining four neighbors into a center square, you will perform two joins as you go and then finish the final side by sewing or single crochet through both layers. Fasten off and weave ends after completing join round for each square.
Info :
Tip: When joining, keep tension slightly looser than working rounds so squares sit flat and do not pull. Place the square on a flat surface and pin before joining to keep alignment perfect.
Round 5 :
For a neater internal seam, after joining columns and rows, return with cream and work 1 sc into each stitch around the entire assembled blanket but only into the front loop of each stitch (FLO) to create a framed ridge defining squares. This round will highlight the grid and create a raised crossing. Approx stitch count will be total perimeter stitches across entire blanket.
Info :
Work this grid-defining round after all squares are assembled. Using FLO creates a subtle ridge and keeps the cream join from covering the mint frames entirely.
— Border & Edging (multi-round decorative border) :
Round 1 :
With Cream, join at any corner of assembled blanket. Ch1, sc in same corner, sc evenly along edge until you come to corner; in corner work (sc, ch2, sc) to turn; repeat along perimeter. This creates a clean base edge. (Total perimeter sc depends on blanket size)
Round 2 :
Ch3 (counts as dc), dc in each st around; in corners work (2 dc, ch2, 2 dc) to keep corners square. Join with sl st to top of ch3. This establishes a double crochet border frame.
Info :
Counting for border rounds depends on your blanket size; maintain symmetry by working same number of stitches on opposite edges. If your sides are longer/shorter, add or remove dc evenly on opposing sides.
Round 3 :
Change to Mint. Ch1, *sc in next 3 dc, (skip 1 dc, 7 dc in next st or space) to create shell windows evenly around edges; rep from * working shells spaced evenly to create a delicate mint accent running through border. Join with sl st to first sc.
Round 4 :
Ch1, sc around working 3 sc in each shell peak to anchor and sc across non-shell dc. Sl st to join. This secures shells and evens the edge.
Info :
Round 3-4 produce the mint decorative round shown in the sample bedspread near the edge — it also helps the scallop edge sit neatly. Keep shell spacing consistent - use blocking later for perfect curvature.
Round 5 :
Change to Peach A. Ch2, in each sc work: (hdc, ch1, hdc) every 6th stitch to create small scallop anchors; in the shell peaks work (3 hdc) to fill. Repeat across perimeter and join with sl st. (approx 4-6 scallops per short side, adjust for size)
Round 6 :
Change to Peach B. Ch1, work 5-loop puff into each scallop anchor space, ch1 between puffs; at corners adjust by making 3 puffs in corner space to keep turn. Sl st to join and fasten off. This is the outer scallop layer giving a soft peach shell edge.
Info :
Outer scallop uses 5-loop puff for the gentle scalloped texture you see in photos. Keep loops consistent—if puffs look too large, reduce to 4 loops for a tighter finish. Block after finishing for best appearance.
Round 7 :
Optional finishing round in Cream: Ch1, sc in each stitch around to neaten scallops and hide join tails. Use this round to smooth any irregular scallops and to anchor puffs so they do not snag. Sl st to join and weave in ends.
Info :
After edging, soak and block your blanket flat and pin scallops to an even curve. Allow to dry fully for crisp square edges and even seams.
— Alternate Join (Whip Stitch Seaming Option) :
Round 1 :
Make all motifs and block individually. Lay motifs in final arrangement on a flat surface. Using cream yarn and a yarn needle, whip stitch through the outer cream edge loops of adjacent squares aligning petals carefully. Use 3-4 mattress stitch passes per 1cm to secure seam firmly.
Round 2 :
After seaming rows together, join rows with the same whip stitch method. Once all squares joined, work a round of sc in BLO around the whole blanket to create the subtle ridge shown in the images. Proceed to edging instructions above.
Info :
Whip stitch gives a very clean, nearly invisible join that preserves the mint frame look. Choose this if you prefer not to use JAYG. Pin squares heavily before sewing to avoid shifting petals and frames.
This Peach Flower Granny Square Bedspread brings a cozy, romantic energy to any room with its soft peach petals and mint frames. Each square is a meditative little project that comes together into a stunning, tactile whole. Whether you make a small throw or a full bedspread, the modular design and clear joining instructions make it thoroughly achievable and deeply satisfying. I hope you enjoy every puff stitch and every seam—happy crocheting! 🧶🌸