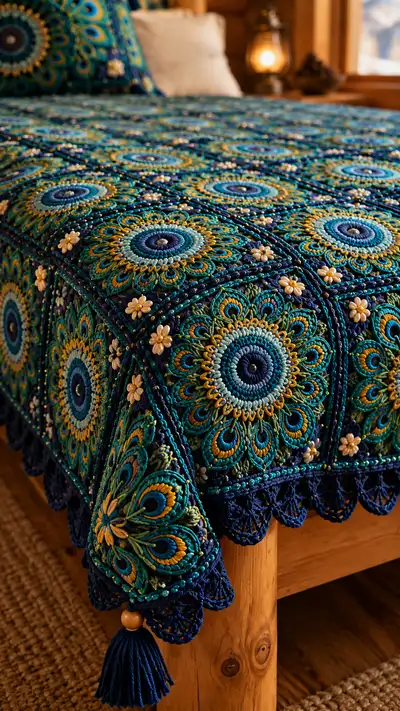
Create a luxurious peacock-inspired bedspread made from 16 ornate medallion squares, edged with a scalloped beaded border and tassel corners. Each square features raised petals, layered rounds and small daisy appliques that catch the light. This pattern walks you through motif construction, join-as-you-go assembly, decorative beads, edging and matching pillow covers for a coordinated set.
Progress Tracker
0% Complete
— Overview :
Info :
This bedspread is built from 16 medallion squares (4x4 layout pictured). Each square is a layered circular medallion worked in the round, then squared into a block and joined using a beaded join-as-you-go technique. Make a gauge swatch for a single square to size and adjust hook if needed. The written instructions produce medallions approximately 12 x 12cm (4.75 x 4.75in) before blocking; modify yarn/hook to reach desired motif size.
— Materials & Prep :
Info :
Before beginning, wind yarn into center-pull balls and pre-string beads you plan to use on a small beading thread or the yarn tail. Label colors A (Navy), B (Teal), C (Turquoise), D (Gold), E (Light Aqua), F (Olive). Keep contrast high between petals and background for definition.
— Medallion Square (Make 16) :
Round 1 :
With Color D (Gold), make a magic ring, ch 1, 8 sc into ring. Pull tight and join with sl st to first sc. (8)
Round 2 :
Change to Color F (Olive). Ch 1, 8 inc evenly around (16). (Info: when changing color, finish last pull of previous round with new color to avoid knot.)
Round 3 :
Change to Color E (Light Aqua). Ch 1, (1 sc, inc) x8. (24)
Round 4 :
With Color B (Teal). Ch 1, (2 sc, inc) x8. (32)
Round 5 :
With Color C (Turquoise). Ch 1, (3 sc, inc) x8. (40)
Round 6 :
With Color A (Navy). Ch 2 (counts as hdc), hdc in same st, hdc in next 39 sts. Join. (40)
Info :
Rounds 1-6 form a firm center; keep tension slightly tighter here to provide a sturdy center to build raised petals against.
Round 7 :
Change to Color B. Ch 1, 1 sc in same st, *ch 2, skip 1 st, sc in next st* around to create small picot loops for petal anchors. Join. (Approx 20 ch-2 loops)
Round 8 :
With Color C, work petal bases: sl st into first ch-2 space, *(ch 2, 3tr, ch 2) all in ch-2 space, sl st into next ch-2 space* around. This produces 20 petal-like arches. Join. (20 petals)
Info :
Use a slightly larger hook (3.5mm) for the petal arches if needed to keep them open and defined. Keep the number of base loops even to maintain symmetry.
Round 9 :
With Color E, working into spaces: In each petal arch, *(fpdc around the first tr of arch, 3 puff stitches in center of arch, fpdc around last tr) then sl st to next petal*. Each puff: yarn over, insert hook, yarn over, pull up a loop, repeat 4 times (5 loops on hook), yarn over and pull through all loops, ch 1 to close puff. Secure with sl st. (20 puff groups)
Round 10 :
Change to Color D. Ch 1, sc in each stitch around across arch bases and puff tops, placing 3 sc between puff groups to create a band. Join. (Approx 80 sc)
Round 11 :
With Color A, Ch 3 (counts as dc), dc around placing (2 dc) evenly to form a raised ring. Work fpdc behind each dc to create ridge texture: *dc in next 3 sts, fpdc around next dc* repeat. Join. (Approx 90 stitches including dc counts)
Info :
Front post double crochets here push previous rounds forward and create the embossed look seen in the photo. Maintain consistent height of posts by keeping the same tension.
Round 12 :
With Color B, ch 1, *(sc, ch 2, 3tr in ch-2 space, ch 2, sc) repeat around placing petals that are taller; use 16-20 spaces depending on your previous counts.* Join. (16-20 tall petals)
Round 13 :
With Color C, sl st to top of a tall petal, then work along each petal: *(ch 3, puff in next sc at petal base) x 3, ch 3, sl st to next petal top* to add raised feathering. Be consistent with puff counts per petal. (Info: Each puff here is a 4-loop puff as in Round 9.)
Round 14 :
Change to Color E. Ch 1, 1 sc in each st and 1 sc in top of each petal to stabilize petals. Join. (Stitch count varies approx 120-140 depending on petals)
Info :
At this stage you have a circular medallion with raised petals. Check symmetry: petals should be evenly spaced. If necessary, add or reduce slip-stitch transitions to equalize counts.
Round 15 :
With Color D, create small teardrop loops between petals: *sl st into next st, ch 6, sl st into base a few sts ahead forming a teardrop* repeat around making a decorative halo. Join. (Approximately equals number of petals)
Round 16 :
Change to Color A. Working into each teardrop: *(3 sc, hdc in next 2 chs, 3 sc) in each teardrop* to create a solid ring. Join. (Approx 160 sc total)
Round 17 :
With Color B, ch 1, 1 sc in each st for two rounds to firm up surface. Rounds 17-18: 1 sc in each st (approx 160). (Info: These even rounds stabilize the medallion before squaring.)
Round 19 :
With Color C, begin the square formation: Work (3 sc, ch 3) in every 16th stitch to create corner ch-3 spaces; work 1 sc in remaining stitches. You will create 4 corner ch-3 spaces. Join. (Stitch count maintained approx 160)
Round 20 :
Change to Color D. In each side between corner ch-3 spaces work: *[sc, ch1, sc] in next 8 sts across*, adjusting spacing evenly; in corner ch-3 work (sc, ch 3, sc) to form squared corners. Join. (This begins the square frame and evens each side.)
Round 21 :
With Color A, ch 1, sc in each st and (sc, ch 3, sc) in each corner. If stitch count per side is uneven, use extra sc to compensate. Aim for even sides of approximately 12cm width. Join.
Info :
Block the medallion now: pin to a flat square shape using the corner ch-3 spaces as guides. Spray-block lightly or steam-block per yarn instructions to set shape and uniform size across motifs.
Round 22 :
With Color B, add decorative raised chain border: *sl st to side center, work a rope chain (ch 3, sc in back bump of chain across 6 times) across each side, anchoring with sc at corners.* This makes a beaded-look rope for join placement.
Round 23 :
With Color E, create small picot and bead anchors along side edges: *[sc, ch 2, sl st back in ch-2 to form picot]* every 6 sts. Place a bead (pearlescent) onto the yarn and work it into the stitch at the sl st to secure. Repeat across sides. (Info: pre-string beads to yarn tail if preferred.)
Round 24 :
With Color D, stabilize edge with one round sc in each stitch around including picots and bead anchors. Join. (Edge now set for joining.)
Round 25 :
Edge finishing: With Color A, work a decorative slip-stitch ridge around the square: *sl st in back loops only across all edge stitches* to create a defined frame. Join. (This ridge will read as the dark outline between squares.)
Round 26 :
Flower applique anchors: At each corner, leave a loop of Color D (approx 10 cm) for later attaching 3D daisy appliques. Fasten off leaving tail. Weave tails to back.
Info :
One medallion square took 26 rounds of shaping and edging. Repeat to make 16 squares. Keep a notation of color order to maintain consistent color layout across the blanket.
— Small Daisy Applique (Make 48 small daisies for joins) :
Round 1 :
With Color D (Gold), make magic ring, ch 1, 6 sc into ring. Pull tight and join (6).
Round 2 :
Ch 1, inc in each st (12).
Round 3 :
Change to Color E (Light Aqua). *[ch 3, sl st into same st]* repeat 6 times to form 6 petal loops around center. Fasten off and leave tail for attaching bead center.
Round 4 :
Info : Sew a pearlescent bead in the center of each daisy using yarn needle and secure at the back. Attach daisies at the corner spaces between squares using tails left from medallion Round 26.
— Join-As-You-Go Beaded Join (Assemble 4x4 layout) :
Info :
Join squares while adding 3 pearl beads at each corner between neighboring squares, creating the dotted floral pattern shown. Work to join each new square to previously joined squares along two edges (left and bottom) using beaded slip-stitch technique so bead sits in the gap between squares.
Round 1 :
Lay the first square face-up. Pick a second square face-up. With Color A and WS together, join in a corner st: insert hook through both edge loops, pull yarn, ch 1, sc through both layers across the side; every 6th sc, stop and slip a bead onto the yarn then ch 1 and sc through both layers to hold bead. Continue to join side. Fasten off. Repeat to join adjacent sides creating a joined strip. (Info: aim for 3 beads per side segment between corner daisies)
Round 2 :
Join strips: After joining strips of 4, join strips to each other using the same method to form a 4x4 block. When joining a square to two existing squares (one to left, one below), work sc through three layers at the corner intersection for strength. Weave tails through back of join for neat finish.
Info :
Blocking the joined panel flat is critical so the beaded joins sit flush and the border will lay even. After joining each row, pin to blocking surface and steam lightly. Allow to dry completely before continuing.
— Center Panel Stabilization Rounds (On assembled 4x4 piece) :
Round 1 :
With Color A held double (two strands held together), join in any outer edge stitch and work 1 sc in each visible edge stitch around entire assembled panel; sc in corner (sc, ch 3, sc). This forms a sturdy outer frame. (Stitch count will depend on assembled size.)
Round 2 :
With Color B, ch 3 (counts as dc), dc around placing 3 dc in each corner ch-3 space to maintain shape. Work fpdc in every 6th dc to create vertical ridges aligning with medallion petals. Join.
Round 3 :
With Color D, sc in each st around with picot edging every 8 sts: *sc 7, ch 3, sl st back into 3rd ch to make picot* repeat. Join. (This anchors the next lace rounds.)
Info :
These stabilization rounds use doubled yarn to make the center sturdy enough for the heavier lacy border and for long-term durability on a bedspread.
— Decorative Scalloped Border (12 rounds) :
Round 1 :
With Color A, ch 1, sc in each st around for one round to firm edge. Join. (Even round)
Round 2 :
With Color B, *ch 5, skip 4 sts, sl st* repeat across to create arches for scallops. Join.
Round 3 :
With Color C, in each ch-5 arch work (sc, hdc, 5 dc, hdc, sc) to form a full scallop shell. Join. (This creates pronounced rounded scallops.)
Info :
Work one scallop sequence centered over each side segment so corners remain balanced; adjust counts slightly to prevent puckering at corners.
Round 4 :
With Color D, *ch 3, sl st into space between the 2nd and 3rd dc of each scallop, repeat to form small arches inside each scallop.* Join.
Round 5 :
With Color A, along each scallop top work picot points: *(sl st to last dc of scallop, ch 5, sl st into 3rd ch to make picot) repeat across scallop centers.* Join.
Round 6 :
With Color B, anchor bead row on scallop junctions: *sc in base between scallops, then string one bead onto yarn, ch 1, sl st into bead loop to secure, continue*. Secure beads spaced evenly across border peaks. Join.
Round 7 :
With Color C, work decorative filet/fan stitches behind scallops to create open lattice: *ch 6, sl st two scallops ahead* across, then overlay with sc ropes at intersections. Join.
Round 8 :
With Color D, reinforce scallop bottoms with 1 sc in each stitch across the back row to stabilize. Join.
Info :
Test a small sample of scallops and bead placement on a spare motif corner to ensure the spacing matches the finished assembled panel. The bead row gives an added visual seam and weight to help drape.
Round 9 :
With Color A, add a decorative shell overlay: in each scallop top work *(ch 1, 5 dc in space, ch 1)* and finish with a row of sl st braid along the outer edge for neat finish. Join.
Round 10 :
With Color B, repeat a final lace top: *[ch 3, sl st into outer edge] across* to accent scallop peaks. Join.
Round 11 :
With Color A, work a final tidy ridge by working sl st in back loops only around outermost edge to create a dark defined frame. Join.
Round 12 :
With Color D, weave in ends and add final blocking to scalloped border, shaping scallops uniformly and weighting with pins until dry. Fasten off and weave tails to back. Info: The scallop rounds complete the bedspread edge and produce the lacy hanging edge shown in the photo.
— Corner Tassels & Beads :
Round 1 :
Make 4 tassels: Cut 60 strands of Color A yarn at 20cm (8in) length. Fold in half and secure loop around a wooden bead, knotting threads tightly into bead hole and wrapping top with extra yarn for a neat finish. Trim ends evenly. Attach tassels to each corner through the corner ch-3 space, securing with multiple stitches and knotting on the back. Add bead to top of tassel as shown. Info: Tassels add weighted drape to corners.
— Matching Pillow Covers (Make 2) :
Info :
Each pillow uses a single medallion square centered on a 45cm (18in) square pillow cover. The medallion is bordered by smaller rounds to reach pillow dimensions. The construction mirrors the medallion rounds above. Work one large medallion for front and backing panels in Color A and match edging.
Round 1 :
Make medallion as per Motif Rounds 1-26 but stop at Round 21 where square shape is approx 12cm. Then expand sides with alternating rounds of sc and shell to reach 45cm: Rounds 22-30: alternate Color B and Color C: (row of sc across each side), then shell round to increase width evenly. Aim for 8-10 additional rounds depending on gauge.
Round 2 :
Info: Add a zip or envelope closure on backing panel. If adding zipper, sew zipper onto the wrong side of panels before final border rounds so stitches cover zipper edge neatly.
Round 3 :
Attach small daisies at corners and outline with sl st ridge as for bedspread. Attach tassels to two corner tops of each front pillow for a coordinated look. Fasten off and weave in ends.
— Final Assembly & Finishing Touches :
Info :
Weave in all tails on WS; check bead security and sew through bead holes once more with strong sewing thread where needed. Re-block entire bedspread to final dimensions, shaping scallops and smoothing joins. Use damp blocking or steam per yarn care to set shape.
Round 1 :
Edge reinforcement: With Color A, join at back and run one single crochet round in the joining seam across the entire perimeter to hide join edges and make the bedspread comfortable against surfaces.
Round 2 :
Final inspection: Ensure beads are tight, daisies are centered, tassels secure, and border scallops even. Trim stray fibers and lightly brush to remove loose lint. Store flat if not in use to preserve shape.
Info :
Care instructions: Hand wash in cool water, reshape while damp and dry flat. Avoid machine washing due to beads and tassels; spot clean if needed. Use gentle detergent for color preservation.
This Peacock Medallion Granny Bedspread brings a bold splash of color and texture to any bedroom. Each medallion square is a small work of art that, when joined, creates a hypnotic peacock-inspired surface full of raised petals, beads and lacy scallops. The included matching pillows and tassels add the finishing touches that make this set feel curated and cozy. I hope this pattern inspires a relaxing, creative process and a truly special heirloom piece. 🧶✨