🧢 Beautiful ✨ Detailed πŸ’ Adorable

Pika the Electric Mouse Amigurumi Pattern

Pika the Electric Mouse Amigurumi Pattern
4.1β˜… Rating
5-7 Hours Time Needed
3.0K Made This
βœ‚οΈ

Intermediate Level

Ideal for those with basic crochet experience, featuring slightly more advanced stitches and techniques to expand your skills.

⏱️

Weekend Treat

Takes 5-7 hours, making it an enjoyable project to finish over a couple of days.

🧸

Cute Companion

An adorable friend to cherish, handcrafted with love to bring comfort and joy for years to come.

About This Pika the Electric Mouse Amigurumi Pattern

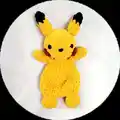
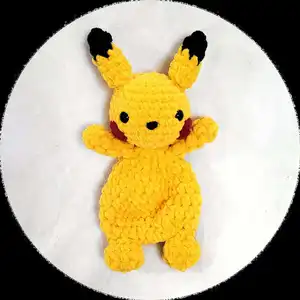
This pattern creates a soft, squishy Pika the Electric Mouse amigurumi using bulky Bernat Blanket yarn for a plush textured finish. You will crochet a rounded head, a short squat body, tiny arms and legs, pointed ears with black tips, cranberry cheeks and a zig-zag tail. The pattern uses single crochet and half double crochet shaping, invisible colour changes, and clear photo references to guide assembly.

Pika the Electric Mouse Amigurumi Pattern crochet pattern - detailed view of completed project

Perfect for making a handmade gift or a snuggly shelf companion, the pattern is detailed and photo-supported. Materials are common and the finished piece is quick to assemble with basic crochet skills.

Why You'll Love This Pika the Electric Mouse Amigurumi Pattern

I absolutely love this pattern because it turns chunky, tactile yarn into a delightful little character that is both quick to make and full of charm. I enjoy the combination of single crochet and half double crochet shaping that gives Pika a soft, squishy look while still holding its shape. The invisible colour change technique for the ears is one of my favorite details because it looks professional but is simple to execute. Sewing the parts together and seeing the face come alive never fails to make me smile, and I hope you feel the same satisfaction as you assemble each piece.

Pika the Electric Mouse Amigurumi Pattern step 1 - construction progress Pika the Electric Mouse Amigurumi Pattern step 2 - assembly progress Pika the Electric Mouse Amigurumi Pattern step 3 - details and accessories Pika the Electric Mouse Amigurumi Pattern step 4 - final assembly and finishing

Switch Things Up

I love how easy it is to customize this pattern by swapping colors; try pastel yellow and soft greys for a muted look or bright neons for a playful twist.

I often change yarn weight and hook size to make different sizes: a smaller hook and lighter yarn creates a mini keychain version, while bulky yarn and a large hook makes a chunky cuddle toy.

I like to replace safety eyes with embroidered eyes for a child-safe toy β€” embroidery gives a softer, handmade expression too.

Try adding wire inside the arms or tail if you want posable features; I add thin craft wire and wrap it before stuffing for bendable limbs.

Embroidered facial details can change personality: a little smile, tilted mouth, or different eye placement always makes the face unique and expressive.

To make a set, I sometimes crochet small outfits or props like a tiny scarf or hat using leftover yarn; these accessories make handmade gifts extra special.

I also play with texture by combining Bernat Blanket with a smooth worsted yarn for trims; this contrast highlights details like cheeks and ear tips.

Try using felt for the cheeks and nose instead of crocheting them; I glue and stitch felt firmly in place for a flatter, stylized look.

If you want to make this pattern faster, skip stuffing the body fully and create a flattened lovey version that is lighter and quicker to finish.

I recommend experimenting with placement of eyes, ears, and cheeks on a practice head first; moving these small elements slightly changes personality and I always try several options before sewing permanently.

Common Mistakes & How to Fix Them

βœ— Skipping stitch markers when working the body and legs can lead to misplaced leg openings; use stitch markers to mark leg positions and check placement before crocheting. βœ— Stuffing the head too loosely results in a floppy shape; stuff firmly and gradually while shaping to maintain a rounded head. βœ— Changing yarn tension during rounds will make the texture uneven; keep a consistent, relaxed tension and practice a swatch if needed to match gauge. βœ— Rushing the invisible colour change can leave a visible seam; follow the invisible colour change instructions and use a slip stitch to reduce the appearance of the change.

Pika the Electric Mouse Amigurumi Pattern

Make your own adorable Pika the Electric Mouse with this friendly amigurumi crochet pattern. You will create a cuddly plush using bulky Bernat Blanket yarn and clear step-by-step instructions. The pattern includes head, body, arms, legs, ears, cheeks, nose and tail assembly details so you can finish a charming toy you will love to gift or display. Great for crafters who enjoy quick, tactile projects with bold color and texture.

Intermediate 5-7 Hours

Materials Needed for Pika the Electric Mouse Amigurumi Pattern

β€” Main Fabric

  • 01
    Bulky Weight 6 Bernat Blanket Brights - Yellow (main color)
  • 02
    Bernat Blanket - Black (for ear tips and nose)
  • 03
    Bernat Blanket - Cranberry (for cheeks)

β€” Tools Required

  • 01
    Hook L 8mm (US L)
  • 02
    14mm Safety Eyes (2)
  • 03
    Stuffing (polyester fiberfill)
  • 04
    Tapestry Needle for sewing
  • 05
    Stitch Markers
  • 06
    Scissors

Progress Tracker

0% Complete

β€” Head :

Round 1 :

8 Sc into Magic Ring (8)

Round 2 :

Inc x 8 (16)

Round 3 :

(Sc 1, Inc) x 8 (24)

Round 4-6 :

Sc around (24) (3 Rounds x 24 Sc = 72 Sc)

Round 7 :

(Sc 3, Inc) x 6 (30)

Round 8-9 :

Sc around (30) (2 Rounds x 30 Sc = 60 Sc)

Round 10 :

(Sc 3, Dec) x 6 (24)

Round 11 :

(Sc 2, Dec) x 6 (18)

Round 12 :

(Sc 1, Dec) x 6 (12)

Info :

Place safety eyes between rounds 7 & 8, 5 stitches apart. (PHOTO A)

Info :

If embroidering eyes, loop yarn through repeatedly until you have a full, round eye. Tie ends off and leave the tails inside the head.

Info :

Nose can be added at this time, or at the end. Refer to Page 6 for instructions.

Info :

Stuff the head until the desired firmness is achieved.

Round 13 :

Dec x 6 (6)

Info :

Tie off, leaving a 6" tail. Using a tapestry needle, finish off the head by picking up the front loops of the final 6 stitches. Pull tight to close and then hide the yarn tail through the piece and trim the excess. (PHOTO B)

β€” Arms :

Info :

Make 2

Round 1 :

5 Hdc into Magic Ring (5)

Round 2-4 :

Hdc around (5) (3 Rounds x 5 Hdc = 15 Hdc)

Round 5 :

Hdc 3, Hdc Dec (4)

Info :

Fasten off and leave a long tail for sewing onto the body. (PHOTO C) Set aside for sewing later.

β€” Ears :

Info :

Make 2. In Black:

Round 1 :

5 Sc into Magic Ring (5)

Round 2 :

Sc 4, Inc (6)

Info :

Invisible colour change to Yellow:

Round 3 :

Sl st, Sc 5 (6) (The sl st reduces the appearance of the colour change).

Round 4 :

(Sc 2, Inc) x 2 (8)

Round 5 :

Sc around (8)

Round 6 :

Dec x 4 (4)

Info :

Fasten off and leave a long tail for sewing onto the head. (PHOTO D)

β€” Body :

Info :

In Yellow: Begin by holding the head upside down and face pointing away from you. Note: You will be placing 6 sc into the bottom of the head (using Round 13 as a guide for stitch placement). You will start the row at the back of the head. (PHOTO E)

Round 1 :

6 sc into head (6)

Round 2 :

Hdc Inc x 6 (12)

Round 3 :

(Hdc 1, Hdc Inc) x 6 (18)

Round 4 :

(Hdc 2, Hdc Inc) x 6 (24)

Round 5 :

Hdc around (24)

Round 6 :

(Hdc 3, Hdc Inc) x 6 (30)

Round 7-8 :

Hdc around (30) (2 Rounds x 30 Hdc = 30 Hdc)

Round 9 :

(Hdc 3, Hdc Dec) x 6 (24)

Round 10 :

(Hdc 2, Hdc Dec) x 6 (18)

Info :

Add extra Hdc to get to the centre of the back. Do not fasten off yet, you will go directly to the leg instructions.

β€” Legs :

Info :

Lay the body flat to figure out how to place the legs (There will be 5 stitches designated for each leg, that will leave 8 stitches unworked). Recall that on the previous page that you added extra Hdc to get to the centre of the back.

Info :

Using stitch markers, mark 5 stitches for each leg, with a 4 stitch gap in between on each side. (PHOTO F). Add extra Hdc to get to the first st marker, if needed.

First Leg :

1. Sc Inc x 5 (10) (PHOTO G)

Round 2 :

(Sc 4, Inc) x 2 (12)

Round 3 :

(Sc 2, Dec) x 3 (9)

Round 4 :

(Sc 1, Dec) x 3 (6)

Info :

Fasten off and weave in tail. (PHOTO H)

Second Leg :

Add Yellow yarn to Round 10 of body, leaving a 10" yarn tail. The second leg will be worked the same way as the first leg. (PHOTO I)

Info :

Use the 10" yarn tail to sew closed the gap between the legs. (PHOTO J)

β€” Assembly :

Info :

Sew the arms onto Round 2 of the body, 4 stitches apart, at the front. (PHOTO K)

Info :

Sew the ears onto either side of the head, between Rounds 3 & 4. (PHOTO L)

β€” Nose :

Info :

In Black: Sew a strand of black yarn around the centre stitch of Rounds 8 & 9, between the eyes. Secure the ends inside the head. (PHOTO M)

β€” Cheeks :

Info :

Make 2. In Cranberry: 1. 5 Sc into Magic Ring (5) Sl st.

Info :

Fasten off and sew between Rounds 9 & 11, slightly behind the eyes. (PHOTO N)

β€” Tail :

Info :

* Leave a long tail at the beginning to sew onto body. In Yellow:

Round 1 :

Ch 6

Round 2 :

Starting 2nd Ch from the hook: Sc 5 (5) Ch 1 & turn

Round 3 :

Sc 5 (5) Ch 1 & turn

Round 4 :

Sc 2 (2) Ch 1 & turn

Round 5 :

Sc 2, Ch 4 (6) turn

Round 6 :

Starting 2nd Ch from the hook: Sc 5 (5) Ch 1 & turn

Round 7 :

Sc 5 (5) Ch 1 & turn

Round 8 :

Sc 5

Info :

Fasten off and sew between Rounds 7 & 8, at a slight angle. (PHOTO O & P)

Assembly Instructions

  • Sew the arms onto Round 2 of the body, spacing them 4 stitches apart at the front for a natural pose.
  • Sew the ears onto either side of the head between Rounds 3 & 4 so the black tips face forward and are symmetrical.
  • Attach the cheeks (cranberry) between Rounds 9 & 11, slightly behind the eyes, and secure the tails inside the head.
  • Add the tail by sewing it between Rounds 7 & 8 at a slight angle, using the long tail left at the start to secure it.
  • Use the 10" yarn tail from the second leg to sew closed the gap between the legs and secure the body base.

Important Notes

  • πŸ’‘Use stitch markers to mark the start of rounds and leg placement; this helps maintain symmetry and correct shaping.
  • πŸ’‘When stuffing the head and body, add filling gradually to achieve a smooth, even shape without overstuffing.
  • πŸ’‘Practice the invisible colour change on a scrap to ensure a neat transition on the ears and reduce visible seams.

This cute Pika the Electric Mouse pattern is a fun, tactile project that turns chunky Bernat Blanket yarn into a lovable plush companion. Perfect for gifting or keeping on a cozy shelf, it blends simple shaping with charming details like cranberry cheeks and black-tipped ears. Happy crocheting and enjoy every squishy stitch! 🧢✨

You ask,

we answer.

FAQs

What size will the finished piece be?

The finished amigurumi measures approximately 18-20 cm tall when using Bernat Blanket bulky yarn and an 8mm hook, though exact size may vary with tension and stuffing.

Can I use different yarn weights for this pattern?

Yes, you can use different yarn weights, but this will affect the final size and texture; adjust your hook size accordingly and expect a different finished height.

Do I need prior crochet experience for this pattern?

This pattern is rated Intermediate, so basic knowledge of single crochet, half double crochet, increases, decreases, and invisible colour change is recommended.

How long does this project typically take to complete?

Most crocheters complete this project in 5-7 hours, though time may vary based on experience level and how much time you spend on assembly and finishing.