🧢 Beautiful ✨ Detailed πŸ’ Adorable

The Elephant Queen Amigurumi Pattern

The Elephant Queen Amigurumi Pattern
4.0β˜… Rating
8-10 Hours Time Needed
1.8K Made This
βœ‚οΈ

Intermediate Level

Ideal for those with basic crochet experience, featuring slightly more advanced stitches and techniques to expand your skills.

⏱️

All-Day Adventure

Requires 8-10 hours, ideal for a full day of immersive crocheting.

πŸ₯

Charming Critter

Delightful animal designs with sweet details that capture the essence of your favorite woodland and farmyard friends.

About This The Elephant Queen Amigurumi Pattern

This pattern creates a soft, posed elephant amigurumi with a long trunk and large floppy ears. It uses basic amigurumi shaping with single crochet increases and decreases plus a few double crochet rounds for the ears. The pattern includes all pieces: trunk (connected to the head), head, body, legs, arms, ears, tail and an optional mouth piece. You will receive explicit round-by-round instructions and clear assembly directions to finish a polished toy.

The Elephant Queen Amigurumi Pattern crochet pattern - detailed view of completed project

Make two inner ear pieces and two outer ear pieces to create the signature folded ears. The pattern recommends stuffing as you go and placement notes for safety eyes and final sewing.

Why You'll Love This The Elephant Queen Amigurumi Pattern

I absolutely love this pattern because the big folded ears give the elephant so much personality and charm. I enjoy the trunk shaping β€” starting in a contrasting color and switching to the body color creates a lovely detail. The pattern balances shaping with straightforward rounds so I can relax and enjoy stitching without getting lost. Sewing the pieces together gives a rewarding finishing step where the character comes to life. Sharing this elephant as a gift always brings smiles and makes me proud of the handmade result.

The Elephant Queen Amigurumi Pattern step 1 - construction progress The Elephant Queen Amigurumi Pattern step 2 - assembly progress The Elephant Queen Amigurumi Pattern step 3 - details and accessories The Elephant Queen Amigurumi Pattern step 4 - final assembly and finishing

Switch Things Up

I love customizing this elephant by changing colors; try pastel shades for a nursery-friendly version or deep jewel tones for an adult gift.

I often make a mini version by using fingering weight yarn and a smaller hook; this makes a lovely keychain or ornament-sized elephant.

To make a larger, cuddlier elephant, use bulky yarn with a larger hook and increase stuffing for a plush result.

I sometimes add embroidery details like eyelashes or a little heart on the belly to personalize each piece.

For posable limbs, I add a thin wire armature inside the legs and arms before stuffing; it lets me pose the elephant for display.

Try different eye optionsβ€”safety eyes for durability, embroidered eyes for a child-safe toy, or small buttons for a vintage look.

Want a dress or crown? Crochet tiny accessories like a flower crown, scarf or skirt to change the style and create themed characters.

Alter ear size and folding placement to create a variety of expressionsβ€”from shy and folded to wide and playful.

I sometimes change the trunk length or add a curl at the tip by adjusting round counts to give each elephant its own personality.

Experiment with textured stitches on the body or add surface crochet details to create unique tactile interest and make each project truly one-of-a-kind.

Common Mistakes & How to Fix Them

βœ— Skipping the stitch marker at the beginning of rounds causes you to lose track of the start and miscount later; always place a marker and move it each round to maintain correct stitch counts. βœ— Forgetting to stuff as you go can make shaping difficult and result in lumps; stuff gradually and firmly during the recommended rounds to keep a smooth, even shape. βœ— Not placing safety eyes at the recommended rounds will lead to incorrect face placement; attach eyes between rounds 25 and 26 with 18 stitches between them as instructed. βœ— Overstuffing the body or head makes sewing pieces together awkward and the finished toy stiff; stuff firmly but not excessively and adjust while shaping to maintain softness. βœ— Closing leg and arm openings without pinning can make positioning inconsistent when sewing; pin limbs in place and check symmetry before stitching them securely. βœ— Ignoring BLO instructions (back loop only) will change the intended texture and fit of parts like legs and arms; work in BLO exactly where it is specified for the correct shaping.

The Elephant Queen Amigurumi Pattern

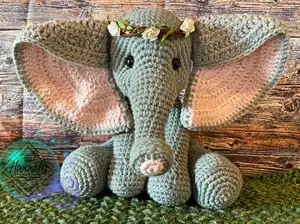
Make a sweet, huggable elephant with this step-by-step amigurumi pattern. You will create a detailed trunk, large expressive ears, and a cuddly body with clear shaping instructions. The pattern guides you through each round and assembly so you can follow along with confidence. Perfect for gifting or keeping as a charming handmade companion.

Intermediate 8-10 Hours

Materials Needed for The Elephant Queen Amigurumi Pattern

β€” Main Fabric

  • 01
    I Love This Yarn (any 4ply yarn will do) - main Gray color (as needed)
  • 02
    I Love This Yarn (any 4ply yarn will do) - Light Pink (as needed for inner ears and trunk tip)
  • 03
    4-ply / Worsted weight yarn suggested (no specific gram amounts provided in pattern)

β€” Tools Required

  • 01
    Crochet hook size 3.5mm (E)
  • 02
    15mm safety eyes (2 pieces)
  • 03
    Stitch marker
  • 04
    Scissors
  • 05
    Tapestry needle for sewing
  • 06
    Fiberfill stuffing / poly-fil

Progress Tracker

0% Complete

β€” Trunk :

Info :

Start with Pink: Lightly stuff with poly-fil as you go!!

Round 1 :

MR-6sc (6)

Round 2 :

INC x6 (12) CHANGE COLOR- Gray

Round 3 :

(Hdc, Hdc INC) x6 (18)

Round 4 :

Sc in BLO each st around (18)

Round 5 :

(4sc, Dec) x3 (15)

Round 6 :

Sc each st around (15)

Round 7 :

(3sc, Dec) x3 (12)

Round 8-12 :

Sc each st around (12) 5 rounds

Round 13 :

(3sc, INC) x3 (15)

Round 14 :

Sc each st around

Round 15 :

(4sc, INC) x3 (18)

Round 16-17 :

Sc each st around (18) 2 rounds

Round 18 :

(4sc, INC) x3, Sc next 3st (21)

Round 19 :

Sc each st around (21)

Round 20 :

(5sc, INC) x3, Sc next 3st (24)

Round 21 :

Sc each st around (24)

Round 22 :

(6sc, INC) x3, Sc next 3st (27)

Round 23 :

(7sc, INC) x3, Sc next 3st (30)

Info :

This completes the trunk. DO NOT FASTEN OFF. Continue to head ->

β€” Head :

Round 24 :

6sc, (2sc, INC) x6, 6sc (36)

Round 25 :

6sc, (3sc, INC) x6, 6sc (42)

Round 26 :

6sc, (4sc, INC) x6, 6sc (48)

Round 27 :

6sc, (5sc, INC) x6, 6sc (54)

Round 28-35 :

Sc each st around (54) 8 rounds

Info :

At this time place safety eyes between rounds 25 & 26, before the 2nd INC and after the 5th INC, 18st apart. From this point on stuff with poly-fil accordingly!

Round 36 :

(7sc, Dec) x6 (48)

Round 37 :

Sc each st around (48)

Round 38 :

(6sc, Dec) x6 (42)

Round 39 :

(5sc, Dec) x6 (36)

Round 40 :

(4sc, Dec) x6 (30)

Round 41 :

(3sc, Dec) x6 (24)

Round 42 :

(2sc, Dec) x6 (18)

Info :

Finish stuffing firmly!

Round 43 :

(1sc, Dec) x6 (12)

Round 44 :

Dec x6 (6)

Info :

F/O. Cinch up the opening and weave in end.

β€” Legs :

Info :

Make 2. Gray

Round 1 :

MR-6sc (6)

Round 2 :

INC each st (12)

Round 3 :

(1sc, INC) x6 (18)

Round 4 :

(2sc, INC) x6 (24)

Round 5 :

(3sc, INC) x6 (30)

Round 6 :

(4sc, INC) x6 (36)

Round 7 :

Sc BLO each st around (36)

Round 8-9 :

Sc each st around (36) 2 rounds

Round 10 :

(4sc, Dec) x6 (30)

Round 11 :

Sc each st around (30)

Round 12 :

(3sc, Dec) x6 (24)

Round 13 :

Sc each st around (24)

Round 14 :

(2sc, Dec) x6 (18)

Round 15-24 :

Sc each st around (18) 10 rounds

Info :

Stuff firmly with poly-fil until about round 20! Pinch opening together and Sc stitches together to close. F/O. Leave tail for sewing to body.

β€” Arms :

Info :

Make 2. Gray

Round 1 :

MR- 6sc (6)

Round 2 :

INC each st around (12)

Round 3 :

(1sc, INC) x6 (18)

Round 4 :

(2sc, INC) x6 (24)

Round 5 :

(3sc, INC) x6 (30)

Round 6 :

Sc BLO each st around (30)

Round 7 :

Sc each st around (30)

Round 8 :

(3sc, Dec) x6 (24)

Round 9 :

Sc each st around (24)

Round 10 :

(2sc, Dec) x6 (18)

Round 11 :

Sc each st around (18)

Round 12 :

Dec, Sc next 16st (17)

Round 13-14 :

Sc each st around (17) 2 rounds

Round 15 :

Dec, Sc next 15st (16)

Round 16-17 :

Sc each st around (16) 2 rounds

Round 18 :

Dec, Sc next 14st (15)

Round 19 :

(3sc, Dec) x3 (12)

Round 20-23 :

Sc each st around (12) 4 rounds

Round 24 :

(2sc, Dec) x3 (9)

Round 25-28 :

Sc each st around (9) 4 rounds

Info :

Stuff firmly with poly-fil until about round 24!! Pinch opening together and Sc stitches together to close. F/O. Leave tail for sewing to body.

β€” Body :

Round 1 :

MR- 6sc (6)

Round 2 :

INC each st around (12)

Round 3 :

(1sc, INC) x6 (18)

Round 4 :

(2sc, INC) x6 (24)

Round 5 :

(3sc, INC) x6 (30)

Round 6 :

(4sc, INC) x6 (36)

Round 7 :

(5sc, INC) x6 (42)

Round 8 :

(6sc, INC) x6 (48)

Round 9 :

(7sc, INC) x6 (54)

Round 10 :

(8sc, INC) x6 (60)

Round 11-14 :

Sc each st around (60) 4 rounds

Round 15 :

(8sc, Dec) x6 (54)

Round 16-17 :

Sc each st around (54) 2 rounds

Round 18 :

15sc, (2sc, Dec) x6, 15sc (48)

Round 19-20 :

Sc each st around (48) 2 rounds

Round 21 :

15sc, (1sc, Dec) x6, 15sc (42)

Round 22-23 :

Sc each st around (42) 2 rounds

Round 24 :

15sc, Dec x6, 15sc (36)

Round 25-26 :

Sc each st around (36) 2 rounds

Round 27 :

(4sc, Dec) x6 (30)

Round 28 :

Sc each st around (30)

Round 29 :

(3sc, Dec) x6 (24)

Round 30 :

Sc each st around (24)

Round 31 :

(2sc, Dec) x6 (18)

Round 32-33 :

Sc each st around (18) 2 rounds

Info :

F/O. Leave long tail for sewing the body to the head. Stuff firmly with poly-fil!!

β€” Ears :

Info :

Make 4: 2 pink-inner earpieces, 2 Gray- Outer earpieces

Inner Round 1 :

MR- ch3, 5Dc (6)

Inner Round 2 :

Ch1, Turn, 2 Dc each st around (12)

Inner Round 3 :

Ch1, Turn, (1Dc, Dc INC) x6 (18)

Inner Round 4 :

Ch1, Turn, (2Dc, Dc INC) x6 (24)

Inner Round 5 :

Ch1, Turn, (3Dc, Dc INC) x6 (30)

Inner Round 6 :

Ch1, Turn, (4Dc, Dc INC) x6 (36)

Inner Round 7 :

Ch1, Turn, (5Dc, Dc INC) x6 (42)

Inner Round 8 :

Ch1, Turn, (6Dc, Dc INC) x6 (48)

Inner Round 9 :

Ch1, Turn, (7Dc, Dc INC) x6 (54)

Inner Round 10 :

Ch1, Turn, (7Dc, Dc INC) x6 (54) (pattern shows up to 9 rounds of increases to 54)

Info :

** F/O inner earpieces & cut short tail.

Info :

**Do NOT F/O outer earpieces. Continue using working yarn to sew the inner and outer earpieces together. See "Assembly" section for directions!!

β€” Tail :

Round 1 :

MR-6sc (6)

Round 2 :

INC x6 (12)

Round 3-14 :

Sc each st around (12) 10 rounds

Info :

Do not stuff with poly-fil. Attach to bum between rounds 10 & 11.

β€” Mouth :

Info :

Gray (Optional Piece)

Round 1 :

MR- 6sc (6)

Round 2 :

INC x6 (12)

Round 3-4 :

Sc each st around (12) 2 rounds

Info :

Fold, match up stitches, sc the opening shut and attach under the trunk between rounds 23 & 24.

Assembly Instructions

  • Head/Body: Sew the Head to the Body. Make sure the head is centered over the opening of the body and that the trunk is centered over the belly before sewing.
  • Assembling the Ears: Match 1 inner and 1 outer earpiece. Using the working yarn from the outer earpiece, SC all the way around the two pieces to join them. Fold the top of the ear down to the center then sew the folded edge to hold the shape; left and right ears are folded over at opposite endsβ€”check placement against the head before final sewing.
  • Attach the ears to the side of the head slightly up from the eyes so folds are at the top; ears should be placed between rounds 32 & 33.
  • Legs: Sew the closed end of the legs to the sides of the body between rounds 10-16, spacing them evenly and securing with a whipstitch.
  • Arms: Sew the closed end of the arms to the seam between the head and the body directly above the legs so the placement looks natural and balanced.
  • Tail: Sew the tail to the bum between rounds 10 & 11; do not stuff the tail before attaching.

Important Notes

  • πŸ’‘Do NOT join rounds unless stated; work in continuous spiral throughout unless the pattern explicitly says otherwise.
  • πŸ’‘Use a stitch marker to mark the beginning of each round to avoid losing your place during the continuous spiral.
  • πŸ’‘All stitches are worked in both loops unless stated otherwise; check for BLO instructions where texture or shaping is specified.
  • πŸ’‘Place safety eyes between rounds 25 and 26, before the 2nd INC and after the 5th INC, 18 stitches apart to match the pattern guidance.
  • πŸ’‘Stuff firmly but gradually while shaping, and finish stuffing before closing decreases so the toy keeps its intended shape.

Youve just completed The Elephant Queen β€” a handmade friend full of personality and charm. This amigurumi makes a perfect gift or nursery companion that lasts for years. Enjoy the smiles and cozy cuddles this adorable elephant will bring! 🐘🧢✨

You ask,

we answer.

FAQs

What size will the finished piece be?

The finished amigurumi size depends on yarn and hook, but using the recommended 4-ply yarn and 3.5mm hook will produce a medium-sized elephant about the size shown in photos (approximate height varies).

Can I use different yarn weights for this pattern?

Yes, you can use different yarn weights, but this will affect the final size; use an appropriate hook for the chosen yarn and remember to adjust stuffing and safety eye size accordingly.

Do I need prior crochet experience for this pattern?

This pattern is rated intermediate, so basic knowledge of single crochet, increases, decreases, working in BLO and double crochet is recommended for best results.

How long does this project typically take to complete?

Most crocheters complete this project in 8-10 hours, though time may vary based on experience level, customization, and assembly time.

Where should I place the safety eyes?

Place safety eyes between rounds 25 and 26 of the head, positioned before the 2nd INC and after the 5th INC, with 18 stitches between them as instructed.