🧢 Beautiful ✨ Detailed πŸ’ Adorable

Pika the Electric Mouse Amigurumi Pattern

Pika the Electric Mouse Amigurumi Pattern
4.1β˜… Rating
5-7 Hours Time Needed
2.2K Made This
βœ‚οΈ

Intermediate Level

Ideal for those with basic crochet experience, featuring slightly more advanced stitches and techniques to expand your skills.

⏱️

Weekend Treat

Takes 5-7 hours, making it an enjoyable project to finish over a couple of days.

🧸

Cute Companion

An adorable friend to cherish, handcrafted with love to bring comfort and joy for years to come.

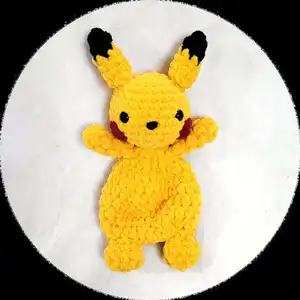
About This Pika the Electric Mouse Amigurumi Pattern

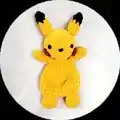
This pattern guides you through crocheting a plush Pika the Electric Mouse using bulky Bernat Blanket yarn for a soft, cuddly finish. It includes clear instructions for shaping the head, body, arms, legs, ears, cheeks, nose and tail. Photo references and placement notes help with accurate assembly for a polished result.

Pika the Electric Mouse Amigurumi Pattern crochet pattern - detailed view of completed project

Techniques used include magic ring starts, invisible colour change and half double crochet shaping for a textured look. The finished toy is soft, squishy and perfect as a unique handmade gift or cherished keepsake.

Why You'll Love This Pika the Electric Mouse Amigurumi Pattern

I absolutely love this pattern because it turns simple stitches into a charming, huggable character with minimal fuss. The use of bulky Bernat Blanket yarn creates an irresistibly plush texture that feels great to hold. I enjoy how the invisible colour change technique gives clean, professional-looking ears without bulky joins. Sewing the parts together is satisfying and quick, and the finished Pika always makes people smile when I gift one.

Pika the Electric Mouse Amigurumi Pattern step 1 - construction progress Pika the Electric Mouse Amigurumi Pattern step 2 - assembly progress Pika the Electric Mouse Amigurumi Pattern step 3 - details and accessories Pika the Electric Mouse Amigurumi Pattern step 4 - final assembly and finishing

Switch Things Up

I love how easily this pattern adapts to different colours and personalities; try pastel shades for a softer, nursery-friendly Pika or bold neons for a playful twist.

I often change yarn weight and hook size to alter the finished size; use a larger hook and bulky yarn for a chunky cuddle buddy or thinner yarn for a mini keychain version.

I sometimes embroider different facial expressions by moving the eyes slightly closer or farther apart to change the character's look.

For a seasonal touch, make tiny crocheted accessories like a scarf or little hat to dress up your Pika for holidays.

I enjoy adding wire to the limbs for posabilityβ€”just insert thin craft wire into the arms before stuffing to pose the toy.

Try mixing yarn textures: use a fuzzy or boucle yarn for body and a smooth yarn for details to create contrast and interest.

I recommend experimenting with safety eye sizes; smaller eyes give a cuter, more delicate face while larger eyes add character and presence.

Want to make a sibling set? Change just the cheek colour or tail length to create a family of Pik a with unique personalities.

I like to embroider tiny freckles or a smile with contrasting thread to add charm and make each piece unique.

Use felt or fabric for cheeks instead of crochet for a neater flat finish, or add sewn-on buttons for playful embellishments.

If you want a weighted toy, add a small bag of poly pellets at the base before stuffing to help the Pika sit upright.

Common Mistakes & How to Fix Them

βœ— Placing safety eyes too high or low can make the face look off-balance; place the safety eyes between rounds 7 and 8, five stitches apart, and check placement before securing. βœ— Skipping stitch markers when working the legs and body can cause misaligned leg placement; mark five stitches for each leg and keep a four stitch gap between legs to ensure correct positioning. βœ— Overstuffing the head and body will distort the shape and make sewing the final stitches difficult; stuff gradually to the desired firmness and avoid packing too tightly. βœ— Failing to perform the invisible colour change correctly will leave a noticeable seam; insert the hook and pull up a loop in the old colour then pull through both loops with the new colour to hide the join. βœ— Not counting stitches after increases or decreases can quickly lead to incorrect stitch counts; count your stitches at the end of each round especially after shaping rounds to keep the pattern accurate.

Pika the Electric Mouse Amigurumi Pattern

Make your own cuddly Pika the Electric Mouse with this friendly amigurumi pattern. You'll work with plush bulky Bernat Blanket yarn to create a soft, huggable toy with clear step-by-step instructions. The pattern includes head, body, limbs, ears, cheeks, nose and tail, plus assembly guidance and helpful photos. Perfect for gifting or keeping as a playful handmade companion.

Intermediate 5-7 Hours

Materials Needed for Pika the Electric Mouse Amigurumi Pattern

β€” Main Fabric

  • 01
    Bulky Weight 6 Bernat Blanket Brights - Yellow
  • 02
    Bernat Blanket - Black
  • 03
    Bernat Blanket - Cranberry

β€” Tools Required

  • 01
    Crochet hook size L/8mm
  • 02
    14mm Safety Eyes (2 pieces)
  • 03
    Stuffing (polyester fiberfill)
  • 04
    Tapestry needle
  • 05
    Stitch markers
  • 06
    Scissors

Progress Tracker

0% Complete

β€” Materials :

Infos :

Yarn Used: Bulky Weight 6 Bernat Blanket Brights - Yellow. Black Bernat Blanket. Cranberry Bernat Blanket. You can use a different weight of yarn for this project, and adjust for the appropriate hook size. Be aware that this will affect the finished size.

Infos :

Additional Supplies: Stuffing. 14mm Safety Eyes. Hook L 8mm. Tapestry Needle. Stitch Markers. Scissors.

β€” Special Stitches :

Info :

Invisible Colour Change Sc: Performed on the stitch before the colour change: Begin Sc (insert hook into stitch and pull up a loop). There are 2 loops on the hook. Using new colour, pull through both loops to complete the stitch. Tie off both yarn tails to secure stitch.

β€” Head :

Round 1 :

8 Sc into Magic Ring (8)

Round 2 :

Inc x 8 (16)

Round 3 :

(Sc 1, Inc) x 8 (24)

Round 4-6 :

Sc around (24) (3 Rounds x 24 Sc = 72 Sc)

Round 7 :

(Sc 3, Inc) x 6 (30)

Round 8-9 :

Sc around (30) (2 Rounds x 30 Sc = 60 Sc)

Round 10 :

(Sc 3, Dec) x 6 (24)

Round 11 :

(Sc 2, Dec) x 6 (18)

Round 12 :

(Sc 1, Dec) x 6 (12)

Info :

Place safety eyes between rounds 7 & 8, 5 stitches apart. (PHOTO A) If embroidering eyes, loop yarn through repeatedly until you have a full, round eye. Tie ends off and leave the tails inside the head.

Info :

Nose can be added at this time, or at the end. Refer to Page 6 for instructions. Stuff the head until the desired firmness is achieved.

Round 13 :

Dec x 6 (6)

Info :

Tie off, leaving a 6" tail. Using a tapestry needle, finish off the head by picking up the front loops of the final 6 stitches. Pull tight to close and then hide the yarn tail through the piece and trim the excess. (PHOTO B)

β€” Arms :

Info :

(Make 2) In Yellow

Round 1 :

5 Hdc into Magic Ring (5)

Round 2-4 :

Hdc around (5) (3 Rounds x 5 Hdc = 15 Hdc)

Round 5 :

Hdc 3, Hdc Dec (4)

Info :

Fasten off and leave a long tail for sewing onto the body. (PHOTO C) Set aside for sewing later.

β€” Ears :

Info :

(Make 2) In Black

Round 1 :

5 Sc into Magic Ring (5)

Round 2 :

Sc 4, Inc (6)

Info :

Invisible colour change to Yellow:

Round 3 :

Sl st, Sc 5 (6) (The sl st reduces the appearance of the colour change).

Round 4 :

(Sc 2, Inc) x 2 (8)

Round 5 :

Sc around (8)

Round 6 :

Dec x 4 (4)

Info :

Fasten off and leave a long tail for sewing onto the head. (PHOTO D)

β€” Body :

Info :

In Yellow: Begin by holding the head upside down and face pointing away from you. Note: You will be placing 6 sc into the bottom of the head (using Round 13 as a guide for stitch placement). You will start the row at the back of the head. (PHOTO E)

Round 1 :

6 sc into head (6)

Round 2 :

Hdc Inc x 6 (12)

Round 3 :

(Hdc 1, Hdc Inc) x 6 (18)

Round 4 :

(Hdc 2, Hdc Inc) x 6 (24)

Round 5 :

Hdc around (24)

Round 6 :

(Hdc 3, Hdc Inc) x 6 (30)

Round 7-8 :

Hdc around (30) (2 Rounds x 30 Hdc = 30 Hdc)

Round 9 :

(Hdc 3, Hdc Dec) x 6 (24)

Round 10 :

(Hdc 2, Hdc Dec) x 6 (18)

Info :

Add extra Hdc to get to the centre of the back. Do not fasten off yet, you will go directly to the leg instructions.

β€” Legs :

Info :

Lay the body flat to figure out how to place the legs (There will be 5 stitches designated for each leg, that will leave 8 stitches unworked). Recall that on the previous page that you added extra Hdc to get to the centre of the back. Using stitch markers, mark 5 stitches for each leg, with a 4 stitch gap in between on each side. (PHOTO F). Add extra Hdc to get to the first st marker, if needed.

Item Name (First Leg) :

First Leg

Round 1 :

Sc Inc x 5 (10) (PHOTO G)

Round 2 :

(Sc 4, Inc) x 2 (12)

Round 3 :

(Sc 2, Dec) x 3 (9)

Round 4 :

(Sc 1, Dec) x 3 (6)

Info :

Fasten off and weave in tail. (PHOTO H)

Item Name (Second Leg) :

Second Leg

Info :

Add Yellow yarn to Round 10 of body, leaving a 10" yarn tail. The second leg will be worked the same way as the first leg. (PHOTO I) Use the 10" yarn tail to sew closed the gap between the legs. (PHOTO J)

β€” Assembly :

Info :

Sew the arms onto Round 2 of the body, 4 stitches apart, at the front. (PHOTO K)

Info :

Sew the ears onto either side of the head, between Rounds 3 & 4. (PHOTO L)

β€” Nose :

Info :

In Black: Sew a strand of black yarn around the centre stitch of Rounds 8 & 9, between the eyes. Secure the ends inside the head. (PHOTO M)

β€” Cheeks :

Info :

(Make 2) In Cranberry: 5 Sc into Magic Ring (5) Sl st.

Info :

Fasten off and sew between Rounds 9 & 11, slightly behind the eyes. (PHOTO N)

β€” Tail :

Info :

* Leave a long tail at the beginning to sew onto body. In Yellow:

Round 1 :

Ch 6

Round 2 :

Starting 2nd Ch from the hook: Sc 5 (5) Ch 1 & turn

Round 3 :

Sc 5 (5) Ch 1 & turn

Round 4 :

Sc 2 (2) Ch 1 & turn

Round 5 :

Sc 2, Ch 4 (6) turn

Round 6 :

Starting 2nd Ch from the hook: Sc 5 (5) Ch 1 & turn

Round 7 :

Sc 5 (5) Ch 1 & turn

Round 8 :

Sc 5

Info :

Fasten off and sew between Rounds 7 & 8, at a slight angle. (PHOTO O & P)

Assembly Instructions

  • Sew the arms onto Round 2 of the body, 4 stitches apart, at the front. (PHOTO K)
  • Sew the ears onto either side of the head, between Rounds 3 & 4. (PHOTO L)
  • Use a strand of black yarn to sew the nose around the centre stitch of Rounds 8 & 9 between the eyes, and secure ends inside the head. (PHOTO M)
  • Sew the cheeks (cranberry pieces) between Rounds 9 & 11, slightly behind the eyes. (PHOTO N)
  • Use the 10" yarn tail from the second leg to sew closed the gap between the legs for a neat finish. (PHOTO J)
  • Leave long tails on arms and ears when fastening off; use these tails to sew parts securely to the body and head, hiding ends inside the pieces.

Important Notes

  • πŸ’‘Use stitch markers to mark leg placement and the start of rounds, especially when joining the head to the body for accurate positioning.
  • πŸ’‘Stuff the head and body gradually to the desired firmness; under-stuffing gives a floppy toy while overstuffing makes sewing the final stitches difficult.
  • πŸ’‘When changing colours use the invisible colour change method to reduce the appearance of the seam between black and yellow on the ears.
  • πŸ’‘Do not fasten off the body after shaping; continue directly to the leg instructions to maintain correct stitch placement and flow.

This adorable Pika the Electric Mouse pattern brings a squishy, handmade friend to life with plush Bernat Blanket yarn and simple shaping. Whether you keep it for yourself or gift it to someone special, it makes a heartwarming, tactile companion. Follow the photo cues and step-by-step instructions for a polished finish. 🧢😊✨

You ask,

we answer.

FAQs

What size will the finished piece be?

The finished amigurumi measures approximately 12-15 cm tall when using Bernat Blanket bulky yarn and an L/8mm hook; size may vary with different yarn weights.

Can I use different yarn weights for this pattern?

Yes, you can use different yarn weights, but this will change the final size and texture; adjust your hook size accordingly and expect a different finished measurement.

Do I need prior crochet experience for this pattern?

This pattern is rated intermediate, so basic knowledge of crochet stitches, working in the round, increases and decreases is recommended for best results.

How long does this project typically take to complete?

Most crocheters complete this project in 5-7 hours, depending on experience level, yarn familiarity and how much time is spent on assembly and finishing.

Where should I place the safety eyes?

Place safety eyes between rounds 7 and 8 of the head, spaced five stitches apart, and check placement against the photos before securing.