🧶 Beautiful ✨ Detailed 💝 Adorable

Wallace and Wanda Whales Amigurumi Pattern

Wallace and Wanda Whales Amigurumi Pattern
4.3★ Rating
5-7 Hours Time Needed
3.7K Made This
✂️

Intermediate Level

Ideal for those with basic crochet experience, featuring slightly more advanced stitches and techniques to expand your skills.

⏱️

Weekend Treat

Takes 5-7 hours, making it an enjoyable project to finish over a couple of days.

🧸

Cute Companion

An adorable friend to cherish, handcrafted with love to bring comfort and joy for years to come.

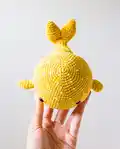
About This Wallace and Wanda Whales Amigurumi Pattern

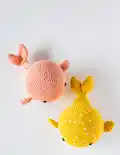
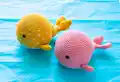
This pattern creates two lovable whale amigurumi — Wallace with color dots and Wanda plain — worked from top to bottom with separate fins and tail pieces. The pattern includes fair isle instructions for the dotted version and clear joining directions for the tail. You will shape a round body, attach side fins and a two-piece tail, and finish with safety eyes and stuffing.

Wallace and Wanda Whales Amigurumi Pattern crochet pattern - detailed view of completed project

Worked in continuous rounds using DK cotton yarn and a 2.75 mm hook, the pattern uses basic amigurumi techniques with a few intermediate details. Full abbreviations, stitch counts and assembly steps are included for accurate shaping and neat finishing.

Why You'll Love This Wallace and Wanda Whales Amigurumi Pattern

I absolutely love this pattern because the whales are simple yet full of personality — their round bodies and little fins make them instantly charming. I enjoy the fair isle dot option for Wallace because it adds playful texture and a chance to practice carrying yarn colorfully. The pattern is satisfying to work from start to finish: increases shape the round body nicely and the joining instructions for the tail give a clean, professional result. I also love how quick they are to whip up as thoughtful handmade gifts.

Wallace and Wanda Whales Amigurumi Pattern step 1 - construction progress Wallace and Wanda Whales Amigurumi Pattern step 2 - assembly progress Wallace and Wanda Whales Amigurumi Pattern step 3 - details and accessories Wallace and Wanda Whales Amigurumi Pattern step 4 - final assembly and finishing

Switch Things Up

I love how customizable these whales are — you can change colors to match any nursery or gift theme and the fair isle dot pattern makes Wallace especially playful.

Want a smaller version? Use a lighter weight yarn and a smaller hook to create tiny keychain-sized whales perfect for gifts.

For a larger huggable whale, choose a bulkier yarn and larger hook and increase stuffing for a chunky, cuddly finish.

I often swap the safety eyes for embroidered eyes on toys for babies to make them completely soft and safe.

Try using variegated yarn for an ombre or speckled effect instead of the dot pattern for an interesting all-over texture.

I sometimes add a little embroidered smile or blush using a contrasting yarn to give each whale more personality.

Want different tails? Experiment with flared, heart-shaped, or longer tails by adjusting the joining rounds and increases.

I recommend adding a small hanging loop on the top back if you want to turn these into ornaments or a mobile for a nursery.

Mix and match eye sizes — 6mm or 8mm safety eyes create different looks; smaller eyes make a cuter, more minimalist face.

For a sewn-on felt belly or applique, use matching thread and neat blanket stitches to secure felt shapes for added detail and durability.

Common Mistakes & How to Fix Them

✗ Skipping the stitch marker when working in continuous rounds leads to losing your round start; place a marker at the first stitch of every round and move it up as you go to stay oriented. ✗ Not stuffing as you go results in lumps and poor shaping; stuff gradually and firmly, adjusting stuffing before closing each section for smooth curves. ✗ Cutting and rejoining yarn for each color change in the fair isle pattern can create lots of ends; instead carry the unused color on the wrong side and crochet over it at intervals to secure. ✗ Pulling yarn too tight when working BLO rounds can change the size of the round; maintain even, moderate tension and check stitch counts frequently to keep shaping accurate.

Wallace and Wanda Whales Amigurumi Pattern

Make two charming whale friends — Wallace (with color dots) and Wanda — using DK cotton yarn and simple amigurumi techniques. This pattern gives you full, step-by-step rounds for the body, tail and fins plus fair isle dot instructions so you can customize Wallace. Perfect as a gift or a cute nursery companion, you'll enjoy shaping the round body and finishing details to bring these whales to life.

Intermediate 5-7 Hours

Materials Needed for Wallace and Wanda Whales Amigurumi Pattern

— Main Fabric

  • 01
    Rico creative Ricorumi DK cotton - Color A: Tangerine (2 x 0.9 oz balls)
  • 02
    Rico creative Ricorumi DK cotton - Color B: White (1 x 0.9 oz ball)
  • 03
    Pattern can be made with any DK or worsted weight yarn (note: gauge and finished size will vary)

— Tools Required

  • 01
    Crochet hook 2.75 mm (US size C)
  • 02
    Fiberfill for stuffing
  • 03
    Safety eyes 8 mm (2 pieces)
  • 04
    Tapestry needle
  • 05
    Stitch marker
  • 06
    Scissors
  • 07
    Pins for assembly (optional)

Progress Tracker

0% Complete

— Stats :

Info :

The whale is approximately 6.5 inches long (15.24 cm)

— Materials :

Info :

YARN: Rico creative Ricorumi DK cotton: A - Tangerine (2 x 0.9 oz ball) B - White (1 x 0.9 oz ball). HOOK: 2.75 mm (US size C). OTHER: Fiberfill for stuffing. Safety eyes (8 mm). Tapestry needle. Stitch marker.

— Terminology :

Infos :

This pattern uses US terminology. MR - magic ring. st(s) - stitch(es). ch(s) - chain(s). sc - single crochet. inc - increase. dec - decrease. sl st - slip stitch. F/O - fasten off. BLO - back loop only. [ ] - total # of sts per round. hdc - half double crochet. ( ) - repeat steps in brackets.

— Notes :

Info :

1. The basic pattern for both of the whales is the same. If you want to make the whale with color dots (Wallace), follow the fair isle pattern instructions listed below, along with the basic pattern beginning from round 1 to round 25 of the head and body. 2. Work in continuous rounds without joining the round with a slip stitch. Do not turn at the end of each round unless directed to. 3. Use a stitch marker to keep track of the beginning of each round. 4. The whale's body is constructed from top to bottom. The fins and tail are made separately and attached to the body during assembly. 5. I recommend using an invisible decrease to avoid getting a gap in the stitches. 6. Firmly stuff as you work and overstuff slightly before finishing the section you are working on. This will allow for the stuffing to fill out the shape once crocheting is done. 7. For the whale with colored dots (Wallace) carry the yarn on the wrong side technique is used for changing colors, instead of cutting and rejoining a new strand each time. To carry a strand on the wrong side, work over the unused strand every few stitches with the second color.

— Fair Isle Color Dot Pattern :

Round 1 :

sc in color A around

Round 2 :

sc in color A around

Round 3 :

(5 sc in color A, 1 sc in color B) around

Round 4 :

sc in color A around

Round 5 :

sc in color A around

Round 6 :

2 sc in color A, (1sc in color B, 5 sc in color A) around until last four stitches. End with 1sc in color B, 3 sc in color A.

Info :

Repeat Rounds 1-6 for the color dot pattern.

— Body :

Info :

Using the color A (Tangerine) yarn, begin with an MR

Round 1 :

6 sc in MR [6]

Round 2 :

(inc in each st) x 6 [12]

Round 3 :

(sc, inc) x 6 [18]

Round 4 :

(2 sc, inc ) x 6 [24]

Round 5 :

(3 sc, inc) x 6 [30]

Round 6 :

(4 sc, inc ) x 6 [36]

Round 7 :

(5 sc, inc ) x 6 [42]

Round 8 :

(6 sc, inc ) x 6 [48]

Round 9 :

(7 sc, inc ) x 6 [54]

Round 10 :

(8 sc, inc) x 6 [60]

Round 11 :

sc in each st around [60]

Round 12 :

(9 sc, inc) x 6 [66]

Round 13 :

(10 sc, inc) x 6 [72]

Round 14-24 :

sc in each st around [72]

Round 25 :

(10 sc, dec) x 6 [66]

Info :

Insert the safety eyes between rounds 17 and 18, approx 13 sts apart. Stuff and shape the body as you work.

Info :

F/O color A (Tangerine) yarn, join and continue in color B (White) yarn.

Round 26 :

sc in each st through BLO around [66]

Round 27 :

(9 sc, dec) x 6 [60]

Round 28 :

(8 sc, dec) x 6 [54]

Round 29 :

(7 sc, dec) x 6 [48]

Round 30 :

(6 sc, dec) x 6 [42]

Round 31 :

(5 sc, dec) x 6 [36]

Round 32 :

(4 sc, dec) x 6 [30]

Round 33 :

(3 sc, dec) x 6 [24]

Round 34 :

(2 sc, dec) x 6 [18]

Round 35 :

(1 sc, dec) x 6 [12]

Round 36 :

(dec) x 6 [6]

Info :

Fill the body with fiberfill firmly. F/O and thread tail end of yarn onto a tapestry needle, insert the needle in and out of the remaining sts, pull tight to close, and weave in end.

— Tail :

Info :

Start by making two fins (these will be joined together later in the pattern to complete the tail). Using the color A (Tangerine) yarn, begin with an MR

Round 1 :

6 sc in MR [6]

Round 2 :

(sc, inc) x 3 [9]

Round 3 :

sc in each st around [9]

Round 4 :

(2 sc, inc) x 3 [12]

Round 5 :

(3 sc, inc) x 3 [15]

Round 6 :

(4 sc, inc) x 3 [18]

Round 7 :

sc in each st around [18]

Round 8 :

(4 sc, dec) x 3 [15]

Round 9 :

(3 sc, dec) x 3 [12]

Round 10 :

(1 sc, dec) x 4 [8]

Info :

For the first fin, you make, F/O and cut the yarn. For the second fin, stop after round 10 and follow the joining instructions given on the next page below.

— Tail Joining :

Round 11 :

Joining round. Insert your hook into the st next to the closing st of the first fin and draw up a loop and yarn through as you would for any sc stitch. Mark this as the first sc of this round and continue crocheting around through both fins. You should have 16 sts by the end of this round.

Round 12 :

(2 sc, dec) around [12]

Round 13 :

sc in each st around [12]

Round 14 :

(inc) x 2; sc in next 9 sts; inc around [15]

Round 15 :

(1 sc, inc) x 2; sc in next 10 sts; inc around [18]

Round 16 :

(2 sc, inc) around [24]

Round 17 :

sc in each st around [24]

Round 18 :

(inc) x 6 times; sc in next 18 sts around [30]

Round 19 :

(inc, 2 sc) x 4; sc in next 4 sts; hdc in next 10 sts; sc in next 4 sts around [34]

Round 20 :

sc in next 20 sts; hdc in next 10 sts; sc in next 4 sts around [34]

Info :

Sl st into the next stitch and F/O leaving a long tail for sewing.

— Side Fins (Make 2) :

Info :

Using the color A (Tangerine) yarn

Round 1 :

6 sc in MR [6]

Round 2 :

(1 sc; inc) x 3 [9]

Round 3 :

(2 sc, inc) x 3 [12]

Round 4 :

(3 sc, inc) x 3 [15]

Round 5 :

sc in each st around [15]

Round 6 :

(3 sc, dec) x 3 [12]

Round 7 :

(1 sc, dec) x 4 [8]

Round 8 :

sc in each st around [8]

Info :

Sl st into the next stitch and F/O leaving a long tail for sewing. Do not stuff the fins.

— Assembly :

Info :

1. Position the fins evenly on each side of the body. I have placed them on rounds 24 and 25 beginning from the top. Before sewing the fins on, ensure that they are symmetrically placed and are parallel to the eyes. 2. The side with hdc is the bottom side of the tail. Use fiberfill to stuff the front of the tail (not the fins). Using the side fins as a guide pin the tail centrally to the back of the body. Sew the tail neatly and carefully.

Assembly Instructions

  • Position the side fins evenly on each side of the body; I placed them on rounds 24 and 25 beginning from the top — check symmetry and that fins sit parallel to the eyes before sewing.
  • For the tail, use the side fins as a guide and pin the joined tail centrally to the back of the body; the side with hdc is the bottom side of the tail.
  • Stuff the front of the tail lightly (do not stuff the fins) and use a tapestry needle and long tail to sew the tail securely with neat whipstitches.
  • Attach side fins using the long tail left from F/O; place them so they are parallel to the eyes and sew through all tail loops to secure firmly.
  • Weave in all ends and hide tails inside the body; adjust stuffing from the opening before fully closing to maintain a smooth round shape.

Important Notes

  • 💡Use stitch markers to keep track of the beginning of each round, especially since the pattern is worked in continuous rounds.
  • 💡Work in continuous rounds without joining with a slip stitch unless directed to, and do not turn at the end of rounds.
  • 💡Firmly stuff as you work and slightly overstuff before finishing sections to ensure the stuffing fills out the shape when completed.
  • 💡For the dotted whale, carry the unused color on the wrong side and work over it every few stitches to avoid many ends.
  • 💡Use an invisible decrease for closing rounds to avoid gaps in the stitches and produce a cleaner finish.

These two whales were designed to be sweet, quick-to-stitch companions that make perfect handmade gifts. Whether you choose the dotted Wallace or the plain Wanda, both are full of character and simple finishing details. Enjoy stitching, stuffing, and personalizing them — they bring so much joy to make and give. 🐳🧶

You ask,

we answer.

FAQs

What size will the finished piece be?

The finished whale measures approximately 6.5 inches long (15.24 cm) when using the recommended DK yarn and 2.75 mm hook.

Can I use different yarn weights for this pattern?

Yes, you can use other yarn weights but the finished size will change; adjust your hook accordingly and expect differences in stitch counts and appearance.

Do I need prior crochet experience for this pattern?

This pattern is rated intermediate; familiarity with single crochet, increases, decreases, working in the round and carrying yarn for fair isle is recommended.

How long does this project typically take to complete?

Most crocheters complete one whale in about 5-7 hours, depending on experience, customization and finishing time.