🧢 Beautiful ✨ Detailed πŸ’ Adorable

Pika the Electric Mouse Amigurumi Pattern

Pika the Electric Mouse Amigurumi Pattern
4.4β˜… Rating
6-8 Hours Time Needed
2.3K Made This
βœ‚οΈ

Intermediate Level

Ideal for those with basic knitting experience, featuring slightly more advanced stitches and techniques to expand your skills.

⏱️

Weekend Treat

Takes 5-7 hours, making it an enjoyable project to finish over a couple of days.

🧸

Cute Companion

An adorable friend to cherish, handcrafted with love to bring comfort and joy for years to come.

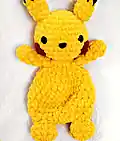
About This Pika the Electric Mouse Amigurumi Pattern

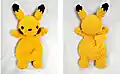
This delightful Pika pattern brings the beloved electric mouse to life in soft, cuddly form. Using bulky weight yarn in vibrant yellow with black and cranberry accents, you'll create a charming character that's instantly recognizable and irresistibly huggable. The pattern features clever construction techniques including invisible color changes and strategic placement of safety eyes to achieve that perfect animated expression. Each component is carefully designed to capture the character's distinctive features while maintaining excellent structural integrity.

Pika the Electric Mouse Amigurumi Pattern crochet pattern - detailed view of completed project

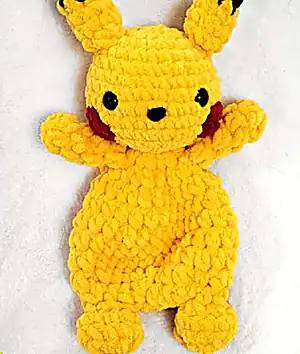
The finished amigurumi stands approximately 6-7 inches tall, making it the perfect size for display or play. With its sturdy construction and secure assembly, this electric mouse is built to withstand plenty of love and cuddles.

Why You'll Love This Pika the Electric Mouse Amigurumi Pattern

I absolutely love how this pattern combines simplicity with character! The way the black ear tips create that iconic silhouette never fails to make me smile, and watching the personality emerge as you add each detail is pure magic. The invisible color change technique keeps everything looking clean and professional, while the chunky yarn makes the stitching process so satisfying and quick to work up.

Pika the Electric Mouse Amigurumi Pattern step 1 - construction progress Pika the Electric Mouse Amigurumi Pattern step 2 - assembly progress Pika the Electric Mouse Amigurumi Pattern step 3 - details and accessories Pika the Electric Mouse Amigurumi Pattern step 4 - final assembly and finishing

Switch Things Up

I love experimenting with different color combinations for this pattern! While the classic yellow is iconic, I've had so much fun creating variations in different shades. Try making a shiny version using metallic gold yarn, or go wild with rainbow colors for a completely unique take.

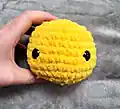
For the cheeks, I sometimes substitute different colors like pink or orange to give each Pika its own personality. You could even add small accessories like a tiny scarf or bow to make your creation extra special.

I've also found that using different eye sizes can dramatically change the expression - smaller eyes create a more subtle look while larger ones give that classic animated appearance. Don't be afraid to play with the ear positioning too; slightly different angles can give your Pika a completely different character!

Common Mistakes & How to Fix Them
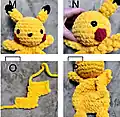
βœ— Forgetting to stuff the head firmly enough before closing, resulting in a floppy appearance βœ— Placing safety eyes too close together or at wrong angles, affecting facial expression βœ— Not using invisible color changes properly, creating visible lines between color sections βœ— Sewing ears at incorrect angle or position, disrupting the character's recognizable silhouette

Pika the Electric Mouse Amigurumi Pattern

Create your very own adorable electric mouse companion with this charming amigurumi pattern! This delightful yellow character features distinctive black-tipped ears, rosy cheeks, and a lightning bolt tail that captures the essence of everyone's favorite pocket monster. Perfect for Pokemon fans of all ages, this cuddly creation makes an excellent gift or addition to any collection. The pattern includes detailed step-by-step instructions with helpful photos to guide you through each stage of construction.

Intermediate 6-8 Hours

Materials Needed for Pika the Electric Mouse Amigurumi Pattern

β€” Main Fabric

  • 01
    Bulky Weight 6 Bernat Blanket Brights in Yellow
  • 02
    Bernat Blanket in Black
  • 03
    Bernat Blanket in Cranberry

β€” Tools Required

  • 01
    Hook L 8mm
  • 02
    14mm Safety Eyes
  • 03
    Stuffing
  • 04
    Tapestry Needle
  • 05
    Stitch Markers
  • 06
    Scissors

Progress Tracker

0% Complete

β€” Head :

Round 1 :

8 Sc into Magic Ring (8)

Round 2 :

Inc x 8 (16)

Round 3 :

(Sc 1, Inc) x 8 (24)

Round 4-6 :

Sc around (24) (3 Rounds x 24 Sc = 72 Sc)

Round 7 :

(Sc 3, Inc) x 6 (30)

Round 8-9 :

Sc around (30) (2 Rounds x 30 Sc = 60 Sc)

Round 10 :

(Sc 3, Dec) x 6 (24)

Round 11 :

(Sc 2, Dec) x 6 (18)

Round 12 :

(Sc 1, Dec) x 6 (12)

Info :

Place safety eyes between rounds 7 & 8, 5 stitches apart. Stuff the head until desired firmness is achieved.

Round 13 :

Dec x 6 (6)

β€” Arms (Make 2) :

Round 1 :

5 Hdc into Magic Ring (5)

Round 2-4 :

Hdc around (5) (3 Rounds x 5 Hdc = 15 Hdc)

Round 5 :

Hdc 3, Hdc Dec (4)

β€” Body :

Round 1 :

6 sc into head (6)

Round 2 :

Hdc Inc x 6 (12)

Round 3 :

(Hdc 1, Hdc Inc) x 6 (18)

Round 4 :

(Hdc 2, Hdc Inc) x 6 (24)

Round 5 :

Hdc around (24)

Round 6 :

(Hdc 3, Hdc Inc) x 6 (30)

Round 7-8 :

Hdc around (30) (2 Rounds x 30 Hdc = 30 Hdc)

Round 9 :

(Hdc 3, Hdc Dec) x 6 (24)

Round 10 :

(Hdc 2, Hdc Dec) x 6 (18)

β€” Ears (Make 2) :

Round 1 :

5 Sc into Magic Ring (5)

Round 2 :

Sc 4, Inc (6)

Round 3 :

Invisible colour change to Yellow: Sl st, Sc 5 (6)

Round 4 :

(Sc 2, Inc) x 2 (8)

Round 5 :

Sc around (8)

Round 6 :

Dec x 4 (4)

β€” Legs :

First Leg Round 1 :

Sc Inc x 5 (10)

Round 2 :

(Sc 4, Inc) x 2 (12)

Round 3 :

(Sc 2, Dec) x 3 (9)

Round 4 :

(Sc 1, Dec) x 3 (6)

Info :

Second leg worked same way as first leg

β€” Nose :

Info :

Sew a strand of black yarn around the centre stitch of Rounds 8 & 9, between the eyes

β€” Cheeks (Make 2) :

Round 1 :

5 Sc into Magic Ring (5) Sl st

Info :

Sew between Rounds 9 & 11, slightly behind the eyes

β€” Tail :

Round 1 :

Ch 6

Round 2 :

Starting 2nd Ch from hook: Sc 5 (5) Ch 1 & turn

Round 3 :

Sc 5 (5) Ch 1 & turn

Round 4 :

Sc 2 (2) Ch 1 & turn

Round 5 :

Sc 2, Ch 4 (6) turn

Round 6 :

Starting 2nd Ch from hook: Sc 5 (5) Ch 1 & turn

Round 7 :

Sc 5 (5) Ch 1 & turn

Round 8 :

Sc 5

Info :

Sew between Rounds 7 & 8, at a slight angle

Assembly Instructions

  • Sew the arms onto Round 2 of the body, 4 stitches apart, at the front
  • Sew the ears onto either side of the head, between Rounds 3 & 4
  • Sew a strand of black yarn around the centre stitch of Rounds 8 & 9 for the nose
  • Attach cranberry cheeks between Rounds 9 & 11, slightly behind the eyes
  • Sew the lightning bolt tail between Rounds 7 & 8 of the body at a slight angle
  • Use the 10 inch yarn tail to sew closed the gap between the legs

Important Notes

  • πŸ’‘Use invisible color change technique for clean transitions between black and yellow on ears
  • πŸ’‘Place safety eyes between rounds 7 & 8, exactly 5 stitches apart for proper expression
  • πŸ’‘Stuff head firmly but not overly tight to maintain proper shape and proportions
  • πŸ’‘Mark leg placement with stitch markers before beginning to ensure even spacing
  • πŸ’‘Leave long tails when fastening off pieces to make assembly easier and more secure

This adorable Pika pattern captures the essence of everyone's favorite electric mouse in the most huggable way possible! The combination of bulky yarn and thoughtful construction creates a sturdy yet soft companion that's perfect for Pokemon fans of all ages. With its distinctive black ear tips, rosy cheeks, and iconic lightning bolt tail, this little guy is sure to spark joy wherever he goes. The clear instructions and helpful photos make this an enjoyable project that you'll be proud to display or gift. Happy crocheting, and may your stitches be as electric as Pika himself! ⚑🧢✨

You ask,

we answer.

FAQs

Can I use a different weight yarn for this pattern?

Yes, you can use different yarn weights, but you'll need to adjust your hook size accordingly. Keep in mind this will change the finished size of your Pika.

What if I can't find 14mm safety eyes?

You can substitute with embroidered eyes using black yarn, or use slightly smaller safety eyes like 12mm for a different look.

How do I make the invisible color change look seamless?

Begin your single crochet in the old color, then pull through with the new color to complete the stitch. Tie off both yarn tails securely.

My ears don't look right - what am I doing wrong?

Make sure you're placing them between rounds 3 & 4 of the head, and ensure the black tips are pointing slightly upward and outward.

Can I make this pattern larger?

Absolutely! Use a thicker yarn with a larger hook, or add extra increase rounds in the head and body sections.