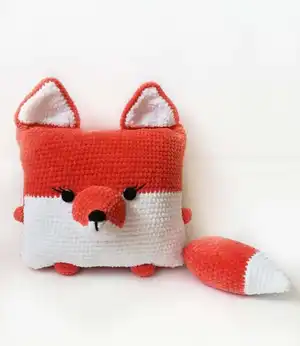
Make a super soft and adorable Pillow Fox using plush yarn and simple amigurumi techniques. This pattern walks you through every round, from the pillow body to ears, nose, legs, arms and tail, with clear photos and finishing tips. Perfect as a cozy gift or playful room accent — you can easily customize colors and size to match your style.
Progress Tracker
0% Complete
— Materials :
Info :
I used YarnArt Dolce yarn. (120 m /100 g.). Colors: orange (2 clew), white (1 clew), black acryl or cotton yarn for eyes. (You can crochet any other plush yarn - Himalaya Dolphin Baby or YarnArt Dolce). Filler (I used hollofayber). Hook № 3.5-4 mm (The size of the hook is specified on the package of yarn.). I used №3,5. black beads (or buttons) for eyes (18-22 mm). Needle. Do not forget to fix the beginning of each new circle with a pin or thread.
— Symbols :
Info :
sc - single crochet. inc - sc2tog increase. dec - invisible decrease (single crochet 2 together): (We knit two loops together behind the front wall of the loop). dc - double crochet. sl st - slip stitch. ch - chain.
— Pillow :
Info :
Use orange plush yarn
Round 1 :
93 ch, connect with the first loop
Round 2 :
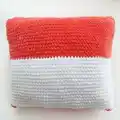
White yarn: 45 sc; Orange yarn: 48 sc {93}
Round 3 - 19 :
White yarn: 45 sc; Orange yarn: 48 sc {93} (17 rounds)
Round 20 - 38 :
Orange yarn: 93 sc (19 rounds)
Info :
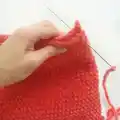
Leave a long thread and sew the top of the pillow. We fasten the thread and hide inside the pillow. Fill tightly and evenly. Fill the angle of the pillow well. Sew and fasten the thread and hide inside the pillow.
— Nose :
Info :
Use white plush yarn
Round 1 :
6 sc in magic Ring {6}
Round 2 :
orange yarn: inc, inc, inc; white yarn: inc, inc, inc {12}
Round 3 :
orange yarn: 7 sc; white yarn: 5 sc {12}
Round 4 :
orange yarn: 3 sc, inc, 1 sc, inc, 1 sc; white yarn: 5 sc {14}
Round 5 :
orange yarn: 2 sc, inc, 2 sc, inc, 3 sc; white yarn: inc, 2 sc, inc, 1 sc {18}
Round 6 :
orange yarn: 2 sc, inc, 3 sc, inc, 3 sc, inc; white yarn: 3 sc, inc, 3 sc {22}
Round 7 :
orange yarn: 3 sc, inc, 4 sc, inc, 5 sc; white yarn: inc, 4 sc, inc, 2 sc {26}
Round 8 :
orange yarn: 3 sc, inc, 2 sc, inc, 2 sc, inc, inc, 2 sc, inc, 2 sc; white yarn: inc, 2 sc, inc, 2 sc, inc, 3 sc {34}
Round 9 :
orange yarn: inc, 20 sc; white yarn: 13 sc {35}
Round 10 :
orange yarn: 22 sc; white yarn: 13 sc {35}
Round 11 :
orange yarn: 22 sc; white yarn: 13 sc {35}
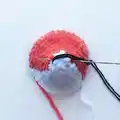
Info :
Leave a long thread for sewing (white and orange). Fill the nose. Use black acryl or cotton yarn and make nose.
— Leg (2 details) :
Info :
Use yellow plush yarn
Round 1 :
6 sc in magic Ring {6}
Round 2 :
( inc) – repeat 6 times {12}
Round 3 :
(1 sc, inc) – repeat 6 times {18}
Info :
Leave a long thread for sewing
— Arm (2 details) :
Info :
Use yellow plush yarn
Round 1 :
6 sc in magic Ring {6}
Round 2 :
(inc) – repeat 6 times {12}
Info :
Leave a long thread for sewing
— Tail :
Round 1 :
6 sc in Magic ring
Round 2 :
(2 sc, inc) – repeat 2 times {8}
Round 3 :
(3 sc, inc) – repeat 2 times {10}
Round 4 :
(2 sc, inc) – repeat 3 times, 1 sc {13}
Round 5 :
(3 sc, inc) – repeat 3 times, 1 sc {16}
Round 6 :
(4 sc, inc) – repeat 3 times, 1 sc {19}
Round 7 :
(5 sc, inc) – repeat 3 times, 1 sc {22}
Round 8 :
(4 sc, inc) – repeat 4 times, 2 sc {26}
Round 9 :
(4 sc, inc) – repeat 5 times, 1 sc {31}
Round 10 - 19 :
31 sc (10 rounds)
Round 20 :
(4 sc, dec) – repeat 5 times, 1 sc {26}
Round 22 :
(3 sc, dec) – repeat 5 times, 1 sc {21}
Round 24 :
(2 sc, dec) – repeat 5 times, 1 sc {16}
Info :
Fill. Leave a long thread for sewing.
— Ears :
Info :
Use orange yarn and make 2 details. Then use white yarn and make 2 details
Row 2 :
We begin to work from the second loop from the hook: 14 sc, 1 ch, turn
Row 3 - 4 :
We begin to work from the second loop from the hook: 14 sc, 1 ch, turn
Row 5 :
We begin to work from the second loop from the hook: dec, 10 sc, dec, 1 ch, turn
Row 6 :
We begin to work from the second loop from the hook: dec, 8 sc, dec, 1 ch, turn
Row 7 :
We begin to work from the second loop from the hook: dec, 6 sc, dec, 1 ch, turn
Row 8 :
We begin to work from the second loop from the hook: dec, 4 sc, dec, 1 ch, turn
Row 9 :
We begin to work from the second loop from the hook: dec, 2 sc, dec, 1 ch, turn
Row 10 :
We begin to work from the second loop from the hook: dec, dec, 1 ch, turn
Row 11 :
We begin to work from the second loop from the hook: dec
Info :
Tighten the thread and cut it off.
Info :
Use orange yarn and crochet around the ear. Start from the bottom right corner. Make 12 sc, 3 sc in the 1 top loop, 12 sc. See photos.
Info :
Leave a long thread to sew ears together.
Info :
Similarly, make two white details. Tighten thread and cut it off.
Info :
We put together white and orange details and crochet ears together sc (use orange yarn).
— Assembly :
Info :
Leave a long thread for sewing. Sew ears to the orange part of the pillow. Sew nose between 12 and 21 rounds, use white and orange yarn.
Info :
Sew eyes (distance between eyes 11 sc). And make eyelashes. Fill and sew legs. Fill and sew arms. Sew tail to bottom corner of the pillow.
This adorable Pillow Fox is a cuddly handmade treasure that brightens any room and makes a thoughtful gift. Customize colors to suit a nursery or a playful adult space with just a skein change. Enjoy the satisfying process of assembling charming features like the nose, ears and tail — the little details truly make it come alive. 🧶🧸