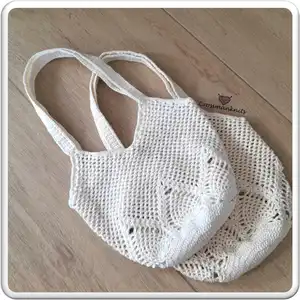
Make a beautiful Pineapple Bag using cotton yarn and a 3mm hook. This intermediate crochet pattern guides you through the bottom, pineapple lace side, top shaping, handles, and finishing steps. Clear round-by-round instructions and charts are included so you can follow along easily. Perfect for creating a stylish market bag you will use again and again.
Progress Tracker
0% Complete
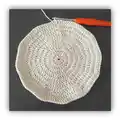
— Bottom of bag :
Info :
Use pink yarn with 3mm crochet hook. Crochet in rounds, using dc technique. The first dc is a ch2. The first inc in each round is a ch2 then dc into same st. At the end of each round, sl into first dc. See chart below.
Round 1 :
12dc into magic ring /12sts/
Round 3 :
(inc, dc) /36sts/
Round 4 :
(inc, dc2) /48sts/
Round 5 :
(inc, dc3) /60sts/
Round 6 :
(inc, dc4) /72sts/
Round 7 :
(inc, dc5) /84sts/
Round 8 :
(inc, dc6) /96sts/
Round 9 :
(inc, dc7) /108sts/
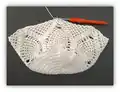
— Side of bag (pineapple design) :
Info :
At the beginning of each round ch2 for first dc. This counts as a st. At the end of each round, slip into the first dc, then slip into ch1. See chart on page 5.
Round 10 :
*(2dc, ch1, 2dc) into 1st st, ch3, sk 3sts, sc into 4th st, ch3, sk 4sts, 9tr into 5th st, ch3, sk 4sts, sc into 5th st, ch3, sk 3sts, * repeat 6 times total.
Round 11 :
*(2dc, ch1, 2dc) into ch1, ch3, (dc1, ch1) into each 9tr, ch2, * repeat 6 times total.
Round 12 :
*(2dc, ch1, 2dc) into ch1, (ch3, sc into ch1) repeat 8 times total, ch3, * repeat 6 times total.
Round 13 :
*(2dc, ch1, 2dc) into ch1, (ch3, sc into ch3 loop) repeat 7 times total, ch3, * repeat 6 times total.
Round 14 :
*(2dc, ch1, 2dc, ch1, 2dc) into ch1, (ch3, sc into ch3 loop) repeat 6 times total, ch3, * repeat 6 times total.
Round 15 :
*(2dc, ch1, 2dc,) into ch1, ch3, (2dc, ch1, 2dc) into next ch1, (ch3, sc into ch3 loop) repeat 5 times total, ch3, * repeat 6 times total.
Round 16 :
*(2dc, ch1, 2dc,) into ch1, ch3, sc into ch3 loop, ch3 (2dc, ch1, 2dc) into next ch1, (ch3, sc into ch3 loop) repeat 4 times total, ch3, * repeat 6 times total.
Round 17 :
*(2dc, ch1, 2dc,) into ch1, ch3, (sc into ch3 loop, ch3) repeat 2 times total, (2dc, ch1, 2dc) into next ch1, (ch3, sc into ch3 loop) repeat 3 times total, ch3, * repeat 6 times total.
Round 18 :
*(2dc, ch1, 2dc,) into ch1, ch3, (sc into ch3 loop, ch3) repeat 3 times total, (2dc, ch1, 2dc) into next ch1, (ch3, sc into ch3 loop) repeat 2 times total, ch3, * repeat 6 times total.
Round 19 :
*(2dc, ch1, 2dc,) into ch1, ch3, (sc into ch3 loop, ch3) repeat 4 times total, (2dc, ch1, 2dc) into next ch1, ch3, sc into ch3 loop, ch3, * repeat 6 times total.
Round 20 :
*(2dc, ch1, 2dc,) into ch1, ch3, (sc into ch3 loop, ch3) repeat 5 times total, (2dc, ch1, 2dc) into next ch1, ch3 * repeat 6 times total.
Round 21 :
*(2dc, ch1, 2dc,) into ch1, ch3, (sc into ch3 loop, ch3) repeat 6 times total, (2dc, ch1, 2dc) into next ch1, ch1 * repeat 6 times total.
Round 22 :
*2dc into ch1, ch3, (sc into ch3 loop, ch3) repeat 7 times total, 2dc into next ch1, ch1 * repeat 6 times total.
— Spiral rounds :
Info :
From here you will crochet in a spiral. At the end of the round do not slip into previous rounds loop, but continue crocheting into the top of the loop.
Round 23-41 :
Ch3, sc into ch3 loop, all around /19 rounds in a spiral/
Info :
You should have 54 loops.
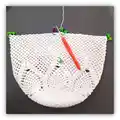
— Top of bag :
Info :
Using 8 stitch markers mark the beginning and end of each 4 sides. First, your last loop must be right above the tip of the pineapple. If it shifted, add more loops to be exactly above the pineapple. (I added 2 more loops). Do not cut yarn. We will start here with marking.
Info :
Place 1st marker in the next loop. Place 2nd marker into 13th loop. Place 3rd marker into 14th loop. Place 4th marker into 26th loop. Place 5th marker into 27th loop. Place 6th marker into 40th loop. Place 7th marker into 42th loop. Place 8th marker into 54th loop.
— Continue where you left off :
Info :
You will work between the markers. You should have 13 loops at each 4 sides marked. Do not cut yarn but continue with top of the bag.
Row 1 :
ch3, sc into ch3 loop 12 times. Turn at marker. Sl into 1st loop.
Row 2 :
ch3, sc into ch3 loop 11 times. Turn. Sl into 1st loop.
Row 3 :
ch3, sc into ch3 loop 10 times. Turn. Sl into 1st loop.
Row 4 :
ch3, sc into ch3 loop 9 times. Turn. Sl into 1st loop.
Row 5 :
ch3, sc into ch3 loop 8 times. Turn. Sl into 1st loop.
Row 6 :
ch3, sc into ch3 loop 7 times. Turn. Sl into 1st loop.
Row 7 :
ch3, sc into ch3 loop 6 times. Turn. Sl into 1st loop.
Row 8 :
ch3, sc into ch3 loop 5 times. Turn. Sl into 1st loop.
Row 9 :
ch3, sc into ch3 loop 4 times. Turn. Sl into 1st loop.
Row 10 :
ch3, sc into ch3 loop 3 times. Turn. Sl into 1st loop.
Row 11 :
ch3, sc into ch3 loop 2 times. Turn. Sl into 1st loop.
Row 12 :
ch3, sc into ch3 loop. Cut yarn, leave tail for sewing.
Info :
Repeat Row1-12 between each marker 3 more times.
— Handles :
Info :
Pick up yarn at the top loop. Work in rows.
Row 1 :
ch1, 4sc into loop. Turn
Row 2-120 :
(ch1, sc4, turn) /total 120 rows/
Info :
Place the bag in front of you. You will slip into the top loop of the back side, from the inside.
Row 121 :
sl through each sc, then back of top loop.
Info :
Repeat handle on the other side.
— Edge of bag :
Info :
1sc into each sc on the side of the handles, and 2sc into each loop of the edge of the bag. There are 3 sections on the bag, where you need to sc around. At the end, seamless st into 1st sc. Weave in all ends.
— Abbreviations :
Infos :
ch - chain. sc - single crochet. dc - double crochet. tr - treble crochet. inc - double crochet increase. mr - magic ring. sk - skip. sl - slip. st(s) - stitch(es). * - repeat around.
This Pineapple Bag Pattern blends vintage pineapple lace with a sturdy cotton build to create a stylish everyday tote. The pattern includes charts, step-by-step rounds, and handle instructions so you can make a professional finish. Enjoy crocheting something beautiful and practical for yourself or as a handmade gift! 🧶✨