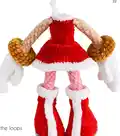
Create your very own Pink Rascal with this comprehensive amigurumi pattern! This delightful plush character features a classic red dress, white gloves, and tall red boots with white stripes. Perfect for fans of energetic video game heroes, this pattern guides you step-by-step through creating a beautifully shaped, dynamic plush toy. Grab your chenille yarn and let's bring this vibrant friend to life!
Progress Tracker
0% Complete
— Arms :
Info :
Make 2 details. Stuff only the palms.
Thumb Round 1 :
With white yarn: 6 SC in MR (6)
Thumb Round 2-5 :
4 rounds of 6 SC (6)
Thumb Finish :
Work a CH, fold in half and crochet the sides together with 3 SC. Fix and cut the thread.
Fingers Round 1 :
Make 4 details. With white yarn: 6 SC in MR (6)
Fingers Round 2-6 :
5 rounds of 6 SC (6)
Info :
Fix and cut the thread in 3 details. Do NOT cut the thread on the 4th detail, continue to join.
Round 7 (Join Fingers) :
3 SC on 1st finger, 3 SC on 2nd finger, 3 SC on 3rd finger, 6 SC on 4th finger, 3 SC on 3rd finger, 3 SC on 2nd finger, 3 SC on 1st finger (24)
Round 8-12 :
5 rounds of 24 SC (24)
Round 13 (Left Arm) :
SC, 3 SC with the thumb, 20 SC (24)
Round 13 (Right Arm) :
8 SC, 3 SC with the thumb, 13 SC (24)
Round 14 :
(10 SC, DEC) x 2 (22)
Round 15 :
(9 SC, DEC) x 2 (20)
Round 16 :
(3 SC, DEC) x 4 (16)
Round 17 :
(2 SC, DEC) x 4 (12)
Info :
Change thread color to ivory, fix and cut the white thread.
Round 18 :
(4 SC, DEC) x 2 (10)
Round 19 :
(3 SC, DEC) x 2 (8)
Round 20 :
(2 SC, DEC) x 2 (6)
Info :
Stuff only the palm so that it stays flat.
Round 21-30 :
10 rounds of 6 SC (6)
— Bracelets :
Info :
Make 2 details with mustard-colored yarn. Do NOT stuff.
Round 1 :
Work first Rd in a spiral along the chain: 8 SC (8)
Round 2-22 :
21 rounds of 8 SC (8)
Info :
Fasten off, leave long end to sew. Sew edges in a circle. Put on the arm and fix with two stitches opposite the thumb between Rds 15 and 16.
— Tail :
Info :
With pink yarn. Make a turn and work a turning CH at the end of each row.
Row 1 :
Start in 2nd chain from hook: 2 SC (2)
Row 2-4 :
3 rows of 2 SC (2)
Row 6-7 :
2 rows of SC (1)
Info :
Work a CH, turn the detail on its side and work the SS series on the side to the initial row. Fasten off.
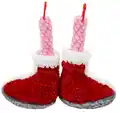
— Legs :
Info :
Make 2 details. Stuff in process. Start with grey yarn. Oval-shape detail.
Round 1 :
Start in 2nd chain from hook: 10 SC, 5 SC into the last chain from the hook, on the other side: 9 SC, INC (26)
Round 2 :
INC, 10 SC, 3 SC in 1 St, SC, 3 SC in 1 St, 10 SC, 2 INC (33)
Round 3 :
SC, INC, 11 SC, 3 SC in 1 St, 3 SC, 3 SC in 1 St, 11 SC, (SC, INC) x 2 (40)
Round 4 :
2 SC, INC, 12 SC, 3 SC in 1 St, 5 SC, 3 SC in 1 St, 12 SC, (2 SC, INC) x 2 (47)
Info :
Change thread color to red. Don't cut grey thread, leave on outside.
Round 6 :
16 SC, DEC 3 SC in 1 St, 5 SC, DEC 3 SC in 1 St, 20 SC (43)
Info :
Return to grey thread. Work 47 SS in loose front loops of Rd 4. Fasten off grey thread. Continue with red.
Round 7 :
15 SC, DEC 3 SC in 1 St, 3 SC, DEC 3 SC in 1 St, 19 SC (39)
Round 8 :
14 SC, DEC 3 SC in 1 St, SC, DEC 3 SC in 1 St, 18 SC (35)
Round 9 :
12 SC, DEC 3 SC in 1 St, SC, DEC 3 SC in 1 St, 16 SC (31)
Round 10 :
10 SC, DEC 3 SC in 1 St, SC, DEC 3 SC in 1 St, 14 SC (27)
Round 11 :
8 SC, DEC 3 SC in 1 St, SC, DEC 3 SC in 1 St, 12 SC (23)
Round 12 :
6 SC, DEC 3 SC in 1 St, SC, DEC 3 SC in 1 St, 10 SC (19)
Round 13 :
4 SC, DEC 3 SC in 1 St, SC, DEC 3 SC in 1 St, 8 SC (15)
Info :
Stuff the foot tightly keeping the square shape on the toe. Change to pink thread. Leave red on outside.
Round 14 :
BLO: (3 SC, DEC) x 3 (12)
Round 15 :
(2 SC, DEC) x 3 (9)
Round 16 :
3 SC, DEC, 2 SC, DEC (7)
Round 17-30 :
14 rounds of 7 SC (7). Finish with straight line.
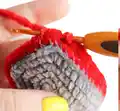
— Upper Edge of Boot :
Info :
Return to red thread, attach to loose front loop of Rd 13.
Round 2-4 :
3 rounds of 15 SC (15)
Info :
Change thread color to white, fasten off the red thread.
Round 5 :
FLO: (4 SC, INC) x 3 (18)
Round 6 :
(5 SC, INC) x 3 (21)
Round 7 :
21 SC (21). Finish with straight line. Hide ends.
— Front Stripe on Boot :
Round 0 :
With white yarn: Chain 18
Round 1 :
Start in 2nd chain from hook: 17 SC (17). Sew to boot.
— Body :
Info :
Attach white thread to St marked on right leg, work chain series of 3 CH.
Round 31 :
On the left leg: 7 SC, on the chain: 3 SC, on the right leg: 7 SC, on the chain: 3 SC (20)
Round 32 :
(SC, INC) x 10 (30)
Info :
Mark 2 SC in the middle of the back for tail attachment.
Round 34 :
27 SC, 2 SC with the tail, SC (30)
Round 35 :
(8 SC, DEC) x 3 (27)
Round 36 :
(7 SC, DEC) x 3 (24)
Round 37 :
(6 SC, DEC) x 3 (21)
Info :
Change thread color to red, fasten off white thread.
Round 38 :
(5 SC, DEC) x 3 (18)
Round 39 :
BLO: 18 SC (18)
Round 41 :
(5 SC, INC) x 3 (21)
Round 43 :
(6 SC, INC) x 3 (24)
Round 45 :
(6 SC, DEC) x 3 (21)
Round 46 :
(5 SC, DEC) x 3 (18)
Info :
Mark 3 SC on sides at a distance of 6 SC in front and back for arm attachment.
Round 47 :
4 SC, 3 SC with the arm, 6 SC, 3 SC with the arm, 2 SC (18)
Info :
Change thread color to white, fasten off red thread.
Round 48 :
18 SC (18). Leave loop to change to pink.
— Skirt :
Info :
Go back to Rd 38 of body. Turn toy upside down, attach red thread to loose front loop.
Round 1 :
FLO: (2 SC, INC) x 6 (24)
Round 2 :
(3 SC, INC) x 6 (30)
Round 3 :
(4 SC, INC) x 6 (36)
Round 4 :
(5 SC, INC) x 6 (42)
Round 5 :
(6 SC, INC) x 6 (48)
Round 6 :
(7 SC, INC) x 6 (54)
Round 7 :
(8 SC, INC) x 6 (60)
Round 8 :
(9 SC, INC) x 6 (66)
Info :
Change thread color to white, fasten off red thread.
Round 9 :
(10 SC, INC) x 6 (72)
Round 10 :
(11 SC, INC) x 6 (78). Fasten off.
— Head :
Info :
Continue from body with pink thread. Narrower below than above.
Round 49 :
(SC, INC) x 9 (27)
Round 50 :
(2 SC, INC) x 9 (36)
Round 51 :
(5 SC, INC) x 6 (42)
Round 52 :
(6 SC, INC) x 6 (48)
Round 53-56 :
4 rounds of 48 SC (48)
Round 57 :
(15 SC, INC) x 3 (51)
Round 58 :
(16 SC, INC) x 3 (54)
Round 59-61 :
3 rounds of 54 SC (54)
Round 62 :
(17 SC, INC) x 3 (57)
Round 63 :
(18 SC, INC) x 3 (60)
Round 65 :
(8 SC, DEC) x 6 (54)
Round 66 :
(7 SC, DEC) x 6 (48)
Round 67 :
(6 SC, DEC) x 6 (42)
Round 68 :
(5 SC, DEC) x 6 (36)
Round 69 :
(4 SC, DEC) x 6 (30)
Round 70 :
(3 SC, DEC) x 6 (24)
Round 71 :
(2 SC, DEC) x 6 (18)
Round 72 :
(SC, DEC) x 6 (12)
Round 73 :
6 DEC (6). Do NOT tighten the hole, fix thread and leave long end.
— Muzzle :
Round 0 :
With ivory yarn: Chain 14
Round 1 :
Start in 2nd chain from hook: 12 SC, 3 SC into the last chain, on the other side: 11 SC, INC (28)
Round 2 :
INC, 11 SC, 3 INC, 5 SC, 3 SC in one St, 5 SC, 2 INC (36)
Round 3 :
SC, INC, 11 SC, (SC, INC) x 3, 6 SC, 3 SC in one St, 6 SC, (SC, INC) x 2 (44)
Round 4-5 :
2 rounds of 44 SC (44). Fold detail in half and sew top area with 3 SS.
— Nose :
Round 1 :
With black semi-cotton yarn: 6 SC in MR (6)
Round 2-3 :
2 rounds of 6 SC (6). Tighten hole, leave long end to sew.
— Eye Whites :
Info :
Make 2 details. With white yarn.
Round 1 :
Start in 2nd chain: 3 SC, 3 SC into the last chain, on the other side: 2 SC, INC (10)
Round 2 :
INC, 2 SC, 3 INC, 2 SC, 2 INC (16)
Round 3 :
SC, INC, 2 SC, (SC, INC) x 3, 2 SC, (SC, INC) x 2 (22). Attach fronts to each other and crochet both sides together with 3 SS.
— Eyelids :
Round 1 :
Attach pink thread to right front loop. FLO: 14 SC, SC in the middle between eyes, 14 SC (29). Fasten off.
— Eyelashes :
Round 1 :
Start in 2nd chain: SS, SC, 2 HDC (4)
— Pupils :
Round 0 :
Make 2 with black semi-cotton. Chain 6
Round 1 :
Start in 3rd chain: 4 HDC (4)
— Ears (Inner Part) :
Info :
Make 2 with ivory yarn. Turn and CH at end of row.
Row 1 :
Start in 2nd chain: INC (2)
Row 4 :
INC, 3 SC (5). Leave long end.
— Ears (Outer Part) :
Info :
Make 2 with pink yarn. Turn and CH at end of row.
Row 1 :
Start in 2nd chain: INC (2)
Info :
Work a CH, 3 SC on one side, 3 SC in top, 3 SC on other. Join with inner part using SC on sides and 3 SC in top.
— Forelocks :
Info :
Make 3 with pink yarn. Turn and CH at end of row.
Row 1 :
Start in 2nd chain: 4 SC (4)
Row 3 :
Skip a St, 3 SC (3)
Row 5 :
Skip a St, 2 SC (2)
Row 8 :
SC (1). Work SS series on the side to the initial row.
— Rim :
Info :
With red yarn. Turn and CH at end of row.
Row 3-4 :
2 rows of 2 SC (2)
Row 6-13 :
8 rows of 3 SC (3)
Row 14 :
Skip a St, 2 SC (2)
Row 15-16 :
2 rows of 2 SC (2)
Row 17 :
Skip a St, SC (1)
— Front Side Prickles :
Info :
Make 2 with pink yarn. Do NOT stuff.
Round 2 :
2 SC, 2 INC, 2 SC (8)
Round 3 :
3 SC, 2 INC, 3 SC (10)
Round 4 :
4 SC, 2 INC, 4 SC (12)
Round 5 :
5 SC, 2 INC, 5 SC (14)
Round 6 :
6 SC, 2 INC, 6 SC (16)
Round 7 :
DEC, 5 SC, 2 INC, 5 SC, DEC (16)
Round 8 :
7 SC, 2 INC, 7 SC (18)
Round 9 :
8 SC, 2 INC, 8 SC (20)
Round 10 :
9 SC, 2 INC, 9 SC (22)
Round 11 :
10 SC, 2 INC, 10 SC (24)
Round 12-14 :
DEC, 9 SC, 2 INC, 9 SC, DEC (24)
Info :
Work a CH, fold in half and crochet the sides together with 12 SC.
— Back Side Prickles :
Info :
Make 2 with pink yarn. Do NOT stuff.
Round 2 :
(2 SC, INC) x 2 (8)
Round 3 :
(3 SC, INC) x 2 (10)
Round 4 :
(4 SC, INC) x 2 (12)
Round 5 :
(5 SC, INC) x 2 (14)
Round 6 :
(6 SC, INC) x 2 (16)
Round 7 :
(7 SC, INC) x 2 (18)
Round 8 :
(8 SC, INC) x 2 (20)
Round 9 :
(9 SC, INC) x 2 (22)
Round 10 :
(10 SC, INC) x 2 (24)
Round 11 :
(11 SC, INC) x 2 (26)
Round 12-23 :
12 rounds of 26 SC (26)
Info :
Work a CH, fold in half and crochet the sides together with 13 SC.
— Central Upper & Lower Prickles :
Info :
Make 2 with pink yarn. Do NOT stuff.
Round 2 :
(SC, INC) x 3 (9)
Round 3 :
(2 SC, INC) x 3 (12)
Round 4 :
(3 SC, INC) x 3 (15)
Round 5 :
(4 SC, INC) x 3 (18)
Round 6 :
(5 SC, INC) x 3 (21)
Round 7 :
(6 SC, INC) x 3 (24)
Round 8 :
(7 SC, INC) x 3 (27)
Round 9 :
(8 SC, INC) x 3 (30)
Round 10 :
(9 SC, INC) x 3 (33)
Round 11 :
(10 SC, INC) x 3 (36)
Round 12-19 :
8 rounds of 36 SC (36)
Info :
Work a CH, fold in half and crochet the sides together with 18 SC.
— Hammer :
Info :
Start with mustard yarn. Stuff in process.
Round 3 :
(SC, INC) x 8 (24)
Round 4 :
(2 SC, INC) x 8 (32)
Round 5 :
(3 SC, INC) x 8 (40)
Round 6 :
(4 SC, INC) x 8 (48)
Round 7 :
(5 SC, INC) x 8 (56)
Round 10 :
BLO: 56 SC (56)
Round 11 :
(5 SC, DEC) x 8 (48)
Info :
Change thread color to grey.
Round 12 :
(4 SC, DEC) x 8 (40)
Info :
Change thread color to red.
Round 13-26 :
14 rounds of 40 SC (40)
Info :
Change thread color to grey.
Round 27 :
(4 SC, INC) x 8 (48)
Info :
Change thread color to mustard.
Round 28 :
(5 SC, INC) x 8 (56)
Round 30 :
BLO: 56 SC (56)
Round 32 :
BLO: (5 SC, DEC) x 8 (48)
Round 33 :
(4 SC, DEC) x 8 (40)
Round 34 :
(3 SC, DEC) x 8 (32)
Round 35 :
(2 SC, DEC) x 8 (24)
Round 36 :
(SC, DEC) x 8 (16)
Round 37 :
8 DEC (8). Tighten hole and hide end.
— Hammer Handle :
Info :
Start with dark brown yarn. Stuff in process.
Round 2 :
(SC, INC) x 3 (9)
Round 3-9 :
7 rounds of 9 SC (9)
Info :
Change thread color to mustard.
Round 10-21 :
12 rounds of 9 SC (9)
Info :
Change thread color to grey.
Round 22 :
(2 SC, INC) x 3 (12)
Round 23-25 :
3 rounds of 12 SC (12). Sew to hammer.
This vibrant Pink Rascal pattern is guaranteed to steal the show with her giant hammer and adorable, highly detailed outfit! From the carefully sculpted boots to the perfect plush hair spikes, every element has been thoughtfully designed for an amazing finished piece. Make her as a nostalgic gift for a gamer friend or keep her as your own spunky handmade companion. 🦔💖🔨