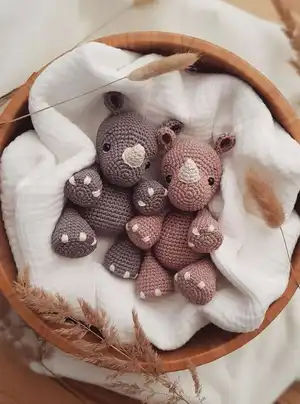
Make your own adorable little rhino with this detailed Pino amigurumi crochet pattern. You will be guided through each piece step-by-step, from legs and arms to head, ears, horn and tiny nails. The pattern uses simple stitches and clear photos so you can create a charming handmade friend to treasure or gift.
Progress Tracker
0% Complete
— Legs :
Round 1 :
6 sc into MR = 6 st
Round 3 :
(1sc, inc) x 6 = 18 st
Round 4 :
(2 sc, inc) x 6 = 24 st
Round 5 :
(3 sc, inc) x 6 = 30 st
Round 6 :
BLO 30 sc = 30 st
Round 7-9 :
30 sc = 30 st (3 rounds)
Round 10 :
(3 sc, dec) x 6 = 24 st
Round 11 :
24 sc = 24 st (1 round)
Round 12 :
(2sc, dec) x 6 = 18 st
Round 13-14 :
18 sc = 18 st (2 rounds)
Info :
Stuff the leg with fiberfill up to round 11. Do not stuff too tightly, so that the leg will keep its shape.
Round 15 :
(1 sc, dec) x 6 = 12 st
Round 16 :
12 sc = 12 st (1 round)
Round 19 :
2 sc, this round is not crocheted until the end of the round. (When folding the opening the joints of round 5 and 6 should be parallel. Adjust the number of stitches if needed.)
Info :
Fold the two sides of the arm together and crochet 2 sc across. Cut the yarn and weave in the yarn tail nicely.
— Arms :
Round 1 :
6 sc into MR = 6 st
Round 3 :
(1 sc, inc) x 6 = 18 st
Round 4 :
(2 sc, inc) x 6 = 24 st
Round 5 :
BLO 24 sc = 24 st (1 round)
Round 6-9 :
24 sc = 24 st (4 rounds)
Round 10 :
(2 sc, dec) x 6 = 18 st
Round 11 :
18 sc = 18 st (1 round)
Round 12 :
(1 sc, dec) x 6 = 12 st
Round 13-14 :
12 sc = 12 st (2 rounds)
Info :
Stuff the arm with fiberfill up to round 12. Do not stuff too tightly, so that the arm will keep its shape.
Round 15 :
(2 sc, dec) x 3 = 9 st
Round 16-17 :
9 sc = 9 st (2 rounds)
Round 18 :
(1 sc, dec) x 3 = 6 st
Round 19 :
2 sc, the round is not crocheted until the end of the round. (When folding the opening the joints of round 5 and 6 should be parallel. Adjust the number of stitches if needed.)
Info :
Fold the two sides of the arm together and crochet 2 sc across. Cut the yarn and weave in the yarn tail nicely.
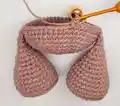
— Body :
Round 1 :
6 sc into MR= 6 st
Round 3 :
(1 sc, inc) x 6 = 18 st
Round 4 :
(2 sc, inc) x 6 = 24 st
Round 5 :
(3 sc, inc x 6 = 30 st
Round 6 :
(4 sc, inc) x 6 = 36 st
Round 7 :
(5 sc, inc) x 6 = 42 st
Round 8 :
(6 sc, inc) x 6 = 48 st
Round 9-10 :
48 sc = 48 st (2 rounds)
Info :
The stitch marker is on the front. You can use a yarn remnant as a stitch marker for the front. Make sure that the legs are crocheted in with the right side to the front - the joints of the rounds have to be at the backside
Round 11 :
13 sc, crochet in the 1st leg with 2 sc, 24 sc, Crochet in the 2nd leg with 2 sc, 7 sc = 48 st (At the front the legs have 20 sc in between and at the back there are 24 sc in between. Make sure that the legs are exactly symmetrically at each side of the body. Change the position of the arms when needed.)
Round 12-14 :
48 sc = 48 st (3 rounds)
Round 15 :
(6 sc, dec) x 6 = 42 st
Round 16-17 :
42 sc = 42 st (2 rounds)
Round 18 :
(5 sc, dec) x 6 = 36 st
Round 19 :
(4 sc, dec) x 6 = 30 st
Round 20-21 :
30 sc = 30 st (2 rounds)
Round 22 :
(3 sc, dec) x 6 = 24 st
Info :
Now start stuffing the body with fiberfill.
Round 23 :
(2 sc, dec) x = 18 st
Round 24 :
7 sc, crochet in the 1st arm with 2 sc, 7 sc, crochet in the 2nd arm with 2 sc = 18 st (The arms have 7 sc in between - at the front and as well at the back. Make sure that the arms are exactly symmetrically at each side of the body. Change the position of the arms when needed.)
Round 25 :
(1 sc, dec) x 6 = 12 st
Info :
Fold the two sides of the opening together and crochet 5 sc across. Cut the yarn and weave in the yarn tail nicely.
— Tail :
Info :
Mark the position of tail centered at the back in round 9 with pins. Thread in a piece of yarn - about 20cm / 8 inches in length - and make a knot. Cut it leaving approx. 1 cm/0,4 inches.
— Head :
Round 1 :
6 sc into MR= 6 st
Round 3 :
(1 sc, inc) x 6 = 18 st
Round 4 :
(2 sc, inc) x 6 = 24 st
Round 5 :
(3 sc, inc) x 6 = 30 st
Round 6-9 :
30 sc = 30 st (4 rounds)
Round 10 :
4 sc, (inc, 1 sc) x 6, 14 sc = 36 st
Info :
You can already mark the position of the security eyes with two yarn remnants in round 11.
Round 11 :
5 sc, place first marker, (inc, 2 sc) x 5, inc, place second marker, 15 sc = 42 st
Round 12 :
6 sc, (inc, 3 sc) x 6, 12 sc = 48 st
Round 13-14 :
48 sc = 48 st (2 rounds)
Info :
Now insert the safety eyes (diameter: 8 mm) at the position you marked before.
Round 15 :
48 sc = 48 st (1 round)
Round 16 :
42 sc, crochet in the body with 5 sc, 1 sc = 48 st (Make sure that the head is attached upright.)
Round 17-19 :
48 sc = 48 st (3 rounds)
Round 20 :
(6 sc, dec) x 6 = 42 st
Round 21 :
42 sc = 42 st (1 round)
Round 22 :
(5 sc, dec) x 6 = 36 st
Round 23 :
(4 sc, dec) x 6 = 30 st
Round 24 :
(3 sc, dec) x 6 = 24 st
Round 25 :
(2 sc, dec) x 6 = 18 st
Info :
Stuff the head with fiberfill.
Round 26 :
(1 sc, dec) x 6 = 12 st
Info :
Cut the yarn and weave in the yarn tail nicely.
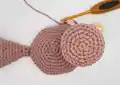
— Ears :
Round 1 :
6 sc into MR = 6 st
Round 3 :
1 ch, 5 hdc, (2 dc in 1 st) x 2, 5 hdc = 14 st
Info :
Finish off with a sl st in the next st. Cut the yarn leaving a long tail for sewing. The working thread is weaved in nicely and then cut it. Fold the ear together and sew the two stitches at the bottom together. Insert the needle from above and withdraw it at the bottom.
Item Name (P1) :
Attach the ears - The ears are sewn to the head centered at round 17 with 12 visible sc in between.
— Horn :
Round 1 :
6 sc into MR = 6 st
Round 2 :
6 sc = 6 st (1 round)
Round 3 :
(1 sc, inc) x 3 = 9 st
Round 4 :
inc x 3, 6 sc = 12 st
Info :
Join the round with a sl st. Cut the yarn leaving a long tail for sewing.
Info :
Stuff the horn slightly with fiberfill and attach it centered to the rounds 3 - 9. Make sure that the 3 increases of the horn are above.
— Facial features :
Info :
The eyebrows are embroidered slanted over round 13 with 2 sc in length - using black embroidery thread.
Info :
For the eye lid use 'Pastell Schlamm' (dark brown) or 'Mocca' (light brown) and make a stitch twice from the upper to the lower part of the eye. One third of the lower part of the eye is embroidered with white cotton yarn.
— Nails :
Info :
Mark the nail position with pins. Your reference point is the joint of the rounds from the arms and legs. The joint of the round is now on the bottom (marked with an X in the picture). Between each nail there are 4 visible sc (marked with an O). Embroider each nail with 4 stiches.
Info :
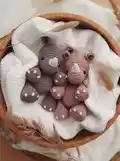
Now your Pino is finished. Have a lot of fun with your own little rhino!
This charming Pino rhino amigurumi is ready to become your new handmade companion — small, sweet and full of character. Perfect for gifting or displaying, the pattern balances simple stitches with delightful details like the horn and embroidered nails. Make yours in soft pastels or earthy tones and enjoy every stitch. 🧶🦏