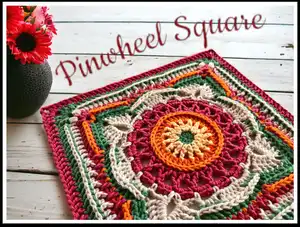
Create a vibrant, textured Pinwheel Square with this detailed crochet pattern. Youll enjoy the layered stitches, puff details, and striking color changes that make this square a standout for blankets, pillows, or standalone decor. The pattern includes full round-by-round instructions, colorway options, and blocking tips so you can achieve a professional finish. Perfect for expanding your stitch vocabulary while making a beautiful finished piece.
Progress Tracker
0% Complete
— Special Instructions :
Info :
Instructions for ALL rounds start with a standing stitch and end with an invisible join to 2nd st of rnd, and fasten off. If not changing colors, you can opt to finish the rnd with a slst join and use the appropriate "ch" or "chainless starting stitch" to begin the next round. Keep in mind that if you choose the slip stitch end, the "ch" or "chainless starting stitch" will replace the first standing st of the round.
Info :
Navigate between written instructions, stitch definitions, videos, and pictures by clicking on the corresponding links. To achieve a professional appearance block your finished square. You can either block your project using a wet block or steam block, but always be cautious when steam-blocking acrylic yarn.
— Pinwheel Square :
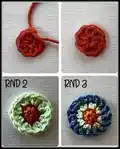
Round 1 :
Colorway 1: A, Apple Green | Colorway 2: A, Aubergine. Start in a double magic circle. In a double magic circle, work a ch 2 OR use an alternate starting hdc (as the first hdc of rnd), 7 hdc; cut yarn, invisible join. Counts: 8 hdc (8 total)
Round 2 :
Colorway 1: B, Banana | Colorway 2: B, Fern. Start in any hdc. [(2 dc) in hdc] 8 times; cut yarn, invisible join. Counts: 16 dc (16 total)
Round 3 :
Colorway 1: B, Banana | Colorway 2: B, Fern. Start around any dc. [FPdc around dc, ch 1] 16 times; cut yarn, invisible join. Counts: 16 FPdc, 16 ch-1 sp (32 total)
Round 4 :
Colorway 1: C, Glowing | Colorway 2: C, Olive. Start in any ch-1 sp. [(3 dc) in ch-1 sp, sk FPdc; (2 dc) in ch-1 sp, sk FPdc] 8 times; cut yarn, invisible join. Counts: 40 dc (40 total)
Round 5 :
Colorway 1: D, Rosey II | Colorway 2: D, Deep Teal. Start around any dc. *shallow BPsc around dc; repeat from * around; cut yarn, invisible join. Counts: 40 shallow BPsc (40 total)
Round 6 :
Colorway 1: D, Rosey II | Colorway 2: E, Lace. Start in any shallow BPsc. dc2tog, working in 1st and 3rd shallow BPsc, skipping 2nd shallow BPsc, ch 3; [dc2tog, working in previously worked shallow BPsc (skipping a shallow BPsc) and NEXT UNworked shallow BPsc, ch 3] 18 times; dc2tog, working in previously worked shallow BPsc (skipping a shallow BPsc) and in 1st worked shallow BPsc of rnd, ch 3; cut yarn, invisible join. Counts: 20 dc2tog, 20 ch-3 sp (80 total)
Round 7 :
Colorway 1: D, Rosey II | Colorway 2: E, Lace. Start in any ch-3 sp. [(3 sc) in ch-3 sp, ch 1, sk dc2tog] 20 times; repeat from * around; cut yarn, invisible join. Counts: 60 sc, 20 ch-1 sp (80 total)
Round 8 :
Colorway 1: E, Lace | Colorway 2: D, Deep Teal. Start in any ch-1 sp. *(sc, ch 6, sc) in ch-1 sp; [ch 3, sk 3 sc, sc in NEXT ch-1 sp] 4 times; ch 3, sk 3 sc; repeat from * around; cut yarn, invisible join. Counts: 24 sc, 20 ch-3 sp, 4 ch-6 sp (108 total)
Round 9 :
Colorway 1: E, Lace | Colorway 2: D, Deep Teal. Start in any ch-6 sp. *(4 tr, dc, ch-2 as a corner; dc, 4 tr) in ch-6 sp; sk NEXT (sc, ch-3 sp, sc); (hdc, 3 dc) in NEXT ch-3 sp; sk sc, (5 tr) in NEXT ch-3 sp; sk sc, (3 dc, hdc) in NEXT ch-3 sp; sk NEXT (sc, ch-3 sp, sc); repeat from * around; cut yarn, invisible join. Counts: 8 hdc, 32 dc, 52 tr, 4 ch-2 corner sp (92 total/23 per side)
Round 10 :
Colorway 1: A, Apple Green | Colorway 2: A, Aubergine. Start in any corner sp. *(2 dc, ch 2, 2 dc) in corner sp; dc in NEXT 5 sts, ch 1; BPdc around NEXT 4 sts; working in 3LP, hdc in NEXT 5 tr; BPdc around NEXT 4 sts, ch 1; dc in NEXT 5 sts; repeat from * around; cut yarn, invisible join. Counts: 20 hdc, 56 dc, 32 BPdc, 8 ch-1 sp, 4 ch-2 corner sp (116 total/29 per side)
Round 11 :
Colorway 1: C, Glowing | Colorway 2: E, Lace. Start in any corner sp. *(hdc, ch 2, hdc) in corner sp; working in 3LP, hdc in NEXT 7 dc, sk ch-1 sp; [hdc in NEXT st, ch 1, sk st] 6 times, hdc in NEXT BPdc, sk ch-1 sp; working in 3LP, hdc in NEXT 7 dc; repeat from * around; cut yarn, invisible join. Counts: 92 hdc, 24 ch-1 sp, 4 ch-2 corner sp (116 total/29 per side)
Round 12 :
Colorway 1: D, Rosey II | Colorway 2: C, Olive. Start in any corner sp. *[(dc, ch 1) 2 times, dc] in corner sp; BPdc around NEXT 8 hdc, sk hdc; [working in front of rnd 11, dc in NEXT UNworked BPdc of rnd 10, sk ch-1 sp, hdc in NEXT hdc of rnd 11] 5 times; working in front of rnd 11, dc in UNworked BPdc of rnd 10; working in rnd 11, sk hdc; BPdc around 8 hdc; repeat from * around; cut yarn, invisible join. Counts: 20 hdc, 36 dc, 64 BPdc, 8 ch-1 sp (128 total/32 per side)
Round 13 :
Colorway 1: E, Lace | Colorway 2: B, Fern. Start in 1st ch-1 sp of any [(dc, ch 1) 2 times, dc] group. *(puff) in ch-1 sp; ch 2 as the new corner, sk dc; (puff) in NEXT ch-1 sp, ch 1 to close puff; dc in NEXT 9 sts; [hdc in NEXT dc, FPdc around NEXT hdc] 5 times, hdc in NEXT dc; dc in NEXT 9 sts; repeat from * around; cut yarn, invisible join. Counts: 24 hdc, 8 puff, 72 dc, 20 FPdc, 4 ch-1 sp, 4 ch-2 corner sp (128 total/32 per side)
Round 14 :
Colorway 1: A, Apple Green | Colorway 2: E, Lace. Start in any corner sp. *(2 e-dc, ch 2, 2 e-dc) in corner sp; e-FPdc around NEXT puff, sk ch-1 sp used to close puff; shallow BPdc around NEXT 29 sts; e-FPdc around NEXT puff; repeat from * around; cut yarn, invisible join. Counts: 116 shallow BPdc, 16 e-dc, 8 e-FPdc, 4 ch-2 corner sp (140 total/35 per side)
Round 15 :
Colorway 1: D, Rosey II | Colorway 2: A, Aubergine. Start in any corner sp. *(2 dc, ch 2, 2 dc) in corner sp; dc across to NEXT corner sp; repeat from * around; cut yarn, invisible join and weave in ends. Counts: 156 dc, 4 ch-2 corner sp (156 total/39 per side)
This Pinwheel Square pattern brings a bright, textured mandala-style motif to your crochet projects with layered stitches and playful colorways. Use it as a stunning single accent or join multiples for a colorful blanket or cushion cover. Block to perfection, and enjoy the lovely stitch definition that makes this design pop. 🧶✨