Create a vibrant Pinwheel Square that adds playful texture and color to any blanket or project. This pattern guides you through raised petals worked from the center ring and a decorative reverse single crochet edge. Youll enjoy the swirling design and learn clever color-change and back-loop techniques to make clean, dimensional petals. Perfect for adding a bright handmade touch to your home or gifting as part of a larger blanket project.
Progress Tracker
0% Complete
— Overview :
Info :
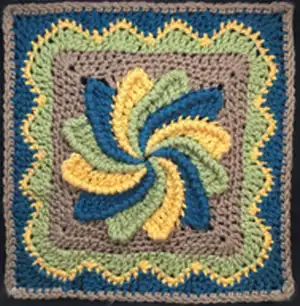
Get spun with this fun and colorful Pinwheel blanket square. Each petal is worked out from a center ring, then back in to opposite direction without turning to form the raised edges. The reverse single crochet edge is worked into the front loop only, leaving the back loop to stitch into for the next petal. This idea may have you spinning, but follow the instructions step by step and give it a try!
Info :
Note: As a left-handed crocheter your pinwheel will twist in the opposite direction like this. As a lefty myself, I flipped the image of mine for the main photo to avoid confusion.
— Materials & Notes :
Info :
DIFFICULTY Advanced Beginner. FINISHED SIZE 12" by 12". YARN USED 4 colors Worsted Weight yarn. Color suggestions A (darkest), B (medium), C (higher contrast), D (neutral). Sample working in Red Heart With Love, 100% acrylic, worsted weight yarn in Peacock, Cornsilk, Lettuce, and Taupe. NOTIONS J hook (or hook to get gauge) 13 Stitch Markers (recommended). GAUGE 12 stitches by 7 rows = 4" by 4".
— Special Stitches :
Info :
Changing Colors: Work previous stitch up to last yarn over, yarn over to with new color, pull through last two loop, drop old color to back of work and continue with new color.
Info :
Double crochet 2 together (dc2tog): *Yo, insert hook into next dc, yo, pull up a loop, yo, pull through 2 loops; Repeat from *, yo, pull through all 3 loops on hook.
Info :
Half double crochet 2 together (hdc2tog): Yo, insert hook into next ch-1 sp, yo, pull up a loop (3 loops on hook), yo, insert hook into next dc, yo, pull up a loop, yo, pull through all 5 loops on hook.
Info :
Half Treble Crochet (htr): Yo 2 times, insert hook into next st, yo, pull up a loop, yo, pull through 2 loops, yo, pull through remaining 3 loops on hook.
Info :
Reverse Single Crochet (revsc): Without turning your work, working from left to right (or right to left for left-handed crocheters), insert hook in the next stitch (under your hook), yo, pull up a loop without twisting the hook, yo, pull through both loops on hook.
Info :
Single Crochet 3 Together (sc3tog): [Insert hook into next st, yo, pull up a loop] 3 times, yo, pull through all 4 loops on hook.
Info :
Treble Crochet 3 Together (tr3tog): *Yo 2 times, insert hook into next st, yo, pull up a loop, [yo, pull through 2 loops] 2 times; Repeat from * 3 times, yo, pull through all 4 loops on hook.
Info :
TUTORIAL LINKS (on Mooglyblog.com) Reverse Single Crochet/Crab Stitch. Front Loop Only/Back Loop Only. Joining with a Single Crochet/Standing Single Crochet.
— Pinwheel Pattern :
Info :
Pinwheel Pattern Notes: Reverse single crochets form the raised “crab stitch” edging of each Petal. They are worked from left to right (or right to left for left-handed crocheters). Recommended to place a stitch marker in the unused back loop of the last treble crochet stitch so make it easier to find on Rnd 1 of the Square. Each time you change colors on the Pinwheel, flip unused colors of yarn up under the hook, between the hook and working yarn. This will bring the yarn up so the new color is ready to join on the next Petal. The first sc of each Pinwheel Petal is worked in the previous color, making it easier to find the first stitch to work into for the next Petal.
Info :
With Color A, ch 14. (Be sure to read all of the pattern notes before starting)
First Petal :
Join with sl st in 4th ch from hook to form ring (place stitch marker in center of ring), work into remaining chs, sc in next ch, hdc in next ch, 2 hdc in next ch, dc in next ch, 2 dc in next ch, htr (see Special Stitches) in next ch, 2 htr in next ch, tr in next ch, 2 tr in next ch, tr in last ch, place stitch marker in back loop of last tr made; Do not turn, working back in the other direction, revsc (see Special Stitches) in the flo (front loops only) of each stitch across to ring (14 revscs), sl st in center of ring, do not turn.
Next Petal :
Working in unused back loops (blo) of previous petal, sc in first sc changing color to B (see Special Stitches), hdc in next hdc, 2 hdc in next hdc, dc in next hdc, 2 dc in next dc, htr in next dc, 2 htr in next dc, tr in next htr, 2 tr in next htr, tr in next htr, leave remaining 4 sts unused; Do not turn, working back in the other direction, revsc in the flo of each stitch across to ring (last stitch will be in prev color), sl st in ring, do not turn.
Info :
Repeat "Next Petal" instructions for 10 more Petals. Change to color C for third Petal, then alternate colors A, B, and C around for a total of 12 petals.
Info :
Fold First Petal down so wrong (or back) side of petal is facing you. Join last Petal to unused loops of beginning chain on First Petal with sl sts worked across, inserting hook in from wrong side of first petal through both layers. Finish off all three colors.
— Square Pattern Notes :
Infos :
If loops are getting too loose when working only into the back loop, pull up on ridge of revscs. This will pull up the front loops they were worked into, tightening back loops so the holes do not seem as big. The back loop of the last treble on each petal may be difficult to find unless you used stitch markers. However, you can use any loop at the top of that stitch that works for you, just be consistent.
— Square Pattern :
Info :
Worked into back loops of the trs that at the ends of each Petal.
Round 1 :
Working into any of the color A Petals, join color D with a sc in blo of third unused tr (stitch before marker), *ch 2, sc in unused blo of next tr of same petal (see pattern notes), sk to next Petal, tr in same back loop as last tr worked into next Petal, [dc in blo of next tr, hdc in blo of next tr, sc in blo of last 2 trs, sk to next Petal, dc in same back loop as last tr worked into next Petal] 2 times, dc in blo of next tr, hdc in blo of next tr**, sc in blo of next tr; Rep from *2 more times; Rep from * to ** once, join with sl st in first sc – 60 sts and 4 ch-2 sps.
Round 2 :
Ch 2 (does not count as a st here and throughout), dc in first sc, *(2 dc, ch 1, 2 dc) in ch-2 sp, dc in next 2 sts, hdc in next 2 sts, sc in next 7 sts, hdc in next 2 sts**, dc in next 2 sts; Rep from * 2 more times; Rep from * to ** once, dc in last st, join with sl st in first dc – 76 sts and 4 ch-1 sps.
Round 3 :
Ch 2, dc in first 3 dc, *(2 dc, ch 1, 2 dc) in ch-1 sp, dc in next 5 sts, hdc in next 3 sts, sc in next 3 sts, hdc in next 3 sts, **, dc in next 5 sts; Rep from * 2 more times; Rep from * to ** once, dc in last 2 dc, join with sl st in first dc. Finish off color D – 92 sts and 4 ch-1 sps.
Round 4 :
Join color B with sl st in second dc of prev rnd, ch 2, dc in same dc as join, *3 tr in next dc, dc2tog (see Special Stitches), hdc2tog (see Special Stitches), [dc in next st, 3 tr in next st, dc in next st, hdc in next st, sc in next st, hdc in next st] 3 times**, dc in next dc; Rep from * 2 more times; Rep from * to ** once, join with sl st in first dc. Finish off color B – 120 sts.
Round 5 :
Join color C with sc in second tr of prev rnd, 2 sc in same tr, *sc in each of next 5 sts, [3 sc in next tr, sc in next 2 sts, sc3tog (see Special Stitches), sc in next 2 sts] 3 times**, 3 sc in next tr; Rep from * 2 more times; Rep from * to ** once, join with sl st in first sc. Finish off color C – 128 sts.
Round 6 :
Join color A with sc in second sc of prev rnd, *hdc in next sc, dc in next sc, (dc, tr) in next sc, 2 tr in next sc, (tr, dc) in next sc, dc in next sc, hdc in next sc, [sc in next sc, hdc in next sc, dc in next sc, tr3tog (see Special Stitches), dc in next sc, hdc in next sc] 3 times**, sc in next sc; Rep from * 2 more times; Rep from * to ** once, join with sl st in first sc. Finish off color A – 116 sts.
Round 7 :
Join color D with sc in first sc of prev rnd, sc in next 4 sts, 2 sc in next tr, ch 2, 2 sc in next tr, *sc in next 27 sts, 2 sc in next tr, ch 2, 2 sc in next tr; Rep from * 2 more times, sc in next 22 sts, join with sl st in first sc. Finish off color D and weave in all ends – 128 sts. Note: If your block is not quite 12", you can add additional rounds of sc, or replace Rnd 7 with hdc or dc around, adding a couple additional stitches at each corner.
Info :
Find Moogly's blog post about the Pinwheel Square here and everything you need to know about the Moogly2019CAL here! Go back and find the previous three squares and check back at Moogly every week for a new Square design from a new designer. I cannot wait to see what colors you have chosen. Have fun!
This Pinwheel Square is a delightful, textured addition to any blanket or home project, showcasing swirling petals and crisp color work. Its raised edges and playful pinwheel design make it a standout square for gifting or decorating. Try a set of squares in coordinating palettes to make a striking blanket or use as individual accents around the home. 🧶✨