About This Pixie pocket Pouch Pattern
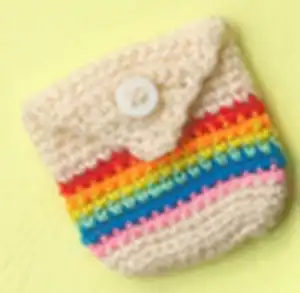
This pattern creates a small pocket pouch worked from the bottom up with colorful stripe rounds and a buttoned flap. It is worked in joined rounds then a continuous spiral and finishes with a small cover flap worked in rows. The pattern is perfect for using up scraps and makes a pretty, practical handmade gift.
Includes full materials list, abbreviations, and step-by-step rounds and rows. Great for practicing consistent tension and color changes with fingering weight yarn.
Why You'll Love This Pixie pocket Pouch Pattern
I absolutely love this pattern because it is quick to make and so satisfying to see the colorful stripes appear. I enjoy how little yarn it uses, making it a perfect scrap-busting project. I also love the simple construction — the pouch is worked in rounds with an easy flap worked in rows, so it is very approachable. The finished pouch is practical and adorable, and I get excited sharing it as a handmade gift or small organizer.
Switch Things Up
I love experimenting with different color combinations in this pattern; try pastels for a soft look or bold brights for a playful finish.
You can make a miniature keychain pouch by using thinner yarn and a smaller hook to scale the project down.
If you want a chunkier pouch, use a bulkier yarn and a larger hook to create a sturdier, more squishy version.
I often add a lining with lightweight fabric for extra strength and a more finished interior—sew it in before attaching the flap.
Try switching the sequence of stripe colours or use variegated yarn for a blended stripe effect that requires no color changes.
For a different closure, replace the button and hole with a loop and decorative toggle or a snap fastener for quick access.
I sometimes embellish the flap with embroidery or beads to personalize a pouch for gift-giving or special occasions.
Consider making matching sets in different sizes to hold notions, earphones, or coin purses—vary yarn weight to create the size range.
Use metallic or sparkly yarn for one of the stripe rounds to add a subtle shimmer that catches the light.
Experiment with adding a small strap or chain to turn the pouch into a wristlet or bag charm for extra portability.
Common Mistakes & How to Fix Them
✗ Skipping the chain one at the beginning of rounds and rows and counting it as a stitch; remember the chain one does not count as a stitch and should not be included in your stitch counts.
✗ Not joining rounds correctly early on which can distort the base shape; always sl st to join at the end of joined rounds and check your stitch counts after each join.
✗ Changing colours without weaving or securing ends can lead to messy edges; fasten off neatly or carry yarn carefully and weave in ends as you change colours.
✗ Failing to end the body on the corner you want can flip the pouch front/back; follow the note and finish on the corner before the side you want to be the front to position the flap correctly.


