🧢 Beautiful ✨ Detailed πŸ’ Adorable

Planter Amigurumi Pattern

Planter Amigurumi Pattern
4.7β˜… Rating
12-15 Hours Time Needed
2.1K Made This
βœ‚οΈ

Intermediate Level

Ideal for those with basic crochet experience, featuring slightly more advanced stitches and techniques to expand your skills.

⏱️

Multi-Day Project

A rewarding 12+ hour journeyβ€”perfect for dedicated crafters who love detailed work.

🧸

Cute Companion

An adorable friend to cherish, handcrafted with love to bring comfort and joy for years to come.

About This Planter Amigurumi Pattern

This pattern creates charming little planter amigurumi characters with a variety of plants and facial details. It includes full instructions for pots, plant pieces (sunflower, cactus, succulents, venus fly trap), and character details (cow, polar bear, spider). You can make no-sew or sew-together versions and customize colors and eyes.

Planter Amigurumi Pattern crochet pattern - detailed view of completed project

Clear rounds and part-by-part instructions guide you through shaping, color changes, and finishing. Perfect for making gifts or a whimsical set of decorative planters.

Why You'll Love This Planter Amigurumi Pattern

I absolutely love this pattern because it brings playful personality to small home decor with easy-to-customize plant tops. I enjoy designing separate plant pieces so you can mix and match stems, leaves, and faces for endless combinations. The pattern includes options for no-sew assembly or sewn pieces to suit your preference. Working on tiny, detailed pieces always feels rewarding to me β€” especially when adding facial details and little props.

Planter Amigurumi Pattern step 1 - construction progress Planter Amigurumi Pattern step 2 - assembly progress Planter Amigurumi Pattern step 3 - details and accessories Planter Amigurumi Pattern step 4 - final assembly and finishing

Switch Things Up

I love how versatile this pattern is for customization! You can change yarn colors to create entirely new characters β€” try pastel palettes for a soft nursery look or bright neons for a playful shelf display.

To make the planters larger or smaller, change your yarn weight and adjust your hook size accordingly. Using bulky yarn with a larger hook will make chunky, cuddly planters while a finer yarn makes tiny keychain versions.

I often add embroidery details like freckles, eyelashes, or little mouths to deepen personality β€” small surface stitches can dramatically change the expression of each face.

You can swap out safety eyes for embroidered eyes or buttons for different looks; embroidered eyes are great for child-safe toys and will give a softer aesthetic.

Try making mix-and-match plant tops: attach a sunflower to a spider pot or create a succulent on the cow pot for unexpected combinations that are delightful.

For more poseability, add pipe cleaners or thin wire into stems or legs so they can bend and hold shapes β€” this is great for display options or playful posing.

Consider adding tiny accessories like crocheted hats, scarves, or a removable felt leaf to give each planter a seasonal theme or holiday-ready style.

If you want a no-sew version, follow the no-sew instructions for legs and join pieces during the crocheting process; this can speed up assembly and create a cleaner look.

Experiment with different eye sizes and placement to change the perceived size and personality of each planter β€” wide-set eyes often read as more whimsical and surprised.

I also enjoy grouping multiple planters in a small tray as a themed set (desert succulents, spooky spiders, sunny flowers) β€” this makes an adorable gift set or market display.

Common Mistakes & How to Fix Them

βœ— Skipping stitch markers at the start of each round can make rounds difficult to track; use a stitch marker at the beginning of every round to keep your place. βœ— Forgetting to check stitch counts after increases or decreases can cause the pot to distort; count your stitches at the end of each round and correct any mistakes immediately. βœ— Overstuffing the pot or plant pieces will make seams bulge and parts hard to sew together; stuff gradually with small amounts of fiberfill until the desired shape is reached. βœ— Attaching eyes or features too early may shift with stuffing and shaping; place and pin eyes between the recommended rounds and check placement before final sewing. βœ— Not fastening off or leaving long tails for sewing can complicate assembly; always leave a long tail when instructed to make sewing parts together easier. βœ— Working too tightly on small pieces like ears and noses makes shaping difficult; relax your tension slightly on small parts for smoother sewing and shaping.

Planter Amigurumi Pattern

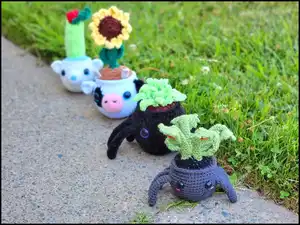
Make a collection of adorable planter amigurumi characters with this detailed crochet pattern. You will create tiny pots with cute faces and a variety of plants β€” from succulents to sunflowers and cacti. The pattern includes multiple plant options, clear part instructions, and assembly tips so you can customize each planter to your liking.

Intermediate 12-15 Hours

Materials Needed for Planter Amigurumi Pattern

β€” Main Fabric

  • 01
    Worsted weight yarn (#4), approximately 75g of main color per planter
  • 02
    Accent colors: approximately 25g total for plant tops and details
  • 03
    Bulky yarn option for plush versions (adjust hook accordingly)
  • 04
    Assorted colors for sunflowers, succulents, cactus, leaves, and noses

β€” Tools Required

  • 01
    Crochet hook size 3.25mm (D) for worsted weight
  • 02
    Crochet hook size 3.75mm (F) for bulky yarn (optional)
  • 03
    Safety eyes: 16mm for worsted, 21mm for bulky spider, 24mm for cow, 20mm for polar bear (as listed)
  • 04
    Scissors
  • 05
    Yarn needle for sewing
  • 06
    Stitch markers
  • 07
    Polyester fiberfill stuffing
  • 08
    Wooden dowel or cake dowel for stems (optional)
  • 09
    Pipe cleaner (optional for shaping legs or stems)
  • 10
    Pins for assembly

Progress Tracker

0% Complete

β€” Pot :

Info :

Crocheted from bottom to top. For the spider, if you want to attach the legs as you work, make the legs first (pg.4). The cow color changes are located below.

Round 1 :

Make 8 sc into a magic ring = 8

Round 2 :

Increase in each st around = 16

Round 3 :

(sc, inc) x 8 = 24

Round 4 :

(3 sc, inc) x 6 = 30

Round 5 :

(4 sc, inc) x 6 = 36

Round 6 :

BLO sc in each st around

Round 7 :

sc in each st around

Round 8 :

(5 sc, inc) x 6 = 42

Round 9 :

sc in each st around

Round 10 :

(6 sc, inc) x 6 = 48

Info :

*for the spider, the no sew version: Round 14: 2 sc, (work 3 sc on the leg and pot, sc) x 4, 11 sc, (work 3 sc on the leg and pot, sc) x 4, 3 sc

Rounds 11-16 :

sc in each st around

Info :

For spiders: Place eyes between rounds 14 and 15, leaving 8 holes apart. For Cow: Place eyes between rounds 14 and 15, leaving 10 holes apart. For Polar Bear: Place eyes between rounds 14 and 15, leaving 10 holes apart.

Round 17 :

(6 sc, dec) x 6 = 42

Round 18 :

(5 sc, dec) x 6 = 36

Round 19 :

sc in each st around

Round 20 :

FLO ch 1, hdc in each st around
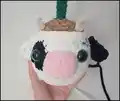
Info :

F/O

β€” Cow Pot :

Round 12 :

White: 20 sc, Black: 3 sc, White: 25 sc

Round 13 :

White: 19 sc, Black: 7 sc, White: 22 sc

Round 14 :

White: 19 sc, Black: 7 sc, White: 22 sc

Round 15 :

White: 19 sc, Black: 6 sc, White: 23 sc

Round 16 :

White: 20 sc, Black: 5 sc, White: 23 sc

Round 17 :

White: (6 sc, dec) x 2, 5 sc, Black: sc, dec, White: (6 sc, dec) x 3 = 42

β€” Spider Legs (Make 8) :

Round 1 :

Make 7 sc into a magic ring = 7

Rounds 2-12 :

sc in each st around

Info :

Do not stuff the legs (if you want, add a pipe cleaner into the legs for some shaping). Fold the legs in half and sc the opening closed. F/O and leave a long tail for sewing if you did not want to make the no sew version.

β€” Polar Bear Ears (Make 2) :

Round 1 :

Make 6 sc into a magic ring = 6

Round 2 :

Increase in each st around = 12

Round 3 :

(sc, inc) x 6 = 18

Round 4 :

sc in each st around

Round 5 :

(sc, dec) x 6 = 12

Info :

Do not stuff the ears. Fold the ears in half and sc the opening closed. F/O and leave a long tail for sewing.

β€” Dirt on Pot :

Info :

Attach dirt colored yarn to back loops of round 20

Round 1 :

(4 sc, dec) x 6 = 30

Info :

*for the cow the round will make the horns: Dirt color: 4 sc, dec, 3 sc, Horn Color: Ch 4, inc3 in 2nd ch from hook, hdc in next ch, dc in next ch, Dirt Color: sc, dec, 4 sc, dec, 2 sc, Work a horn, Dirt color: 2 sc, dec, (4 sc, dec) x 2 = 30

Round 2 :

(3 sc, dec) x 6 = 24

Round 3 :

(2 sc, dec) x 6 = 18

Round 4 :

(sc, dec) x 6 = 12

Round 5 :

dec x 6 = 6

Info :

If you are making the cow, do not F/O! If you are not making the cow, F/O and sew the hole closed.

Change to green :

Rounds 1-18: sc in each st around

Info :

Insert a wooden dowel or something similar inside the stem. F/O and sew the hole closed.

β€” Polar Bear Nose :

Round 1 :

Make 6 sc into a magic ring = 6

Round 2 :

Increase in each st around = 12

Round 3 :

(sc, inc) x 6 = 18

Rounds 4-5 :

sc in each st around

Info :

Place 18 mm nose between rounds 1 and 2. F/O and leave a long tail for sewing.

β€” Cow Ears (Make 2) :

Round 1 :

Make 6 sc into a magic ring = 6

Round 2 :

Increase in each st around = 12

Round 3 :

(sc, inc) x 6 = 18

Info :

Skip 4 st, sl st in next st. Sl st across the top to give the ear a pinched look. F/O and leave a long tail for sewing.

β€” Cow Nose :

Info :

With Pink: Ch 4

Round 1 :

inc in 2nd ch from hook, sc, inc3. Working on the opposite side of the chain: 3 sc = 9

Round 2 :

inc x 2, 2 sc, inc x 3, sc, inc = 15

Round 3 :

(sc, inc) x 2, 2 sc, (sc, inc) x 3, 2 sc, inc = 21

Rounds 4-5 :

sc in each st around

Info :

F/O and leave a long tail for sewing.

β€” Sunflower :

Round 1 :

With Brown: Make 5 sc into a magic ring = 5

Round 2 :

Increase in each st around = 10

Round 3 :

(sc, inc) x 5 = 15

Round 4 :

(2 sc, inc) x 5 = 20

Round 5 :

(3 sc, inc) x 5 = 25

Change :

Change to Yellow

Round 6 :

(Ch 5, sc in 2nd ch from hook, hdc in next ch, dc in next ch, tr in next ch, Sl st in next 2 st) around

Info :

F/O and leave a long tail for sewing.

β€” Sunflower Leaf #1 :

Info :

With Green: Ch 7

Round 1 :

Dc + tr in 3rd ch from hook, sc in last ch, 2 tr in next ch, 2 dc in next ch, Hdc in next ch

Info :

F/O and leave a long tail for sewing

β€” Sunflower Leaf #2 :

Info :

With Green: Ch 7

Round 1 :

Sc in 3rd ch from hook, Hdc in next ch, 2 dc in next ch, 2 tr in next ch, tr + dc in last ch

Info :

F/O and leave a long tail for sewing

β€” Spider Succulent :

Info :

Attach green yarn with a sl st in between rounds 2 and 3.

Instruction :

*Ch 7. 1. sl st in 2nd ch from hook, sc in next ch, hdc in next ch, dc in next 2 chains, tr in next ch, sl st in next 2 stitches.* Repeat from * to * around until you get to the middle of the pot.

β€” Venus Fly Trap :

Stem (Make 4) Round 1 :

With Green: Make 6 sc into a magic ring = 6

Stem Rounds 2-16 :

sc in each st around

Info :

Do not stuff the stems. If you want, place a cake dowel in the stem. F/O and leave a long tail for sewing.

Trap (Make 4 in red, 4 in green) :

Starting with Red: 1. Make 6 sc into a magic ring = 6. 2. Increase in each st around = 12. Do not F/O the green! Place back sides of green and red pieces together.

Trap Round 3 :

With green: (sc, inc) x 6 = 18

Trap Round 4 :

(2 sc, inc) x 6 = 24

Trap Round 5 :

(ch 3, sl st in same st, sl st in next 2 st) around

Info :

F/O and leave a long tail for sewing

Leaves (Make 3) :

Ch 15. 1. sc in 2nd ch from hook, 2 hdc, 2 dc, 4 tr, 2 dc, 2 hdc, inc in last ch. Working on the opposite side of the chain: sc, 2 hdc, 2 dc, 4 tr, 2 dc, 2 hdc, sc. F/O and leave a long tail for sewing.

β€” Polar Bear Cactus :

Info :

With Green: Ch 20

Round 1 :

sc in 2nd ch from hook and across = 19

Rounds 2-16 :

BLO Ch 1, turn, sc in each st across

Info :

F/O and leave a very long tail for sewing

Berries (Make 2) Round 1 :

With red: Make 6 sc into a magic ring = 6

Berries Round 2 :

Sc in each st around

Berries Round 3 :

Dec x 3 = 3

Info :

Sew the berry closed. F/O and leave a long tail for sewing

β€” Holly Leaves (Make 2) :

Info :

With green: Ch 10

Round 1 :

sc in 2nd ch from hook, sc, hdc, dc, dc-inc, dc, hdc, sc, inc3 in last ch

Round 1 (opposite side) :

Working on the opposite side of the chain: sc, hdc, dc, dc-inc, dc, hdc, sc, sl in last st

Round 2 :

sc, *ch 3, sl st in same st*, 4 sc, *to*, 4 sc, *to*, 2 sc, *to*, 4 sc, *to*, 3 sc, sl st to 1st st

Info :

F/O and leave a long tail for sewing

β€” Assembly :

Head :

1. Pin the cow nose onto the front of the pot between the eyes. Sew the nose onto the pot. Embroider 2 nostrils. 2. Pin the ears onto the side of the pot. Sew the ears onto the pot. 3. Pin the polar bear nose onto the front of the pot. Sew the nose onto the pot. 4. Pin the ears onto the side of the polar bear pot. Sew the ears onto the pot.

Spider :

1. If you chose not to work the spider legs into the pot, pin the legs onto the side of the spider pot. 2. Sew the legs onto the side of the pot. 3. Embroider the face onto the spider if you would like.

Plants :

1. For the cow: Pin the leaves onto the bottom of the stem. Sew the leaves onto the stem. 2. Pin the flower onto the top of the stem. Sew the flower onto the stem. 3. Sew the cactus together in a tube. Stuff the cactus. Sew the top of the cactus together. 4. Sew the cactus onto the top of the pot. Sew the holly berry onto the top of the cactus. 5. For the venus fly trap: Sew the stems onto the top of the pot. Fold the trap in half and sew the back to give it a closed look. Sew the trap onto the top of the stem. Sew the leaves onto the top of the pot.

Assembly Instructions

  • Pin the cow nose onto the front of the pot between the eyes, sew the nose onto the pot, and embroider two nostrils for detail.
  • Pin and sew the ears onto the sides of each pot (cow and polar bear), adjusting placement to match photos and maintain symmetry.
  • If you did not crochet spider legs into the pot, pin the completed legs onto the spider pot, then sew them securely into place.
  • Insert a wooden dowel or similar inside stems (when instructed) for support, then sew stems and plant pieces to the top of the pot ensuring even placement.
  • Sew cactus pieces together in a tube, stuff the cactus, sew the top closed, then attach the cactus and any berries to the top of the pot.
  • Pin all plant leaves and flowers before sewing to check placement and achieve a balanced look across the top of the pot.

Important Notes

  • πŸ’‘Do not join rounds unless stated; work in a continuous spiral for smoother amigurumi shaping.
  • πŸ’‘Use a stitch marker to mark the beginning of each round to keep track of rounds and avoid losing your place.
  • πŸ’‘All stitches are worked in both loops unless stated otherwise in the pattern (BLO or FLO will be specified).
  • πŸ’‘Place safety eyes between the recommended rounds and check spacing before securing them permanently.

This whimsical Planter Amigurumi pattern invites you to create tiny plant pals with lots of personality. Mix and match plants, faces, and colors to build a whole collection of adorable pots. Perfect for gifting or brightening your own shelf β€” happy stitching and have fun customizing! 🌱🧢

You ask,

we answer.

FAQs

What size will the finished piece be?

The finished planter measures approximately 6 inches from bottom to top (depending on the plant) when using worsted weight yarn and a 3.25 mm hook.

Can I use different yarn weights for this pattern?

Yes, you can use different yarn weights but this will change the final size and appearance; use an appropriate hook for your chosen yarn and be aware eye sizes and stitch counts may need adjusting.

Do I need prior crochet experience for this pattern?

This pattern is rated intermediate, so basic crochet stitches and familiarity with increases, decreases, and working in spirals are recommended.

How long does this project typically take to complete?

This project typically takes 12-15 hours depending on which plant pieces you make and how many planters you create; it is a multi-day project for most crocheters.