🧢 Beautiful ✨ Detailed πŸ’ Adorable

Plush Booties with Pompoms Pattern

Plush Booties with Pompoms Pattern
4.7β˜… Rating
2-3 Hours Time Needed
2.0K Made This
βœ‚οΈ

Beginner Friendly Level

Perfect for those just starting their crochet journey, with clear instructions and simple techniques

⏱️

Bite-Sized Project

Finishes in 2-4 hoursβ€”perfect for an afternoon of creative relaxation.

🧣

Snug Essential

Everyday comfort with practical charm, designed for both functionality and style through changing seasons.

About This Plush Booties with Pompoms Pattern

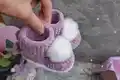
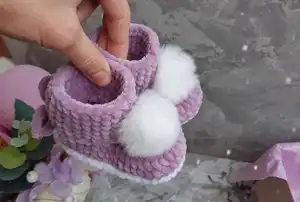
This pattern creates a pair of plush baby booties with pompom embellishments using super-bulky velvet yarn. You will crochet the sole, build up the sides, shape the front muzzle, add a cuff, and finish with sewn pompoms and ties. The instructions are photo-assisted and friendly for crocheters who know basic single crochet, increases, and decreases.

Plush Booties with Pompoms Pattern crochet pattern - detailed view of completed project

Suitable for small sizes (8-13 cm) depending on your hook and tension. Follow the step-by-step rounds exactly to achieve the cute, structured bootie shape.

Why You'll Love This Plush Booties with Pompoms Pattern

I absolutely love this pattern because it turn out so soft and cuddly thanks to the velvet yarn. I enjoy the quick progress you get when working with super-bulky yarn and how fast a finished pair appears. The pompom detail adds an instant cute factor that delights both makers and recipients. I also cherish how adaptable the pattern is β€” small tweaks to chain length or hook size make it simple to customize the size.

Plush Booties with Pompoms Pattern step 1 - construction progress Plush Booties with Pompoms Pattern step 2 - assembly progress Plush Booties with Pompoms Pattern step 3 - details and accessories Plush Booties with Pompoms Pattern step 4 - final assembly and finishing

Switch Things Up

I love customizing these booties by changing yarn color combinations; try two contrasting colors for the sole and cuff to make each pair pop.

I sometimes make the pompom smaller or larger depending on the look I want; experimenting with 3.5 cm or 5 cm pompoms can change the style dramatically.

I often use a smaller hook (3.5 mm) for a denser fabric and a slightly larger hook (4 mm) for a softer, stretchier cuff β€” adjust to suit your tension.

I will change the foundation chain count by 1 or 2 when I want a slightly longer or shorter foot; remember that each extra chain affects the final length noticeably.

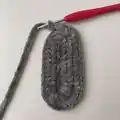
I occasionally replace the ties with a ribbon threaded through the heel for a different finish and easier adjustment for parents.

I recommend adding a tiny non-slip sole by sewing on fabric dots or using puffy paint on the bottom if the booties will be worn on slippery floors.

I sometimes add embroidered hearts or initials on the side for a personalized gift touch that makes each pair unique.

I like to line the cuff with a soft fabric for extra structure and durability when making sizes for older babies or toddlers.

I have made a matching set by crocheting a small hat or mitts in the same yarn and colorway to create a lovely gift bundle.

I encourage you to play with texture by using different yarn types for the sole (a sturdier yarn) while keeping the plush velvet for the upper bootie to combine durability and softness.

Common Mistakes & How to Fix Them
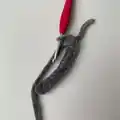
βœ— Making a foundation chain that is too short or too long can ruin the fit; follow the recommended chain length (10-18) and adjust in small increments to match your desired size. βœ— Using inconsistent tension when working with super-bulky velvet yarn will create uneven edges and shapes; keep your tension steady and practice a swatch before starting the sole. βœ— Skipping the instruction to weave in the yarn tail in the foundation chain can create a visible loose edge; always weave the tail into the first stitches on the chain as directed.
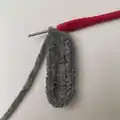
 βœ— Forgetting to mark the middle when folding for the muzzle will give uneven shaping; fold the bootie and place stitch markers on both sides to find the exact middle before crocheting. βœ— Not singeing or securing the tie ends can cause fraying over time; carefully singe the ends with a lighter as instructed and secure them when attaching for durability.

Plush Booties with Pompoms Pattern

Create cozy plush baby booties with fluffy pompoms using super-bulky velvet yarn. This pattern guides you step-by-step from the sole to finishing ties so you can make adorable, wearable booties. Perfect for gifting or keeping little feet warm, the soft texture and pompom detail make these a charming project to crochet and personalize.

Beginner Friendly 2-3 Hours

Materials Needed for Plush Booties with Pompoms Pattern

β€” Main Fabric

  • 01
    Super Bulky / Super Chunky / 14ply velvet yarn - Himalaya Dolphin Baby (100g/120m) - main color (amount depends on size, approx 50-100g)
  • 02
    Super Bulky / Super Chunky / 14ply velvet yarn - Yarn Art Dolce (100g/120m) - contrast color (approx 25-50g)
  • 03
    Pompoms - faux fur or yarn pompoms size 3.5-5 cm (2 pcs.)

β€” Tools Required

  • 01
    Crochet hook 3.5 mm (recommended) or 4.0 mm
  • 02
    Pompoms size 3.5-5 cm (2 pcs.)
  • 03
    Needle and strong sewing thread for sewing pompoms
  • 04
    Scissors
  • 05
    Lighter to singe tie ends
  • 06
    Stitch markers
  • 07
    Yarn needle for weaving ends

Progress Tracker

0% Complete

β€” Note :

Info :

According to this pattern, booties will be from 8 to 13 cm. The size of booties depends on the crochet density and on the hook size, as well as on the number of chain of the foundation chain. I do not recommend to make a chain less than 10 and more than 18 chains!

Info :

My booties are on a leg up to 10 cm (when using hook size 3.5 mm when making ch14).

Info :

For larger booties, I have another pattern.

β€” Materials :

Info :

Super Bulky/Super Chunky/14ply velvet yarn Himalaya dolphin baby (100g/120m) or Yarn Art Dolce (100g/120m) of 2 colors. Crochet hook (I used 3.5 mm or 4 mm). Pompoms size 3.5-5 cm (2 pcs.). Needle, scissors, strong sewing thread for sewing pompoms. Lighter, stitch markers.

β€” Abbreviations :

Infos :

MR - magic ring. ch - chain. sc - single crochet. sl st - slip stitch. inc - increase (2 sc in one stitch). dec - decrease (2 sc together). sc8tog - crochet 8 sc together.

β€” Start crocheting from the sole :

Round 1 :

ch14. Starting on the second chain from the hook: 12 sc; 4 sc in the last chain; on the other side of the chain: 11 sc (weave in the yarn tail into the stitches); inc in the first chain (29)

Round 2 :

12 sc, 4 inc, 11 sc, 2 inc (35)

Round 3 :

Sc, inc, 9 sc, (sc, inc)*4, 12 sc, inc, 2 sc, inc, sl st (42)

Info :

Cut the yarn. The sole is ready.

β€” Change color and work in back loops :

Round 4 :

attach the yarn to the heel and crochet around with sc in back loops (42 sc)

Round 5-6 :

42 sc (42)

β€” Crochet the front part of the bootie (muzzle) :

Round 7 :

Fold the bootie in half. Then in half again. With a hook find the middle and mark it with stitch markers on both sides. And crochet this part from marker to marker. IMPORTANT: you may get a different number of stitches, I have 22sc. Just crochet this part alternating sc and dec.

Info :

I have: (sc, dec)*7, sc (15)

Round 8 :

ch1, crochet decreases along the inner side to the end of row (7 dec and 1sc) - you can have another number of decreases. (8)

Round 9 :

ch1, sc8tog.

β€” Go to the top of the bootie :

Round 10-16 :

sc around (7 rounds) (25)

Info :

Crochet the sole around with sl st in front loops.

Info :

Now sew on pompoms:

Ties (make 2) :

Ch65. Singe the ends with a lighter and attach it to the booties as shown in the photo, using a hook, threading through 1 stitch and tying it on a bow on the heel.

Info :

That's all, your booties are ready! Thank you for crocheting with me! I will be very pleased if you share the result of your work) for me it is very important

Assembly Instructions

  • Sew pompoms to the front top of each bootie using a strong sewing thread and needle, positioning them centered on the muzzle area.
  • Attach the ties by threading each ch65 tie through one stitch on the heel with a hook, then tie into a bow on the outside of the heel for a decorative finish.
  • Weave in all yarn ends securely into the inside of the bootie to hide tails and prevent unraveling before giving to a baby.
  • Pin and align both booties together when finishing to ensure pompoms and ties are positioned evenly and symmetrically on each shoe.
  • If desired, lightly singe the ends of the ties with a lighter to prevent fraying and ensure a neat, finished look.

Important Notes

  • πŸ’‘Make the foundation chain between 10 and 18 chains; chains outside this range are not recommended for this pattern.
  • πŸ’‘Use stitch markers to mark the middle before crocheting the muzzle to ensure even shaping and matching sides.
  • πŸ’‘Work the color change on the sole by attaching the new yarn at the heel and crocheting into the back loops to create a neat edge.
  • πŸ’‘Cut and secure yarn tails and weave them into stitches as you go to keep the inside tidy and avoid bulky seams during assembly.

These Plush Booties with Pompoms are a quick delightful make that leaves you with an adorable wearable keepsake. The velvet yarn creates a plush, snuggly texture perfect for little feet. Add pompoms and ties for that charming finishing touch. πŸ§ΆπŸ‘£

You ask,

we answer.

FAQs

What size will the finished piece be?

According to the pattern, booties will be from 8 to 13 cm depending on crochet density, hook size, and foundation chain length.

Can I use different yarn weights for this pattern?

Yes, you can use different yarn weights, but this will change the final size; adjust the foundation chain and hook size accordingly to achieve the desired measurement.

Do I need prior crochet experience for this pattern?

This pattern is beginner friendly, so basic knowledge of single crochet, increases, and decreases is sufficient to complete these booties.

How long does this project typically take to complete?

Most crocheters finish this project in about 2-3 hours, though time may vary based on experience level and yarn choice.