🧢 Beautiful ✨ Detailed πŸ’ Adorable

Plush Booties with Pompoms Pattern

Plush Booties with Pompoms Pattern
4.1β˜… Rating
2-3 Hours Time Needed
1.5K Made This
βœ‚οΈ

Intermediate Level

Ideal for those with basic crochet experience, featuring slightly more advanced stitches and techniques to expand your skills.

⏱️

Bite-Sized Project

Finishes in 2-4 hoursβ€”perfect for an afternoon of creative relaxation.

πŸ‘•

Casual Chic

Relaxed style with a modern twist, perfect for everyday wear while maintaining that handcrafted uniqueness.

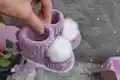
About This Plush Booties with Pompoms Pattern

This pattern creates a pair of plush baby booties with decorative pompoms using super bulky velvet yarn. The design includes a worked sole, a back-loop color change, and shaping for a snug muzzle and cuff. Clear step-by-step instructions and photos help you follow each stage effortlessly. The finished booties are soft, warm, and perfect for gifting.

Plush Booties with Pompoms Pattern crochet pattern - detailed view of completed project

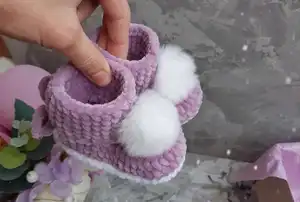
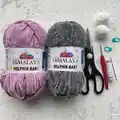
The pattern works with 100g/120m velvet yarn (Dolphin Baby or Yarn Art Dolce) and uses a 3.5–4 mm hook. Youll get full stitch counts for each step and simple finishing instructions to attach pompoms and ties.

Why You'll Love This Plush Booties with Pompoms Pattern

I absolutely love this pattern because it turns plush velvet yarn into irresistibly soft booties that look professionally made. I enjoy how quick the sole and upper come together, giving a satisfying result in just a few hours. The addition of pompoms adds a playful finishing touch that always makes people smile. As a maker, I appreciate the clear stitch counts which make shaping predictable and easy to reproduce.

Plush Booties with Pompoms Pattern step 1 - construction progress Plush Booties with Pompoms Pattern step 2 - assembly progress Plush Booties with Pompoms Pattern step 3 - details and accessories Plush Booties with Pompoms Pattern step 4 - final assembly and finishing

Switch Things Up

I love customizing these booties by switching yarn colors for the sole and cuff to create contrasting or striped looks.

I sometimes use a softer pastel palette for newborn gifts or bright bold colors for toddler pairs to make them pop.

If you want a smaller pair, I make the foundation chain shorter (but never less than 10) and check gauge as I go.

To make a larger, chunkier version I use bulky yarn with a larger hook and increase the starting chain within the recommended limit.

I often replace store pompoms with handmade yarn pompoms for a cozy, handcrafted finish and coordinate their color to the bootie cuff.

I add non-slip dots to the sole with fabric paint or hot glue for little walkers to improve safety and grip.

I sometimes embroider a tiny heart or initial on the side for a personalized baby shower gift or keepsake.

For a waterproof-ish sole I sew a thin fabric layer inside the bottom before finishing to protect delicate surfaces from wear.

I experiment with different tie styles: short toggles, ribbon ties, or elastic loops depending on how snug I want the fit to be.

I like to line the booties with a lightweight cotton fabric for extra warmth and to hide seams; it gives a neat inside finish.

For a festive version I attach tiny jingle bells instead of pompoms for holiday booties that jingle when the baby moves.

I recommend trying different pompom sizes (3.5–5 cm) to see which proportion you prefer, then adjust placement slightly toward the toe or more centered based on style.

Common Mistakes & How to Fix Them

βœ— Starting with the wrong chain length will produce an incorrectly sized bootie; follow the recommendation of ch14 for the sample and dont go below 10 or above 18 chains. βœ— Skipping back loop work when instructed will make the cuff too tight and miss the intended texture; change color and crochet in back loops as directed for the proper fit. βœ— Not marking the middle when folding the sole can cause uneven shaping for the muzzle; fold the bootie in half twice and place stitch markers before crocheting the front section. βœ— Pulling yarn tails too tight when weaving in can distort the sole shape and stitches; weave tails gently into the stitches and maintain even tension for a smooth finish.

Plush Booties with Pompoms Pattern

Make cozy plush baby booties with fluffy pompoms using super bulky velvet yarn. This pattern walks you through the sole, upper, and finishing steps with clear photos and stitch counts so you can craft a warm pair for little feet. Youll love the soft texture and easy shaping that make these booties both practical and adorable. Perfect as a handmade gift or a sweet nursery keepsake.

Intermediate 2-3 Hours

Materials Needed for Plush Booties with Pompoms Pattern

β€” Main Fabric

  • 01
    Super Bulky / Super Chunky / 14ply velvet yarn (Himalaya Dolphin Baby) 100g / 120m β€” main color (approx. 1 ball)
  • 02
    Super Bulky / Super Chunky / 14ply velvet yarn (Himalaya Dolphin Baby or Yarn Art Dolce) 100g / 120m β€” contrast color for sole and cuff (approx. 1 ball)
  • 03
    Pompoms size 3.5-5 cm (2 pcs) β€” white or matching color for decoration

β€” Tools Required

  • 01
    Crochet hook 3.5 mm (recommended)
  • 02
    Crochet hook 4.0 mm (alternative)
  • 03
    Pompoms size 3.5-5 cm (2 pcs)
  • 04
    Needle and strong sewing thread for sewing pompoms
  • 05
    Scissors
  • 06
    Lighter (to singe tie ends)
  • 07
    Stitch markers (to mark middle when folding)
  • 08
    Yarn needle for weaving in ends
  • 09
    Pins for positioning (optional)

Progress Tracker

0% Complete

β€” Sole :

Round 1 :

ch14. Starting on the second chain from the hook: 12 sc; 4 sc in the last chain; on the other side of the chain: 11 sc (weave in the yarn tail into the stitches); inc in the first chain ( 29)

Round 2 :

12 sc, 4 inc, 11 sc, 2 inc ( 35)

Round 3 :

Sc, inc, 9 sc, (sc, inc)*4, 12 sc, inc , 2 sc, inc, sl st (42) Cut the yarn. The sole is ready.

β€” Change color and work in back loops :

Round 4 :

attach the yarn to the heel and crochet around with sc in back loops (42 sc)

Round 5-6 :

42 sc (42)

β€” Crochet the front part of the bootie (muzzle) :

Info :

Fold the bootie in half. Then in half again. With a hook find the middle and mark it with stitch markers on both sides. And crochet this part from marker to marker. IMPORTANT: you may get a different number of stitches, I have 22sc. Just crochet this part alternating sc and dec.

Round 7 :

I have: (sc, dec)*7, sc (15)

Round 8 :

ch1, crochet decreases along the inner side to the end of row (7 dec and 1sc) - you can have another number of decreases. (8)

Round 9 :

ch1, sc8tog.

β€” Go to the top of the bootie :

Round 10-16 :

sc around (7 rounds) (25)

Info :

Crochet the sole around with sl st in front loops.

β€” Finish and Assembly :

Info :

Now sew on pompoms:

Item Name (P1) :

Sew pompoms securely to the front/top of each bootie as shown in the photos, using a needle and strong sewing thread.

Item Name (P2) :

Ties (make 2) Ch65. Singe the ends with a lighter and attach it to the booties as shown in the photo, using a hook, threading through 1 stitch and tying it on a bow on the heel.

Info :

That's all, your booties are ready! Thank you for crocheting with me! I will be very pleased if you share the result of your work) for me it is very important

Assembly Instructions

  • Sew each pompom to the top/front of the bootie securely using a strong sewing thread, stitching several times through the pompom knot to ensure it is well attached.
  • Make two ties by chaining 65, singe the ends with a lighter to prevent fraying, then thread each tie through one stitch on the heel and tie into a bow as shown in the photos.
  • Use stitch markers to mark the center when folding the sole and sew the front (muzzle) evenly between markers to ensure symmetric shaping.
  • Weave in all yarn ends neatly into the inside of the bootie using a yarn needle so they are hidden and secure.
  • Pin pieces in place before final sewing to check positioning of pompoms and ties, adjusting as needed for symmetry.

Important Notes

  • πŸ’‘According to this pattern, booties will be from 8 to 13 cm depending on crochet density, hook size, and foundation chain length.
  • πŸ’‘Do not make a foundation chain less than 10 or more than 18 chains; the sample uses ch14 for a leg up to 10 cm when using 3.5 mm hook.
  • πŸ’‘Change color and work in back loops as instructed for the cuff texture and proper fit.
  • πŸ’‘Fold the sole twice and mark the middle before crocheting the muzzle to ensure even decreases and symmetrical shaping.

Create these plush booties to keep tiny toes warm and adorable with every step. Handmade booties make thoughtful gifts for baby showers and newborn photos. The soft velvet yarn and fluffy pompoms add a luxurious, cozy finish youll love gifting and wearing. 🧢✨

You ask,

we answer.

FAQs

What size will the finished piece be?

According to the pattern, booties will be approximately 8 to 13 cm long depending on your crochet tension, hook size, and number of chains in the foundation; the sample uses ch14 and a 3.5 mm hook.

Can I use different yarn weights for this pattern?

Yes, you can use different yarn weights, but the final size will change; use a suitable hook for your chosen yarn and adjust the starting chain to fit (do not go under 10 or over 18 chains for this design).

Do I need prior crochet experience for this pattern?

This pattern is rated intermediate because it uses shaping, working in back loops, decreases, and finishing techniques; familiarity with single crochet, increases and decreases is recommended.

How long does this project typically take to complete?

Most crocheters finish a pair in about 2-3 hours, though time will vary with your experience and how quickly you sew on pompoms and ties.