🧶 Beautiful ✨ Detailed 💝 Adorable

Plush snuggler BUNNY Amigurumi Pattern

Plush snuggler BUNNY Amigurumi Pattern
4.8★ Rating
5-7 Hours Time Needed
2.7K Made This
✂️

Intermediate Level

Ideal for those with basic crochet experience, featuring slightly more advanced stitches and techniques to expand your skills.

⏱️

Weekend Treat

Takes 5-7 hours, making it an enjoyable project to finish over a couple of days.

🧸

Cute Companion

An adorable friend to cherish, handcrafted with love to bring comfort and joy for years to come.

About This Plush snuggler BUNNY Amigurumi Pattern

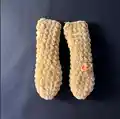
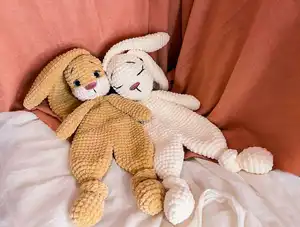
This pattern creates a plush, snuggly bunny approximately 41 cm (16") tall using plush chenille yarn. The design uses spiral amigurumi technique and includes full instructions for legs, body, arms, head, ears, tail, and facial embroidery. It's perfect for gifting or keeping as a soft cuddle buddy.

Plush snuggler BUNNY Amigurumi Pattern crochet pattern - detailed view of completed project

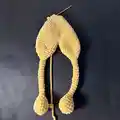
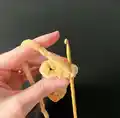
Worked in a continuous spiral, the bunny has large floppy ears and knotted feet for a charming finish. The pattern includes clear placement notes for safety eyes and embroidered details.

Why You'll Love This Plush snuggler BUNNY Amigurumi Pattern

I absolutely love this pattern because it transforms simple plush yarn into an irresistibly soft companion that children and adults both adore. I enjoy the balance of shaping and assembly — the long legs and floppy ears give the bunny character while remaining straightforward to crochet. The pattern lets me be creative with color placement for the muzzle and face, which makes every bunny unique. Sewing and embroidery bring the toy to life, and I always feel proud finishing a cuddly friend ready to be loved.

Plush snuggler BUNNY Amigurumi Pattern step 1 - construction progress Plush snuggler BUNNY Amigurumi Pattern step 2 - assembly progress Plush snuggler BUNNY Amigurumi Pattern step 3 - details and accessories Plush snuggler BUNNY Amigurumi Pattern step 4 - final assembly and finishing

Switch Things Up

I love to change colors to create different personalities — try a two-tone muzzle or contrasting ear tips to make each bunny unique.

I sometimes swap the plush yarn for a bulky chenille alternative to get a slightly firmer but still super-soft finish.

If you want a mini version, use a thinner yarn and a smaller hook to create a keychain-sized bunny.

For a more durable toy suitable for babies, skip safety eyes and embroider the eyes and features with dark yarn instead.

I often add little crocheted accessories like a scarf or tiny hat to match seasons or make the bunny gift-ready.

Try sewing in a small bell or a lavender sachet inside the body for sensory interest or calming scent (ensure secure closure).

Change the eye placement or eyebrow angle when embroidering to give the bunny a sleepy, surprised, or curious expression.

You can add posable wire to the arms for display versions, or leave them soft and floppy for cuddly playmates.

Mix yarn textures — plush body with cotton muzzle or felt details — to make interesting tactile contrasts.

I like to personalize each bunny with a small embroidered initial or heart on the foot or chest for a thoughtful keepsake.

Experiment with knotting or braiding the foot ties for different finishing looks — small bows, knots, or tucked tails all look cute.

For gifting, make a matching set with different-sized bunnies using the same pattern scaled by yarn/hook changes for a sweet family of snugglers.

Common Mistakes & How to Fix Them

✗ Skipping stitch counting during increases causes incorrect stitch totals; count each round and mark repeats to ensure accurate shaping. ✗ Forgetting to stuff at the right moments creates lumps or flattened areas; add filler gradually and shape as you go for an even finish. ✗ Using a hook that is too large makes the plush stitches loose and the stuffing show through; use the recommended hook size or go down a size for tighter stitches. ✗ Not securing the safety eyes or embroidery properly risks loosening with play; place safety eyes between the specified rounds and hide or knot ends securely when embroidering.

Plush snuggler BUNNY Amigurumi Pattern

Create a soft, huggable Plush Snuggler Bunny with this complete crochet pattern. You will make a cuddly 41 cm (16") snuggler using plush chenille yarn and simple amigurumi techniques. Clear round-by-round instructions guide you through legs, body, arms, head, ears, tail, and finishing touches so you can stitch a lovable companion to treasure.

Intermediate 5-7 Hours

Materials Needed for Plush snuggler BUNNY Amigurumi Pattern

— Main Fabric

  • 01
    Wolans Yarns BUNNY BABY plush yarn 100g / 120m (131 yds) shade 100-18 (main color) - 2 skeins if using two colors
  • 02
    Wolans Yarns BUNNY BABY plush yarn 100g / 120m (131 yds) shade 100-02 (secondary color for head) - small amount for head
  • 03
    If making the toy in one color: 2 skeins of Wolans BUNNY BABY (100g / 120m)
  • 04
    Yarn analogues: Yarn Art DOLCE (100g / 120m), Premier Yarns PARFAIT CHUNKY (100g / 120m), Katia BAMBI (100g / 120m), King Cole YUMMY (100g / 120m), Universal Yarn BELLA CHENILLE (100g / 120m), Cygnet JELLY CHUNKY CHENILLE (100g / 120m) - use any plush yarn of the same weight

— Tools Required

  • 01
    Crochet hook 4 mm (G6)
  • 02
    Toy filling or scraps fabric or yarn for stuffing
  • 03
    Stitch markers
  • 04
    Tapestry needle
  • 05
    Scissors
  • 06
    Thread for sewing details
  • 07
    Rose thread or pink thread for embroidery nose
  • 08
    16 mm toy safety eyes OR dark thread for embroidery eyes

Progress Tracker

0% Complete

— LEGS (make 2) :

Info :

Use the main color yarn. Magic ring.

Round 1 :

6sc inside MR (6)

Round 2 :

6inc (12)

Round 3 :

(1sc, inc) x6 (18)

Round 4-6 :

18sc (18)

Round 7 :

(4sc, dec) x3 (15)

Round 8 :

(3sc, dec) x3 (12)

Info :

Add some filler.

Round 9 :

(2sc, dec) x3 (9)

Round 10 :

(1sc, dec) x3 (6)

Rounds 11-25 :

6sc (6)

Round 26 :

(1sc, inc) x3 (9)

Round 27 :

(2sc, inc) x3 (12)

Round 28 :

(3sc, inc) x3 (15)

Round 29 :

(4sc, inc) x3 (18)

Round 30 :

(5sc, inc) x3 (21)

Round 31 :

(6sc, inc) x3 (24)

Rounds 32-36 :

24sc (24)

Info :

Cut the yarn. Make the second leg in the same way, but don’t cut the thread at the end.

— BODY :

Assembling round 1 :

join the 2nd leg with 1st leg (insert hook and make sc in the point where stitch 24 of the last round ended), 23sc of 1st leg, join with the leg 2 (insert hook and make sc in the point where stitch 24 of last round ended), 23sc of 2nd leg (48)

Rounds 2-5 :

48sc (48)

Round 6 :

(6sc, dec) x6 (42)

Rounds 7-8 :

42sc (42)

Round 9 :

(5sc, dec) x6 (36)

Rounds 10-11 :

36sc (36)

Round 12 :

(4sc, dec) x6 (30)

Rounds 13-14 :

30sc (30)

Round 15 :

(3sc, dec) x6 (24)

Rounds 16-17 :

24sc (24)

Round 18 :

(2sc, dec) x6 (18)

Rounds 19-20 :

18sc (18)

Round 21 :

(1sc, dec) x6 (12), sl st.

Info :

Cut the yarn. Make knots on the legs.

— ARMS (make 2) :

Info :

Use the main color yarn. Magic ring.

Round 1 :

6sc inside MR (6)

Round 2 :

(1sc, inc) x3 (9)

Round 3 :

(2sc, inc) x3 (12)

Rounds 4-6 :

12sc (12)

Round 7 :

10sc, dec (11)

Round 8 :

9sc, dec (10)

Rounds 9-16 :

10sc (10)

Info :

Fold and crochet the edges together 5sc. Cut the yarn.

Info :

Make the second arm in the same way in rounds 1-6.

Round 7 :

dec, 10sc (11)

Round 8 :

dec, 9sc (10)

— HEAD :

Info :

Start with secondary color yarn. Magic ring.

Round 1 :

6sc inside MR (6)

Round 2 :

6inc (12)

Round 3 :

(1sc, inc) x6 (18)

Round 4 :

(2sc, inc) x6 (24)

Round 5 :

(3sc, inc) x6 (30)

Round 6 :

(4sc, inc) x6 (36)

Rounds 7-8 :

36sc (36)

Info :

Change yarn to the main color.

Rounds 9-15 :

36sc (36)

Info :

If you use the safety eyes, attach them between rounds 10 and 11 (leave 8 stitches between the eyes).

Round 16 :

(4sc, dec) x6 (30)

Round 17 :

(3sc, dec) x6 (24)

Info :

Fill the head with filler.

Round 18 :

(2sc, dec) x6 (18)

Round 19 :

(1sc, dec) x6 (12)

Info :

Add more filler to the head.

Round 20 :

6dec (6)

Info :

Cut the yarn, pull the hole. Hide the end of the thread inside the head.

— EARS (make 2) :

Info :

Use the main color yarn. Magic ring.

Round 1 :

6sc inside MR (6)

Round 2 :

(1sc, inc) x3 (9)

Round 3 :

(2sc, inc) x3 (12)

Round 4 :

(3sc, inc) x3 (15)

Round 5 :

(4sc, inc) x3 (18)

Round 6 :

(5sc, inc) x3 (21)

Round 7 :

(6sc, inc) x3 (24)

Rounds 8-14 :

24sc (24)

Round 15 :

(6sc, dec) x3 (21)

Rounds 16-17 :

21sc (21)

Round 18 :

(5sc, dec) x3 (18)

Rounds 19-20 :

18sc (18)

Round 21 :

(4sc, dec) x3 (15)

Rounds 22-23 :

15sc (15)

Round 24 :

(3sc, dec) x3 (12)

Rounds 25-26 :

12sc (12)

Info :

Fold and crochet the edges together 6sc. Cut the yarn.

— TAIL :

Info :

Use the main color yarn. Magic ring.

Round 1 :

6sc inside MR (6)

Round 2 :

6inc (12)

Round 3 :

12sc (12)

Round 4 :

(2sc, dec) x3 (9)

Info :

Cut the yarn.

— FINISHING THE TOY :

Step 1 :

Sew the head to the body. Sew the arms to the body, leave 4 stitches between the arms. Sew the tail to the back.

Step 2 :

Sew the ears to the head between rounds 17 and 18.

Step 3 :

Embroider the nose with pink thread between rounds 8 and 9. I got a nose 5 stitches wide. You can use any yarn you have (plush or cotton or acrylic). Hide the end of the thread inside the head.

Step 4 :

Embroider the nose, the eyelashes and the brows with dark thread.

Info :

If you don’t use the safety eyes, embroider the eyes, the nose and the brows with dark thread.

Step 5 :

Tighten the muzzle with the thread of the main color. 1 -> 2 -> 3 -> 4 -> 5 -> 6 -> 7 -> 8

Assembly Instructions

  • Sew the head to the body, aligning the bottom of the head with the top opening of the body and secure with even whipstitches around the neck.
  • Attach the arms to the body leaving 4 stitches between them, sew firmly through the body rounds to prevent loose arms.
  • Sew the tail to the center back of the body, positioning it just above the leg join for a natural look.
  • Place and sew the ears to the head between rounds 17 and 18, matching left and right for symmetry.
  • Embroider the nose between rounds 8 and 9 and add eyelashes and brows with dark thread as shown for expression; hide all thread ends inside the head.

Important Notes

  • 💡Work in a spiral without joining rounds (spiral way) and use a stitch marker to mark the start of each round for accuracy.
  • 💡Stuff gradually during shaping to maintain a smooth, even silhouette and avoid overstuffing the head or limbs.
  • 💡Secure safety eyes before stuffing or embroider eyes if making for a baby, and always hide knots and thread ends inside the toy.

This Plush Snuggler Bunny is designed to become a cherished bedtime companion, soft and full of personality. Handcrafted with plush chenille yarn, it makes a perfect gift for little ones and a cozy addition to any nursery. Enjoy the mindful process of creating a cuddly friend and personalize it with color choices and embroidery for a special finish. 🧶🐰

You ask,

we answer.

FAQs

What size will the finished piece be?

The finished plush bunny measures approximately 41 cm / 16" tall when using the recommended plush yarn and 4 mm hook.

Can I use different yarn weights for this pattern?

Yes, you can use different yarn weights but the final size will change; adjust your hook size accordingly and expect differences in texture and drape.

Do I need prior crochet experience for this pattern?

This pattern is rated intermediate, so basic amigurumi knowledge—single crochet, increases, decreases, and sewing—is recommended.

How long does this project typically take to complete?

Most crocheters complete this project in 5-7 hours, though time can vary based on experience, yarn choice, and assembly complexity.