🧢 Beautiful ✨ Detailed πŸ’ Adorable

Pusheen Cat with Ice Cream Amigurumi Pattern

Pusheen Cat with Ice Cream Amigurumi Pattern
4.6β˜… Rating
5-7 Hours Time Needed
2.6K Made This
βœ‚οΈ

Intermediate Level

Ideal for those with basic knitting experience, featuring slightly more advanced stitches and techniques to expand your skills.

⏱️

Weekend Treat

Takes 5-7 hours, making it an enjoyable project to finish over a couple of days.

🧸

Cute Companion

An adorable friend to cherish, handcrafted with love to bring comfort and joy for years to come.

About This Pusheen Cat with Ice Cream Amigurumi Pattern

This amigurumi pattern recreates the beloved Pusheen cat holding a colorful ice cream cone, with clear step-by-step rounds and helpful assembly directions. The pattern uses DK and sport weight yarns and is worked in continuous spiral rounds for a smooth finish. Includes simple decorative details like stripes, embroidered sprinkles, and a tiny cherry on top.

Pusheen Cat with Ice Cream Amigurumi Pattern crochet pattern - detailed view of completed project

Head and body are crocheted in one piece; other parts are made separately and sewn on. Great for gifting and for practice on shaping and color changes.

Why You'll Love This Pusheen Cat with Ice Cream Amigurumi Pattern

I love how quickly this pattern brings Pusheen to life β€” the rounds are satisfying and the little ice cream details are so fun to embroider. I find the continuous spiral technique keeps the shaping neat and makes assembly simple and enjoyable.

Pusheen Cat with Ice Cream Amigurumi Pattern step 1 - construction progress Pusheen Cat with Ice Cream Amigurumi Pattern step 2 - assembly progress Pusheen Cat with Ice Cream Amigurumi Pattern step 3 - details and accessories Pusheen Cat with Ice Cream Amigurumi Pattern step 4 - final assembly and finishing

Switch Things Up

I enjoyed the playful detail work on this Pusheen pattern and I found the striping and ice cream embroidery especially fun to customize.

I recommend experimenting with slightly different colors for the ice cream scoop to create seasonal or themed variations.

I often change safety eye sizes to give different expressions; smaller eyes give a cuter look while larger eyes can look more cartoonish.

I also like to add a little weighted base when I want the figure to be more stable on shelves or desks.

I suggest practicing the invisible decrease on scrap yarn if you're not used to it β€” it really helps keep shaping neat.

I usually embroider the sprinkles with a contrasting thread for a pop of color that stands out on the rosΓ© scoop.

I find leaving long sewing tails saves time during assembly and ensures stronger attachments when sewing on limbs and ears.

I sometimes tweak the tail stripe pattern to make a longer or shorter tail depending on my yarn left over.

I recommend blocking stripes flat before sewing them on if your yarn tends to curl; it makes placement easier.

I hope you have fun personalizing this Pusheen and creating a sweet little companion to brighten your day.

Common Mistakes & How to Fix Them

βœ— Skipping stitch markers during continuous spiral rounds can cause miscounted stitches; use a marker at the last stitch of each round and move it up as you go. βœ— Not stuffing gradually will produce lumps or misshapen areas; stuff little by little and shape as you add filling. βœ— Forgetting to leave long yarn tails on parts to be sewn makes assembly fiddly; always leave a longer tail for sewing and finishing. βœ— Changing colors without securing yarn ends can create loose tails; fasten off and leave a tail or carry yarn neatly to avoid gaps.

Pusheen Cat with Ice Cream Amigurumi Pattern

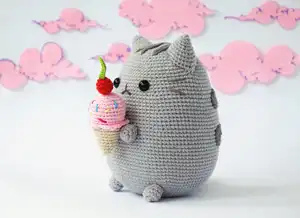
Create an adorable Pusheen holding a whimsical ice cream cone with this clear and delightful amigurumi pattern. The design includes head, body, ears, tail, striped back patches, tiny feet/hands, a cute ice cream scoop with sprinkles and a cherry. Perfect for gifting or keeping as a sweet handmade companion, this pattern walks you through every round and finishing detail.

Intermediate 5-7 Hours

Materials Needed for Pusheen Cat with Ice Cream Amigurumi Pattern

β€” Main Fabric

  • 01
    Dark grey yarn (for stripes and details)
  • 02
    Light grey yarn (main body color)
  • 03
    For ice cream: light brown (cone), rosΓ© (ice cream scoop), red (cherry), green (cherry stalk)
  • 04
    Yarn strength: DK / light worsted (number 3) for main body: approx. 100-150 g light grey
  • 05
    For ice cream and cherry: sport/baby yarn (number 2), less than 50 g of each accent color

β€” Tools Required

  • 01
    Embroidery thread: black or dark grey for nose and mouth
  • 02
    Embroidery needle
  • 03
    Pin-needles
  • 04
    Stitch markers (use a stitch marker in the last stitch of each round, moving it up as you go)
  • 05
    Safety eyes: 12 mm
  • 06
    Crochet hook: EU 4 / 2.5 mm (use hook size recommended to achieve gauge)
  • 07
    Yarn needle
  • 08
    Scissors
  • 09
    Stuffing

Progress Tracker

0% Complete

β€” Head/Body :

With light grey yarn

R1 :

6 sc in magic ring (6)

R2 :

2 sc in each stitch around (12)

R3 :

(1 sc, inc) x6 (18)

R4 :

(2 sc, inc) x6 (24)

R5 :

(3 sc, inc) x6 (30)

R6 :

(4 sc, inc) x6 (36)

R7 :

(5 sc, inc) x6 (42)

R8 :

(6 sc, inc) x6 (48)

R9 :

(7 sc, inc) x6 (54)

R10 :

(8 sc, inc) x6 (60)

R11 :

(9 sc, inc) x6 (66)

R12 :

(10 sc, inc) x6 (72)

R13 :

(11 sc, inc) x6 (78)

R14 :

(12 sc, inc) x6 (84)

R15 :

(13 sc, inc) x6 (90)

R16 :

(14 sc, inc) x6 (96)

R17-30 :

(14 rounds): sc around (96)

R31 :

14 sc, invdec (90)

R32-35 :

(4 rounds): sc around (90)

R36 :

(13 sc, invdec) x6 (84)

R37-40 :

(4 rounds): sc around (84)

R41 :

(12 sc, invdec) x6 (78)

R42-43 :

(2 rounds): sc around (78)

R44 :

(11 sc, invdec) x6 (72)

R45-48 :

(4 rounds): sc around (72)

R49 :

(10 sc, invdec) x6 (66)

Info :

Add safety eyes between round 42 and 43. With 11 stitches in between. Stuff as you go.

R50 :

(9 sc, invdec) x6 (60)

R51 :

(8 sc, invdec) x6 (54)

R52 :

(7 sc, invdec) x6 (48)

R53 :

(6 sc, invdec) x6 (42)

R54 :

(5 sc, invdec) x6 (36)

R55 :

(4 sc, invdec) x6 (30)

R56 :

(3 sc, invdec) x6 (24)

R57 :

(2 sc, invdec) x6 (18)

R58 :

(1 sc, invdec) x6 (12)

R59 :

invdec around (6)

Info :

To close the last round, cut yarn, leaving a yarn end. With a yarn-needle go into outer loops from inside out, pull tight to close hole.

β€” Ears (2x) :

With light-grey

R1 :

6 sc in magic ring (6)

R2 :

(1 sc, inc) x3 (9)

R3 :

sc around (9)

R4 :

(1 sc, inc) x3, 3 sc (12)

R5 :

(1 sc, inc) x6 (18)

R6 :

sc around (18)

R7 :

(1 sc, inc) x6, 6 sc (24)

R8 :

sc around (24)

R9 :

(2 sc, inc) x6, 6 sc (30)

Info :

Cut yarn. Keep a longer yarn tail for sewing. The side with the increases will later be at the outer edge of the head and the side without will be on the inner side.

β€” Stripes on the back :

With dark-grey

Smaller stripe - R1 :

ch 26, beginning in second ch from hook 25 sc, ch1, turn

Smaller stripe - R2 :

25 sc, ch 1, turn

Smaller stripe - R3 :

25 sc, (inc) x3, 22 sc, (inc) x3, slst (60)

Bigger stripe - R1 :

ch 29, beginning in second ch from hook 28 sc, ch 1, turn

Bigger stripe - R2 :

29 sc, ch 1, turn

Bigger stripe - R3 :

27 sc, (inc) x3, 26 sc, (inc) x3, 1 sc, slst (67)

Info :

Cut yarn. Leave a long piece of yarn to sew the stripes to the back later.

β€” Tail :

With dark-grey

R1 :

6 sc in magic ring (6)

R2 :

2 sc in each stitch around (12)

R3-4 :

sc around (12)

Color change to light-grey :

R4-7 (4 rounds): sc around (12)

Change to dark-grey :

R7-10 (4 rounds): sc around (12)

Change to light-grey :

R11-14 (4 rounds): sc around (12)

Change to dark grey :

R15-18 (4 rounds) sc around (12)

Info :

Stuff tail. Hold both sides of the last round together. Slst across to close the tail. Cut yarn, leaving a yarn end for sewing on the body later.

β€” Hands/Feet (x4) :

R1 :

6 sc in magic ring (6)

R2 :

2 sc in each stitch around (12)

R3-4 :

sc around (12)

R5 :

(1 sc, invdec) x3, 3 sc (9) Stuff.

β€” Ice Cream :

With rosΓ© yarn

R1 :

6 sc in magic ring (6)

R2 :

2 sc in each stitch around (12)

R3 :

(1 sc, inc) x6 (18)

R4 :

(2 sc, inc) x6 (24)

R5 :

(3 sc, inc) x6 (30)

R6-10 :

(5 rounds): sc around (30)

R11 :

(3 sc, invdec) x6 (24)

R12 :

in FLO: [hdc + sc]* x3, slst in next stitch, skip one stitch] repeat around *in same stitch

R13 :

in BLO sc around (24)

Color change to brown :

R14-15: Sc around (24)

R16 :

(3 sc, invdec) x5 (20)

R17 :

sc around (20)

R18 :

(2 sc, invdec) x5 (16)

R19 :

sc around (16)

Info :

Stuff icecream.

R20 :

(1 sc, invdec) x5 (10)

R21 :

sc around (10)

R22 :

invdec around (5)

Info :

Cut yarn, hide yarn end. Embroider sprinkles.

β€” Cherry :

With red yarn

R1 :

6 sc in magic ring (6)

R2 :

2 sc in each stitch around (12)

R3-4 :

sc around (12)

R4 :

invdec around (6)

Info :

Close last round

With green yarn :

Ch 11, beginning in second ch from hook slst 10. Fasten off. Sew stalk to cherry. Sew cherry on ice cream.

β€” Assembly :

Assembly :

Sew on ears, tail and feet. Position the tail and feet so that the cat can stand.

Assembly :

Sew on stripes, the smaller stripe on top. Embroider on hair, by taking the yarn double and going over each stripe twice.

Assembly :

Embroider on nose/mouth with dark grey/black yarn between the eyes. Embroider on whiskers.

Assembly :

Then position the ice cream and sew on the hands to the body. Sew ice cream to the hands.

Assembly Instructions

  • Sew ears onto the top outer edge of the head, placing the side with increases to the outside edge.
  • Attach tail to the lower back using the yarn tail left when closing the tail; position so the cat can stand upright.
  • Sew stripes to the back using long yarn tails, placing the smaller stripe above the bigger stripe.
  • Position and sew hands to the sides of the body, then sew the ice cream cone to the hands securely.
  • Embroider hair lines over the stripes (go over each stripe twice), embroider nose/mouth between eyes, and add whiskers using dark grey thread.

Important Notes

  • πŸ’‘This pattern is worked in continuous spiral rounds; do not join with a slst unless instructed for pieces like stripes and stalk.
  • πŸ’‘Use a stitch marker in the last stitch of each round and move it up as you go to keep track of rounds accurately.
  • πŸ’‘Stuff parts gradually while crocheting to avoid lumps and to achieve smooth shaping.
  • πŸ’‘Leave longer yarn tails for sewing on ears and patches; it makes assembly and placement much easier.
  • πŸ’‘Embroider sprinkles and facial features after securing safety eyes and sewing parts in place to avoid shifting.

This delightful Pusheen with Ice Cream pattern brings a pop of sweetness to your handmade collection. The project is compact and charming, perfect for decorators, crafters, and gift-givers. 🐱🍦🧢 Enjoy stitching every adorable detail!

You ask,

we answer.

FAQs

What size will the finished Pusheen be?

The finished cat measures approximately 17 cm tall, depending on yarn and hook tension.

Can I use different yarn weights or hooks?

Yes β€” you can use other yarn weights, but the finished size will change. Use a hook one size smaller than usual for tighter amigurumi stitches if needed.

Where should I place the safety eyes?

Add safety eyes between rounds 42 and 43 of the head/body with 11 stitches in between, as the pattern instructs.

How do I close the last round smoothly?

Cut yarn leaving a tail, use a yarn needle to go through outer loops from inside out, and pull tight to close the hole; weave in the tail securely.