🧢 Beautiful ✨ Detailed πŸ’ Adorable

Potion Amigurumi Pattern

Potion Amigurumi Pattern
4.5β˜… Rating
5-7 Hours Time Needed
3.7K Made This
βœ‚οΈ

Intermediate Level

Ideal for those with basic crochet experience, featuring slightly more advanced stitches and techniques to expand your skills.

⏱️

Weekend Treat

Takes 5-7 hours, making it an enjoyable project to finish over a couple of days.

🧸

Cute Companion

An adorable friend to cherish, handcrafted with love to bring comfort and joy for years to come.

About This Potion Amigurumi Pattern

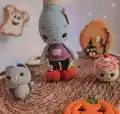
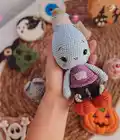
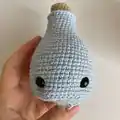
This pattern creates a sweet potion bottle amigurumi with tiny accessories like a pocket and pumpkin-style boots. It uses yarn art jeans colors and simple shaping to form a teardrop bottle head and body. Youll find clear round-by-round instructions and helpful assembly steps to finish the toy neatly.

Potion Amigurumi Pattern crochet pattern - detailed view of completed project

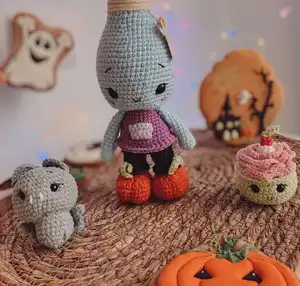
Designed for intermediate crocheters, it guides you through color changes and working into back or front loops. Includes needle sculpting tips and placement notes for eyes and facial embroidery.

Why You'll Love This Potion Amigurumi Pattern

I absolutely love this pattern because it transforms simple stitches into a whimsical bottle character that feels full of personality. I enjoy the combination of shaping techniques and small accessory details like the pocket and boot veins. I find the needle sculpting step brings the face to life and makes each piece uniquely expressive. I love sharing patterns that encourage small creative touches and allow makers to personalize colors and tiny decorations.

Potion Amigurumi Pattern step 1 - construction progress Potion Amigurumi Pattern step 2 - assembly progress Potion Amigurumi Pattern step 3 - details and accessories Potion Amigurumi Pattern step 4 - final assembly and finishing

Switch Things Up

I love customizing this pattern by swapping yarn colors to create different potion themes; try pastel tones for a dreamy look or jewel tones for mystical vibes.

I often change the boot color and add tiny embroidered symbols to make each potion character unique and themed for holidays.

You can make the toy larger or smaller by changing yarn weight and hook size; bulky yarn with a larger hook makes a chunky cuddly version, while fine yarn creates a mini keychain-sized version.

I sometimes replace safety eyes with embroidered eyes for a fully handmade, child-safe version that is perfect for babies or gifting.

I add tiny accessories like a crocheted bottle tag, mini cork, or little felt patches to personalize the character further and tell a story.

Try mixing textures by using a slightly fuzzy yarn for the body and smooth yarn for the clothes to add visual contrast and tactile interest.

I recommend experimenting with different facial expressions by moving the eye placement or changing the smile curve to give each potion a unique personality.

For a posable variant, I add a short length of wire inside the arms so I can pose them holding tiny props like a scroll or wand.

I also enjoy creating matching sets by varying one color across multiple potions so they look like a themed collection for display or gifting.

Dont be afraid to experiment with embroidery and small bead embellishments to create labels, potions names, or magical sparkles on the bottle.

Common Mistakes & How to Fix Them

βœ— Skipping stitch markers during rounds leads to losing your beginning-of-round position; place a marker at the start of every round and move it as you finish each round. βœ— Not stuffing evenly creates lumps and an uneven shape; stuff gradually, adding small amounts of fiberfill and shaping with a chopstick for even distribution. βœ— Changing colors without securing ends causes loose tails and unraveling; carry yarn up inside when possible or weave ends in securely after the round. βœ— Forgetting to count stitch increases or decreases will distort shaping; count your stitches after every increase/decrease round to ensure you have the correct total. βœ— Working too tightly when instructed to work into BLO or FLO makes the fabric too rigid; relax your tension slightly for loop-only rounds to maintain flexibility. βœ— Installing safety eyes in the wrong place will misplace facial features; measure between the specified rounds and stitches (between rounds 30-31, 13SC apart) before fastening eyes.

Potion Amigurumi Pattern

Make a charming potion bottle amigurumi with this friendly intermediate crochet pattern. Youll create a bottle-shaped character with sweet embroidered features, a tiny pocket, and playful pumpkin boots. The pattern includes step-by-step rounds, materials list, and assembly notes so you can finish a cute handmade toy to gift or keep.

Intermediate 5-7 Hours

Materials Needed for Potion Amigurumi Pattern

β€” Main Fabric

  • 01
    Yarn Art Jeans color 75 (main grey/blue) - use small amount
  • 02
    Yarn Art Jeans color 72 - body/contrast (use as needed)
  • 03
    Yarn Art Jeans color 85 - accent color (shirt/pocket) - use small amount
  • 04
    Yarn Art Jeans color 19 - boot orange - small amount
  • 05
    Yarn Art Jeans color 05 - dark (pants) - small amount
  • 06
    Black fine yarn for eyelashes embroidery - small scrap
  • 07
    10-12mm black plastic eyes - 2 pcs
  • 08
    Polyester stuffing - as needed for a 19cm toy

β€” Tools Required

  • 01
    Crochet hook size 1.75 mm
  • 02
    10-12 mm black plastic safety eyes (2 pcs)
  • 03
    Scissors
  • 04
    Needle for joining pieces and embroidering
  • 05
    Chopstick for stuffing
  • 06
    Pins for assembly
  • 07
    Stitch marker
  • 08
    Polyester stuffing

Progress Tracker

0% Complete

β€” Head :

Round 1 :

6SC INTO MR

Round 2 :

6INC (12)

Round 3 :

(1SC, INC)*6 (18)

Info :

WORK INTO BACK LOOPS ONLY

Round 4 :

18SC

Round 5-7 :

18SC

Info :

SWITCH TO BLUE YARN AND WORK INTO BACK LOOPS ONLY

Round 8 :

(2SC, INC)*6 (24)

Round 9-12 :

24SC

Round 13 :

(3SC, INC)*6 (30)

Round 14-15 :

30SC

Round 16 :

(4SC, INC)*6 (36)

Round 17 :

(5SC, INC)*6 (42)

Round 18 :

42SC

Round 19 :

(6SC, INC)*6 (48)

Round 20-21 :

48SC

Round 22 :

(7SC, INC)*6 (54)

Round 23-34 :

54SC

Round 35 :

(7SC, DEC)*6 (48)

Round 36 :

BLO (6SC, DEC)*6 (42)

Round 37 :

(5SC, DEC)*6 (36)

Round 38 :

(4SC, DEC)*6 (30)

Round 39 :

(3SC, DEC)*6 (24)

Info :

RETURN TO ROUND 8, WORK ACROSS THE FRONT LOOPS

Info :

INSTALL EYES BETWEEN ROUNDS 30-31, 13SC APART

β€” Legs and Body :

Round 1 :

CHAIN 7, STARTING TO THE 2ND ST FROM HOOK WORK 5SC, 4SC TO 1 ST, 4SC, INC (13)

Round 2 :

INC, 4SC, 4INC, 4SC, 2INC (22)

Round 3 :

1SC, INC, 4SC, (1SC, INC)*4, 4SC, (1SC, INC)*2 (29)

Round 4 :

2SC, INC, 4SC, (2SC, INC)*4, 4SC, (2SC, INC)*2 (36)

Round 5-7 :

36SC

Round 8 :

12SC, 6DEC HDC, 12SC (30)

Round 9 :

(3SC, DEC)*6 (24)

Round 10 :

3SC, DEC, (1SC, DEC)*5, 4SC (18)

Round 11 :

2SC, DEC, (4SC, DEC)*2, 2SC (15)

Info :

CHANGE YARN COLOR

Round 12 :

15SC

Info :

WORK INTO BACK LOOPS ONLY

Round 13 :

15SC

Round 14-17 :

15SC

Info :

RETURN TO ROUND 13 AND WORK 15DC

Info :

WORK 5SC ADDITIONALLY ACROSS THE SECOND LEG

Info :

CUT YARN ON THE SECOND LEG, BUT DO NOT BREAK YARN ON THE SECOND ONE, GO ON WORKING ACROSS LEG #1: 15SC AND THEN ACROSS LEG #2: 15SC

Round 19 :

(4SC, INC)*6 (36)

Round 20 :

36SC

Info :

CHANGE YARN COLOR

Round 21 :

36SC

Info :

WORK INTO BACK LOOPS ONLY

Round 22 :

36SC

Round 23-25 :

36SC

Round 26 :

(4SC, DEC)*6 (30)

Round 27 :

30SC

Round 28 :

(3SC, DEC)*6 (24)

Round 29-31 :

24SC

Info :

RETURN TO ROUND 22, WORK 36DC

β€” Arms :

Round 1 :

6SC INTO MR

Round 2 :

6INC (12)

Round 3 :

12SC

Round 4 :

10SC, DEC (11)

Round 5 :

9SC, DEC (10)

Round 6-14 :

10SC

Info :

A ROW THROUGH BOTH EDGES WORK

β€” Veins on the boots :

Info :

10CH, TURN AND STARTING TO THE 2ND ST FROM HOOK WORK 9 SL ST

β€” Pocket :

Row 1 :

5CH, TURN YOUR WORK

Row 2 :

INC, 2SC, INC (6SC) TURN YOUR WORK

Row 3 :

6SC

Info :

SEW IT ON THE BELLY

β€” Face assembly and finishing :

Info :

MAKE FACE NEEDLE SCULPTING, SEND YOUR NEEDLE FROM BELOW THE NECK TO THE PLACE UNDER ONE OF THE EYES, AND GO BACK DOWN 1 ST AWAY, PULL. REPEAT THE STEPS ABOVE FOR THE SECOND EYE. PULL AND TIE KNOTS

Info :

EMBROIDER BROWS AND A SMILE.

Assembly Instructions

  • Install safety eyes between rounds 30-31 on the head, spacing them 13 single crochet stitches apart before securing the backs.
  • Sew the head to the body by aligning the head opening with the top of the body and sew evenly using a yarn needle and whipstitch, stuffing as needed to shape the neck area.
  • Position arms on the sides of the body between appropriate rounds (about the top of the body tube) and sew firmly, use pins to check symmetry before stitching.
  • Attach legs at the bottom opening, spacing them evenly and sewing the base of each leg to the body for stable standing, tuck and weave ends neatly inside.
  • Sew the small pocket onto the belly area centered on the front, then embroider or attach any small decorative details per photos.
  • Use needle sculpting to define facial features by sending the needle beneath the neck to the spot under each eye, pulling lightly and tying secure knots; then embroider brows and smile.

Important Notes

  • πŸ’‘Use stitch markers to mark the beginning of rounds and keep track of increases and decreases for accurate shaping.
  • πŸ’‘Stuff gradually and evenly; use a chopstick to push stuffing into narrow sections and avoid overstuffing to maintain shape.
  • πŸ’‘Pin parts in place before sewing to ensure correct positioning and symmetry for arms, legs, and accessories.
  • πŸ’‘Work into BLO or FLO only when instructed to create defined edges or shaping in those rounds.
  • πŸ’‘The finished toy size with the recommended materials is about 19 cm; size will vary with tension and yarn weight.

This adorable Potion amigurumi is full of tiny details and personality that make it perfect for gifting or keeping as a cute decoration. The teardrop bottle head, tiny pocket, and pumpkin boots bring playful charm to every stitch. Finish it with embroidered brows and a smile for a lovable handmade companion. 🧢✨

You ask,

we answer.

FAQs

What size will the finished piece be?

The finished amigurumi measures about 19 cm tall when using the recommended yarn and 1.75 mm hook; size will vary with tension and yarn choice.

Can I use different yarn weights for this pattern?

Yes, you can use different yarn weights, but the final size will change; choose an appropriate hook and keep in mind the stitch counts will make a different scale.

Do I need prior crochet experience for this pattern?

This pattern is rated intermediate, so basic amigurumi experience, working in rounds, increases, decreases, and simple sewing skills are recommended.

How long does this project typically take to complete?

Most crocheters complete this project in 5-7 hours, though time may vary depending on experience, finishing details, and assembly steps.