About This Psyduck-Baby Amigurumi Pattern
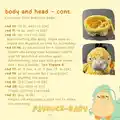
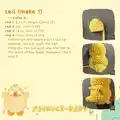
This pattern creates a squishy Psyduck-Baby amigurumi worked in plush yarn for a soft, tactile finish. You will crochet the body and head as one piece, then add wings, a beak, tail, and three little hair strands. The design uses simple increases, decreases, and a handful of shaping tricks to achieve the chubby look.

Includes full round-by-round instructions, a materials list, and clear assembly notes for accurate placement of eyes and features. Suitable for crafters comfortable with basic stitches and reading amigurumi rounds.
Why You'll Love This Psyduck-Baby Amigurumi Pattern
I absolutely love this pattern because the plush yarn makes Psyduck-Baby feel irresistibly soft and squeezable. I enjoy the simple but effective shaping that gives the character its chubby, adorable silhouette. The design is compact yet full of personality, with small details like the flattened feet and embroidered nose bringing it to life. I especially love how quick it is to make—perfect for gifting or making a little collection of pocket pals. Seeing the finished face always makes me smile, so I hope it makes you smile too.
Switch Things Up
I love changing colors to give each Psyduck a unique personality; try pastels for a softer look or bright neons for a playful twist.
If you want a bigger plush, use a bulkier plush yarn and a larger hook, which will give you a chunkier, cuddlier Psyduck-Baby.
For a mini keychain version, use thinner yarn and a smaller hook, then sew a small loop at the top for a keyring.
I often replace safety eyes with embroidered eyes or felt pieces for baby-safe toys—this makes the toy suitable for little ones.
Try adding tiny crocheted accessories like a scarf, hat, or tiny bow to personalize your Psyduck as a gift.
Embroider different eye shapes or mouth expressions to change the character's mood from confused to sleepy or happy.
You can applique small stripes or patches on the body by changing color mid-round to create a patterned Psyduck.
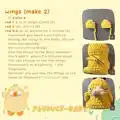
For posable wings, thread thin wire into the wing tails before sewing to the body, then bend gently for poses.
I also like to stuff less for a floppy, plushie feel or more for a firm, display-ready figure—experiment to find your preference.
Finally, mix yarn textures: use a boucle or fuzzy yarn for the body and a smooth yarn for details to create tactile contrast and visual interest.
Common Mistakes & How to Fix Them
✗ Skipping the 2nd loop on the foundation chain can distort the base shape; be sure to start in the 2nd loop from the hook as instructed.
✗ Forgetting to switch to Color B at the indicated round will result in mismatched feet; change colors exactly at Rnd 4 as the note specifies.
✗ Not inserting safety eyes at the recommended rounds causes misplacement of facial features; place safety eyes between rnd 15 and 16 about 5-6 stitches apart.
✗ Overstuffing the head or body makes shaping difficult and lumpy; stuff gradually and shape as you go to achieve a chubby but smooth profile.
✗ Closing the wings or beak openings will prevent correct sewing; leave the openings unclosed and do not stuff these pieces so they fold flat during assembly.