🧶 Beautiful ✨ Detailed 💝 Adorable

Pumpkiny Halloween Cat Amigurumi Pattern

Pumpkiny Halloween Cat Amigurumi Pattern
3.9★ Rating
3-5 Hours Time Needed
3.0K Made This
✂️

Intermediate Level

Ideal for those with basic crochet experience, featuring slightly more advanced stitches and techniques to expand your skills.

⏱️

Afternoon Project

Takes 3-5 hours, perfect for an afternoon or evening of relaxing crochet.

🐾

Pocket Pal

A mini friend to carry anywhere, providing comfort and companionship in a perfectly portable size.

About This Pumpkiny Halloween Cat Amigurumi Pattern

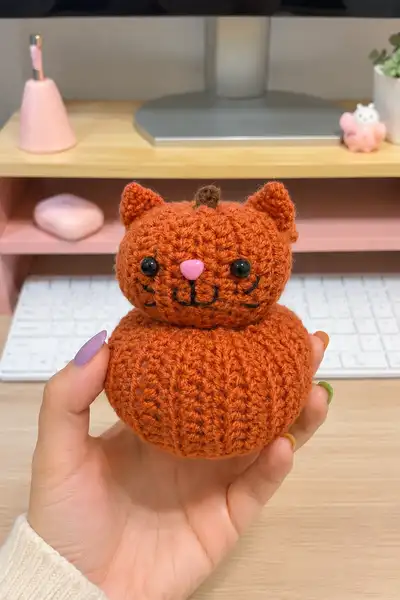
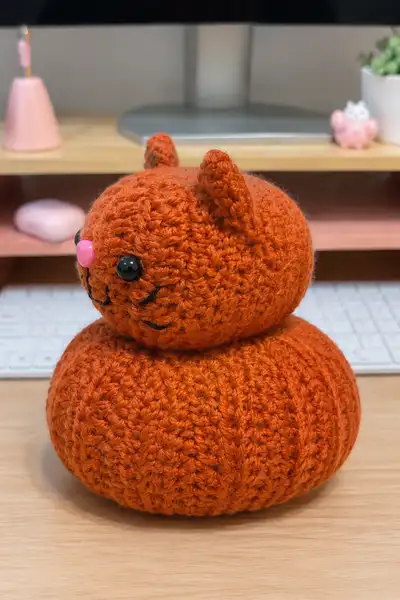
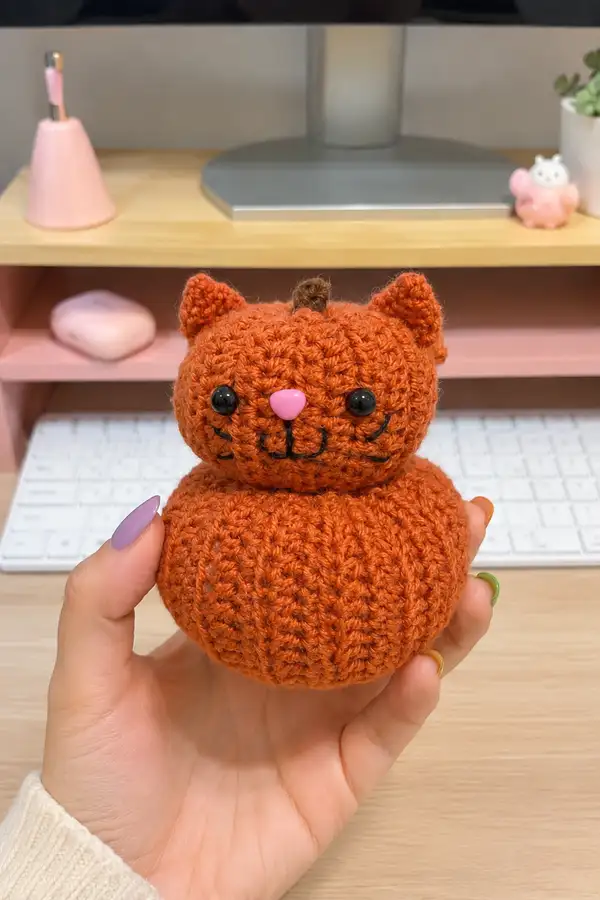
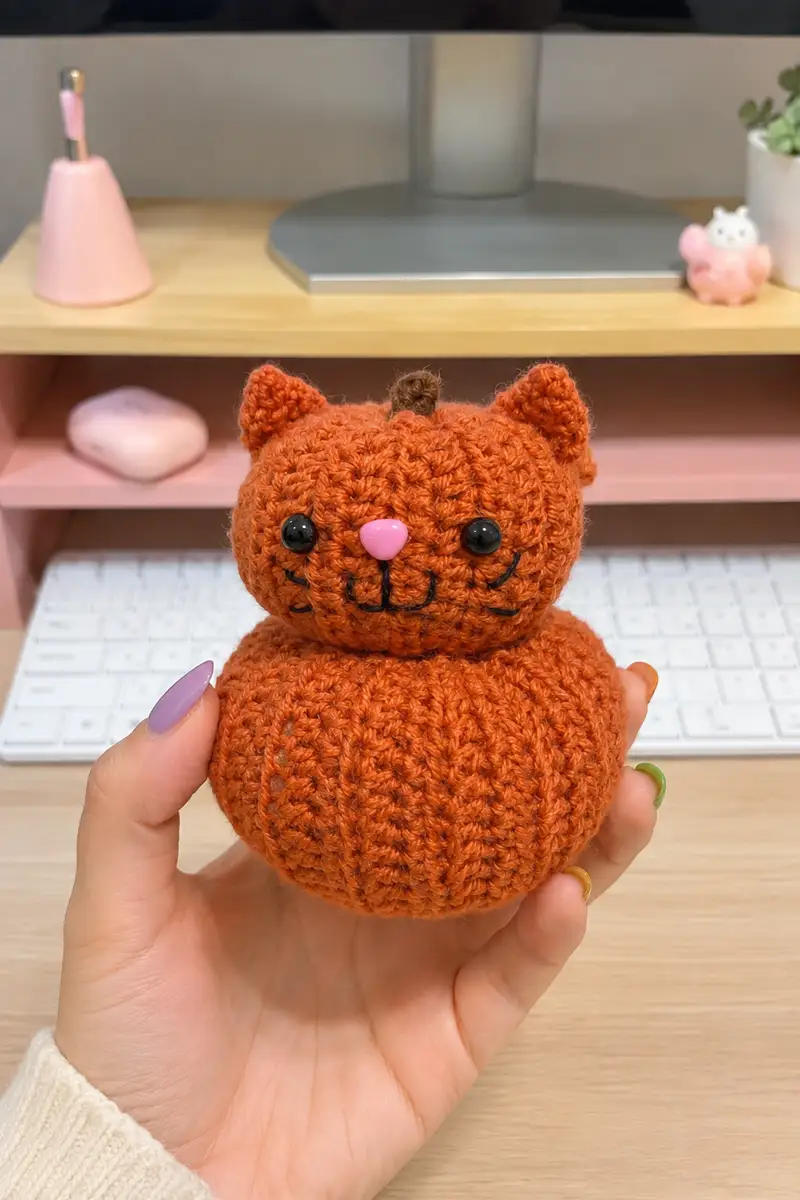
This pattern recreates the adorable orange pumpkin-cat shown in the images: a rounded, ribbed pumpkin base with a small, expressive cat head stacked on top. It uses worsted-weight yarn in a warm pumpkin orange, small black safety eyes, a pink plastic heart nose, and black embroidery for the whiskers and mouth. The pumpkin ribbing is achieved by working rounds in BLO and then surface lines for definition.

Pumpkiny Halloween Cat Amigurumi Pattern crochet pattern - detailed view of completed project

The design is compact and palm-sized with clear shaping to recreate the pumpkiny ribs and the cat's chubby head. It includes helpful tips for stuffing, eye placement, and creating a neat neck join so the head sits firmly on the pumpkin base.

Why You'll Love This Pumpkiny Halloween Cat Amigurumi Pattern

I love this pattern because it turns a simple amigurumi head-and-body form into a charming seasonal character with texture and personality. The ribbed pumpkin body gives great visual interest and the little stem and embroidered whiskers add so much character. I also appreciate how portable the finished piece is—perfect to display on a desk or give as a festive gift.

Pumpkiny Halloween Cat Amigurumi Pattern step 1 - construction progress Pumpkiny Halloween Cat Amigurumi Pattern step 2 - assembly progress Pumpkiny Halloween Cat Amigurumi Pattern step 3 - details and accessories Pumpkiny Halloween Cat Amigurumi Pattern step 4 - final assembly and finishing

Switch Things Up

I absolutely loved imagining the little personality behind this pumpkin-cat and experimenting with the ribbed pumpkin texture. I would try the same construction in a cream or pale mint for a soft seasonal look, or use variegated orange yarn to create natural shading across the ribs.

I also enjoy changing facial features: use smaller eyes and embroidered eyelids for a sleepy expression or larger eyes and a tiny bow for a more playful look. Adding a crocheted scarf, leaf near the stem, or a tiny hat can easily change the theme from Halloween to Thanksgiving or general autumn decor.

To change size, swap yarn weight and hook size: using bulky yarn and a larger hook will produce a showier, larger pumpkin-cat, while fingering yarn will create a dainty miniature version. Mix and match materials and accessories to make this pattern your own!

Common Mistakes & How to Fix Them

✗ Skipping stitch markers at round starts can cause misaligned features and uneven shaping; always mark your first stitch of each round ✗ Inconsistent tension between rounds creates lumpy or uneven surfaces; practice maintaining steady, even tension throughout the entire project ✗ Not stuffing gradually as you work causes difficulty reaching inside later; stuff sections as you complete them for best results ✗ Installing safety eyes after stuffing too much can be awkward; position and attach eyes when the head is only partially stuffed ✗ Missing color change Info steps may create visible jogs; carry or fasten off yarn neatly at color or texture transitions ✗ For the ribbed pumpkin, failing to work consistently in BLO will ruin the vertical rib effect; maintain BLO rounds for the body section

Pumpkiny Halloween Cat Amigurumi Pattern

This sweet pumpkin-cat amigurumi combines a plump ribbed pumpkin base with a round, cuddly cat head. Features include a textured ribbed body, embroidered whiskers, shiny black safety eyes, and a tiny brown stem. The compact, palm-sized design is perfect for seasonal decor or a cute handmade gift.

Intermediate 3-5 Hours

Materials Needed for Pumpkiny Halloween Cat Amigurumi Pattern

— Main Fabric

  • 01
    Worsted weight yarn (#4), approximately 120g in main color (pumpkin orange)
  • 02
    10-15g in brown for stem (accent color)
  • 03
    Small amounts (5-10g) in pink for nose (or use a plastic nose)
  • 04
    Small amount (5-10g) in black for facial embroidery

— Tools Required

  • 01
    3.5mm (E) crochet hook for main work (or size to obtain tight amigurumi gauge)
  • 02
    3.0mm (D) crochet hook for slightly tighter stitches on small parts (optional)
  • 03
    Safety eyes 8mm (recommended) or 10mm depending on desired scale
  • 04
    Small plastic pink nose or 6-8mm plastic nose / embroidery thread for nose
  • 05
    Polyester fiberfill stuffing
  • 06
    Yarn needle for sewing and embroidery
  • 07
    Stitch markers (at least 3-4)
  • 08
    Scissors
  • 09
    Pins for assembly
  • 10
    Optional: thin floral wire if you want a poseable head (not necessary for this pattern)
  • 11
    Optional: fabric glue for securing nose if using glued noses

Progress Tracker

0% Complete

— Head :

Round 1 :

6 sc in magic ring (6)

Round 2 :

6 inc (12)

Round 3 :

(1 sc, 1 inc) x 6 (18)

Round 4 :

(2 sc, 1 inc) x 6 (24)

Round 5 :

(3 sc, 1 inc) x 6 (30)

Round 6 :

(4 sc, 1 inc) x 6 (36)

Round 7 :

(5 sc, 1 inc) x 6 (42)

Round 8 :

(6 sc, 1 inc) x 6 (48)

Info :

Place safety eyes later between Rounds 13-15: mark positions now if you like (approx 6-7 sts apart center to center). Work with a stitch marker at the start of each round to avoid losing your place.

Round 9-12 :

1 sc in each st (48)

Round 13 :

1 sc in each st (48)

Info :

Attach safety eyes between Rounds 13-14 with approximately 6-7 stitches between centers for the sweet, alert look seen in the photo. If using 8mm eyes, place them so the bottom of the eye sits slightly above the halfway point of the head.

Round 14-16 :

1 sc in each st (48)

Round 17 :

(6 sc, 1 dec) x 6 (42)

Round 18 :

(5 sc, 1 dec) x 6 (36)

Info :

Begin stuffing head moderately at the start of Round 18. Use small amounts of fiberfill and press gently into the skull to keep a smooth round shape. Keep stuffing so the eyes sit snugly without wrinkles in the stitches around them.

Round 19 :

(4 sc, 1 dec) x 6 (30)

Round 20 :

(3 sc, 1 dec) x 6 (24)

Round 21 :

(2 sc, 1 dec) x 6 (18)

Round 22 :

(1 sc, 1 dec) x 6 (12)

Info :

Stop stuffing when the head is nicely rounded but still soft—you will add more stuffing after the neck join to sit firmly atop the pumpkin body. Leave the opening slightly larger than for a fully closed amigurumi head.

Round 23 :

6 dec (6)

Round 24 :

Fasten off leaving a long tail for sewing (approx 25-30 cm). Do not close the head completely; we will stitch it to the neck area of the body later. Use mattress stitch or whip stitch to pull the top closed enough so the head keeps shape but leaves an opening for the neck join (6)

Info :

Facial placement: Using black embroidery yarn or thread, prepare to embroider the mouth and whiskers between Rounds 12-17 centered under and between the safety eyes. Use a removable marker to mark the center line for the nose position.

— Ears (Make 2) :

Round 1 :

6 sc in magic ring (6)

Round 2 :

6 inc (12)

Round 3 :

(1 sc, 1 inc) x 6 (18)

Round 4 :

1 sc in each st (18)

Round 5 :

(2 sc, 1 dec) x 4, 2 sc (14)

Info :

Fold the ear slightly and sew the base with a couple of whip stitches to give a pointed, cupped shape. Position ears on head later at approx between Round 5 and Round 8 on top of the head, spaced about 12-14 stitches apart depending on desired personality.

Round 6 :

1 sc in each st (14)

Round 7 :

(1 sc, 1 dec) x 4, 2 sc (10)

Round 8 :

Fasten off leaving tail for sewing. Flatten base and sew into position on head using yarn needle.

— Pumpkin Body (Ribbed) :

Round 1 :

6 sc in magic ring (6)

Round 2 :

6 inc (12)

Round 3 :

(1 sc, 1 inc) x 6 (18)

Round 4 :

(2 sc, 1 inc) x 6 (24)

Round 5 :

(3 sc, 1 inc) x 6 (30)

Round 6 :

(4 sc, 1 inc) x 6 (36)

Round 7 :

(5 sc, 1 inc) x 6 (42)

Round 8 :

(6 sc, 1 inc) x 6 (48)

Round 9 :

(7 sc, 1 inc) x 6 (54)

Round 10 :

(8 sc, 1 inc) x 6 (60)

Info :

We are increasing to a larger circumference to create the pumpkin belly. From Round 11 onward we will establish the ribbed effect by working in BLO for vertical ridging. Place a stitch marker at the start of Round 11.

Round 11 :

1 sc in each st BLO (60)

Round 12-14 :

1 sc in each st BLO (60)

Info :

The BLO rounds create visible ridges that will later be accentuated by surface slip stitch lines or by pulling slightly at the ripples. Maintain BLO to keep consistent texture. Use stitch markers to mark 8 equal segments for pumpkin ribs if you want perfectly even ribs.

Round 15-18 :

1 sc in each st BLO (60)

Round 19 :

(8 sc, 1 dec) x 6 (54)

Round 20 :

(7 sc, 1 dec) x 6 (48)

Info :

Begin stuffing the bottom/center of the pumpkin from Round 19 as the piece widens. Stuff firmly but leave the top portion less packed so the head can sit into a small recessed neck. Use small bits of stuffing and press into the core so the pumpkin keeps its rounded, slightly flattened profile.

Round 21-24 :

1 sc in each st BLO (48)

Round 25 :

(5 sc, 1 dec) x 6 (42)

Round 26 :

(4 sc, 1 dec) x 6 (36)

Round 27 :

(3 sc, 1 dec) x 6 (30)

Round 28 :

(2 sc, 1 dec) x 6 (24)

Info :

Stop stuffing when the pumpkin feels like the photo: plump but slightly squishy so the head will sit on top and not sink in. Keep the top opening large enough to sew the head in place; we will use Round 29-34 to shape and finish the neck hole.

Round 29 :

(1 sc, 1 dec) x 6 (12)

Round 30 :

6 dec (6)

Round 31 :

Fasten off leaving a long tail for final sewing (approx 40-50 cm). Tutor: do not close fully; instead, use the long tail to attach head by sewing the head opening to the pumpkin neck opening, creating a recessed neck so the head sits secure on the pumpkin.

Info :

To accentuate the pumpkin ribs as pictured, create 8 evenly spaced vertical channels by marking the body into 8 segments before continuing. Later, we will run surface slip stitch or embroidery along those lines to deepen the ribs.

— Pumpkin Ribbing Detail (Surface Work) :

Info :

With the body assembled and stuffed, hold it so the top is facing up. Using the same orange yarn (or a slightly darker orange for more definition), we will work slip stitch lines from bottom to top to accentuate ribs. Mark 8 equidistant points around the circumference with pins or stitch markers first.

Round 1 (Surface) :

Insert hook at bottom center and work a surface sl st up along marked line to top, repeat for each of the 8 marked rib lines. Each line will be approximately 12-18 sl st long depending on size.

Info :

For a softer rib, use a yarn needle to run a chain of surface stitches or lightly pull up loops with single crochet surface technique. The images show subtle ridges rather than deep channels—keep tension loose on the surface to avoid puckering.

— Stem :

Round 1 :

6 sc in magic ring (6) using brown yarn (6)

Round 2 :

6 inc (12)

Round 3-4 :

1 sc in each st (12)

Round 5 :

(2 sc, 1 dec) x 3 (9)

Round 6 :

1 sc in each st (9)

Round 7 :

Insert a small amount of stuffing or leave hollow if you prefer a flattened stem. Fasten off leaving a long tail for sewing. Sew stem to the top center of head (between ear placement points), making sure it sits upright.

Info :

Twist the stem slightly when sewing to produce the little corkscrew look in the photo. You can wrap a small length of brown yarn around the sewn base to create a secure, decorative finish.

— Facial Embroidery & Nose :

Info :

Use black embroidery thread or fine yarn to embroider the mouth and whiskers as in photos. The mouth is a simple horizontal line with two small vertical stitches creating the 'cat smile' and three short whisker lines on each side angled slightly upwards.

Step 1 :

Center the nose point between the eyes at the marked centerline and attach the pink plastic nose or embroider a small triangular nose in pink. The nose sits between Rounds 13-14 about 2-3 stitches below the eye centers.

Step 2 :

Using black thread, stitch a short vertical line under the nose (approx 2-3 mm), then a small horizontal smile from the base of that vertical line. Add three whisker lines on each side: two slightly curved lines and one short line near the mouth to match photo styling.

Info :

If you prefer, you can embroider using backstitch for crisp lines. Secure ends on the inside with knots and weave tails into the head with a yarn needle to hide them.

— Assembly & Final Shaping :

Info :

Before final sewing, pin the head onto the pumpkin top and adjust the position so the face looks forward and balanced. The head should sit with its bottom opening aligned to the pumpkin neck opening so the seam is hidden in the recessed ring.

Step 1 :

Use the long tail left on the body neck and the head opening tail to mattress stitch them together. Make sure you catch both edges evenly and pull gently to bring the head snugly into the pumpkin neck. Stitch all the way around; use additional stitches through head and body to ensure a secure join.

Info :

If you want the head to be removable, sew a small button on the inside of the pumpkin opening and a loop inside the head, but note the finished look will be slightly different than the pictured permanently attached head.

Step 2 :

Sew ears in place: pin each ear so the base sits across Rounds 5-8 on top of the head, and sew with ladder stitch for a clean attachment. Slightly angle them forward for the curious expression.

Info :

Trim any visible tails and weave ends into the body. Adjust stuffing if needed by inserting a blunt yarn needle and pushing fiberfill into areas that need more roundness, especially under the chin so the face reads as in the photo.

— Optional Finishing Touches :

Info :

For a slightly darker definition of ribs, you can run a very thin strand of darker orange along the surface sl st lines. Add a tiny sprig of green crocheted leaf near stem for extra pumpkin detail (3 ch, join and sl st to form leaf shape, fasten off).

Info :

Spritz the finished amigurumi lightly with water and block on a round form if needed to even out shapes. Be careful with plastic noses and eyes when wet—dry thoroughly before display.

Assembly Instructions

  • Attach head to body by inserting the neck portion of the head into the pumpkin neck opening. Pin in place first, then sew securely using mattress stitch all around, ensuring an even, hidden seam.
  • Position safety eyes between Rounds 13-14 of the head, approximately 6-7 stitches apart center-to-center. Attach before stuffing the head fully so they lock in place correctly.
  • Sew ears to the top of the head at around Rounds 5-8, spacing them approx 12-14 stitches apart depending on desired expression. Fold slightly and secure base with a few whip stitches to create a cupped ear.
  • Attach the small brown stem to the very top center of the head between the ears. Use a long tail to sew it on securely and twist slightly when finishing to create the corkscrew look.
  • Embroider nose placement: attach a pink plastic nose between the eyes and slightly above the centerline. Embroider mouth and whiskers beneath and around the nose with black embroidery thread, securing knots on the inside.
  • Weave in and trim all loose tails, then check for any visible holes. Add a little extra stuffing through a yarn needle where needed to even out the shape and close remaining small gaps.
  • If adding surface slip stitch ribbing, mark 8 even lines before stitching and work each surface line from base to top for consistent ribs.
  • Pin all pieces in position and re-check symmetry before final sewing to ensure the finished character sits balanced and looks like the reference images.

Important Notes

  • 💡Use stitch markers consistently at the beginning of each round to avoid counting errors and maintain proper shaping
  • 💡Stuff body parts gradually as you work rather than waiting until the end, especially for narrow openings like the head neck join
  • 💡For safety eyes, position and secure before stuffing head fully - they cannot be repositioned once locked in place
  • 💡Maintain consistent tension throughout the project; too tight creates stiff, small pieces, too loose creates floppy, holey fabric
  • 💡When sewing pieces together, use yarn slightly thinner than working yarn for neater, less visible seams
  • 💡Pin all pieces in position before final sewing to ensure proper placement and symmetry
  • 💡For the pumpkin ribs, work consistently in BLO and mark your segments first for even ribs
  • 💡Keep a row counter or notepad to track rounds, especially in long even-stitch sections

This pumpkin-cat is a wonderful little seasonal companion that brings a smile to any shelf or desk. The textured pumpkin base and chubby cat head combine to make a compact, tactile piece that's fun to make and display. Each stitch builds charm—add a stem, embroider whiskers, and your handmade friend is ready to celebrate autumn. 🎃🐱🧶
You ask,

we answer.

FAQs

What is the finished size of this amigurumi?

Based on the specified materials and hook size, the finished piece will measure approximately 12-15 cm (4.5-6 inches) in height. Using different yarn weights or hook sizes will proportionally change the final size.

Can I use different yarn weights for this pattern?

Yes! You can use any yarn weight, but remember to adjust your hook size accordingly (generally 1-2 sizes smaller than yarn recommendation for tight amigurumi fabric). Different weights will change the final size proportionally.

Do I need to use safety eyes or can I embroider them?

Both options work beautifully! Safety eyes give a professional look and are very secure, perfect for gifts. Embroidered eyes are ideal for young children as they have no small parts and allow for expression customization.

How much stuffing will I need?

For this size project, approximately 50-80 grams of polyester fiberfill should be sufficient. Stuff firmly but not overly tight, allowing the piece to maintain its shape while still being cuddly.

Can I make the head removable?

Yes—if you prefer a removable head, sew a small button into the inside rim of the pumpkin opening and add a loop inside the head, but note this will change the permanent look of the seam compared to the pictured permanently attached head.

How do I ensure the ribs are even?

Mark 8 evenly spaced points around the pumpkin circumference before doing any surface slip stitch lines. Use pins or markers and work each rib from bottom to top to maintain symmetry.

What if my stitch count is off?

If you notice a counting error, it's best to unravel back to where the count was correct. Trying to compensate later often creates visible distortions. Using a stitch marker at round starts helps prevent counting mistakes.

Can I customize colors and details?

Definitely! Use any color combinations you love. Try a white cat on a pale pumpkin or add stripes, a tiny scarf, or embroidered eyes for different personalities while following the basic structure.