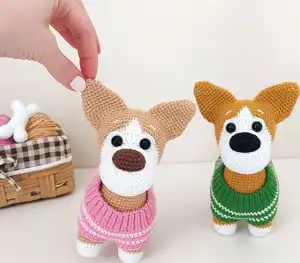
Make an adorable Puppy Corgi amigurumi with clear, photo-assisted instructions and complete round-by-round shaping. This pattern guides you through ears, head, nose, legs, body, tail and a cozy sweater so your little corgi has lots of personality. Perfect for crafters who enjoy color changes and a satisfying assembly process.
Progress Tracker
0% Complete
— Ears (make 2) :
Round 2 :
inc * 6 times (12)
Round 3 :
(5 sc, inc) * 2 times (14)
Round 5 :
(6 sc, inc) * 2 times (16)
Round 6 :
(7 sc, inc) * 2 times (18)
Round 7 :
(8 sc, inc) * 2 times (20)
Round 8 :
(9 sc, inc) * 2 times (22)
Round 9 :
(10 sc, inc) * 2 times (24)
Round 10 :
8 sc, Hdc * 6 times, 10 sc (24)
Round 11 :
8 sc, Hdc * 6 times, 10 sc (24)
Round 12 :
8 sc, Hdc * 6 times, 10 sc (24)
Round 13 :
8 sc, Hdc * 6 times, 10 sc (24)
Info :
Cut the yarn and fasten off.
— Head :
Info :
Start with White yarn.
Round 2 :
inc * 6 times (12)
Round 3 :
(1 sc, inc) * 6 times (18)
Round 4 :
1 sc, inc, (2 sc, inc) * 5 times, 1 sc (24)
Round 5 :
(3 sc, inc) * 6 times (30)
Round 6 :
2 sc, inc, (4 sc, inc) * 5 times, 2 sc (36)
Round 7 :
(5 sc, inc) * 6 times (42)
Round 8 - 13 :
42 sc (6 rounds)
Round 14 :
(5 sc, dec) * 6 times (36)
Round 15 :
13 sc, BLO: 10 sc, 13 sc (36)
Round 17 :
13 sc, 10 sc together with front loops in 15 round, 13 sc (36)
Round 18 :
13 sc, IncDc * 10 times, 13 sc (46)
Round 19 :
17 sc, (inc, 1 sc) * 6 times, 17 sc (52)
Info :
Change the yarn color to mustard.
Round 20 :
23 sc, change the yarn color to white: 6 sc, change the yarn color to mustard: 23 sc (52)
Round 21 :
16 sc, inc, 3 sc, inc, 3 sc, change the yarn color to white: 4 sc, change the yarn color to mustard: 3 sc, inc, 3 sc, inc, 16 sc (56)
Round 22 :
7 sc, inc, 13 sc, inc, 5 sc, change the yarn color to white: 2 sc, change the yarn color to mustard: 5 sc, inc, 13 sc, inc, 7 sc (60)
Round 23 - 25 :
60 sc (3 rounds)
Round 26 :
16 sc, 12 sc together with 1st ear, 5 sc, 12 sc together with 2nd ear, 15 sc (60) Please, look at the pictures. When crocheting together with ears, insert the hook into a ear and into the head simultaneously.
Info :
Important! When crocheting together with the ears, it is important that the part of the ear where Hdc was crocheted is at the edges, and not in the center (for this, start crocheting the 1st ear from the 4th Hdc, and the 2nd ear from the 24th sc).
Round 27 :
16 sc, 12 sc along the 1st ear, 5 sc, 12 sc along the 2nd leg, 15 sc (60)
Info :
Make holes in the circles of felt, insert the eyes there and set them in the 18th round, between 5 Dc and 6 Dc on each side.
Round 29 :
4 sc, dec, (8 sc, dec) * 5 times, 4 sc (54)
Round 31 :
(7 sc, dec) * 6 times (48)
Round 33 :
(6 sc, dec) * 6 times (42)
Round 34 :
(5 sc, dec) * 6 times (36)
Round 35 :
(4 sc, dec) * 6 times (30)
Round 36 :
(3 sc, dec) * 6 times (24)
Round 37 :
(2 sc, dec) * 6 times (18)
Round 38 :
(sc, dec) * 6 times (12)
Round 39 :
dec * 6 times (6)
Info :
Tighten the final gap with the help of the tapestry needle: insert the threaded needle into the front loop of every stitch and slightly pull. Fix the yarn tail and hide it inside the detail.
— Needle sculpt the eyes :
Info :
To needle sculpt, use the White yarn.
Info :
Insert the needle into point 1 that is locating in 19th round, right in the middle of the lower part of the head, in the place where the yarn color was changed (pic 1).
Info :
Withdraw the needle from the right side under the right eye (picts 2 and 3).
Info :
Insert the needle into the stitch neighboring to point 2 and withdraw it out of the stitch neighboring to point 1 (pics 4,5,6).
Info :
Tighten the yarn and make a knot.
Info :
Using the same yarn, repeat these actions for the second eye. Tighten the yarn, make a knot, and hide the yarn tails inside the toy.
— Nose :
Round 1 :
ch 7. Starting in the second chain from the hook: 5 sc, 3 sc into the last stitch of the chain; Along the other side of the chain: 4 sc, inc (14)
Round 2 :
inc, 4 sc, inc * 3 times, 4 sc, inc * 2 times (20)
Info :
Cut the yarn and fasten off. Stuff the nose and sew to the head (Please, look at the pictures).
— Legs (make 4) :
Info :
Start with White yarn.
Round 2 :
inc * 7 times (14)
Round 3 :
(sc, inc) * 7 times (21)
Round 5 - 7 :
21 sc (3 rounds)
Info :
Change the yarn color to Mustard.
Round 8 - 9 :
21 sc (2 rounds)
— Tummy :
Round 1 :
ch 21. Starting in the second chain from the hook: 19 sc, 3 sc into the last stitch of the chain; Along the other side of the chain: 18 sc, inc (42)
Round 2 :
inc, 18 sc, inc * 3 times, 18 sc, inc * 2 times (48)
Round 3 :
1 sc, inc, 18 sc, (sc, inc) * 3 times, 18 sc, (sc, inc) * 2 times (54)
Round 4 :
2 sdc, inc, 18 sc, (2 sc, inc) * 3 times, 18 sc, (2 sc, inc) * 2 times (60)
Info :
Attach the legs to the tummy. Change the yarn color to Mustard.
Round 5 Instruction :
5 sc together with the 1st leg, 17 sc, 5 sc together with the 2nd leg, 3 sc, 5 sc together with the 3rd leg, 17 sc, 5 sc together with the 4th leg, 3 sc (60).
Info :
When crocheting together with legs, insert the hook into a leg and into the tummy simultaneously (Please, look at the pictures).
— Body :
Info :
Crochet in spiral. To avoid gaps, make an additional sc in places where we attached the legs to the tummy (Please, look at the pictures).
Round 1 :
17 sc (along the leg), 17 sc, 17 sc (along the leg), 3 sc, 17 sc (along the leg), 17 sc, 17 sc (along the leg), 3 sc (108) Please, look at the picture.
Info :
If you want your puppy to have a heart on the butt, crochet from the 2nd to the 17th round according to the tutorial on page 20 (here).
Round 2 :
45 sc, inc, 6 sc, inc, 6 sc, inc, 48 sc (111)
Round 3 - 11 :
111 sc (9 rounds)
Round 12 :
(14 sc, dec) * 6 times, 15 sc (105)
Round 13 - 14 :
105 sc (2 rounds)
Round 15 :
37 sc, dec, 6 sc, dec, 6 sc, dec, 6 sc, dec, 42 sc (101)
Round 17 :
37 sc, dec, 5 sc, dec, 5 sc, dec, 5 sc, dec, 41 sc (97)
Round 19 :
37 sc, dec, 4 sc, dec, 4 sc, dec, 4 sc, dec, 40 sc (93)
Round 21 :
37 sc, dec, 3 sc, dec, 3 sc, dec, 3 sc, dec, 39 sc (89)
Round 22 :
37 sc, dec, 2 sc, dec, 2 sc, dec, 2 sc, dec, 38 sc (85)
Round 23 :
37 sc, dec, 1 sc, dec, 1 sc, dec, 1 sc, dec, 37 sc (81)
Round 24 :
37 sc, dec * 4 times, 36 sc (77)
Info :
Please look at the pictures.
Round 25 :
17 sc, 44 sc skip, 16 sc (33)
Info :
Please look at the pictures.
— Neck :
Round 26 - 27 :
33 sc (2 rounds)
Info :
Cut the yarn and fasten off. Stuff the body.
Info :
Divide the yarn into multiple threads, use one of the threads to connect the right and left side of the back. Use blanket stitch (Please, look at the pictures).
— Tail :
Info :
Start with White yarn.
Round 2 :
(1 sc, inc) * 3 times (9)
Round 3 :
inc * 3 times, 6 sc (12)
Round 4 :
2 sc, inc * 2 times, 8 sc (14)
Round 5 :
4 sc, inc, 9 sc (15)
Info :
Change the yarn color to Mustard.
Round 6 :
5 sc, inc, 9 sc (16)
Round 7 - 9 :
16 sc (3 rounds)
Round 10 :
5 sc, dec, 9 sc (15)
Round 11 :
5 sc, dec, 8 sc (14)
Round 12 :
5 sc, dec, 7 sc (13)
Round 13 :
5 sc, dec, 6 sc (12)
Round 14 :
5 sc, dec, 5 sc (11)
Info :
Cut the yarn and fasten off. Stuff the tail and sew to the body between 19 and 24 rounds (Please, look at the picture).
— Sweater :
Info :
Use Green yarn and hook 3 mm. Crochet a sweater not tight.
Item Name (Collar) :
1 row: Ch 9,
Row 2 :
Starting in the second chain from the hook: 8 Sl st. Next, crochet in turning rows, behind the back loop only of the previous row, making a Ch1 rise at the end of each row (Please, look at the pictures 1, 2 and 3).
Row 4 - 60 :
BLO: 8 Sl st (57 rows)
Info :
Fold collar in half and crochet for both walls 7 Sl st (Please, look at the pictures 5-9).
Round :
Ch 1 and 60 sc in a circle (1 round). In the 10th picture the arrows show where to insert the hook when doing sc in the 1st round (Please, look at the pictures).
Info :
Change the yarn color to white.
Info :
Change the yarn color to green.
Round 3 - 4 :
60 sc (2 rounds)
Info :
Change the yarn color to white.
Info :
Change the yarn color to green.
Round 6 - 7 :
60 sc (2 rounds)
Info :
Change the yarn color to white.
Round 8 :
16 sc, Ch 10 (13 sc skip), 2 sc, Ch 10 (13 sc skip), 16 sc (54) (Please, look at the pictures 19 - 21)
Info :
Change the yarn color to green.
Round 10 :
15 sc, dec, 9 Hdc, DecHdc, 9 Hdc, dec, 15 sc (51)
Info :
Change the yarn color to white.
Round 11 :
15 sc, dec, 8 Hdc, DecHdc, 7 Hdc, dec, 15 sc (48)
Info :
Change the yarn color to green.
Round 12 - 13 :
48 sc (2 rounds)
Info :
Change the yarn color to white.
Info :
Change the yarn color to green.
Round 15 - 16 :
48 sc (2 rounds)
Info :
Cut the yarn and fasten off. Put the sweater on the puppy through the hind legs.
Assembly Instructions
- When crocheting together with ears and head (round 26), insert the hook into the ear and into the head simultaneously, then secure by sewing the seam to blend the join.
- Insert felt circles behind safety eyes, then set the eyes into the 18th round between 5 Dc and 6 Dc on each side, and secure according to manufacturer instructions.
- Attach legs to the tummy by crocheting together as instructed (5 sc together with each leg), align and stuff the legs before closing for a smooth finish.
- Sew head to the body using pins to position it first, then sew securely around the neck opening using a matching yarn and mattress or whip stitch.
- Sew the tail between rounds 19 and 24 of the body and tack it firmly; divide yarn into threads and use blanket stitch to close the back opening and finish.
Important Notes
- 💡Use stitch markers to keep track of the start of each round, especially during color changes and shaping sections.
- 💡Stuff firmly but gradually for the best shape and structure; overstuffing can distort the proportions of the head and body.
- 💡Pin all parts in place before sewing to ensure correct positioning and symmetry when attaching ears, head and legs.
- 💡Work with consistent tension and check your stitch counts after each round to maintain the intended shape and size.
This Puppy Corgi pattern is a delightful project that results in a lovable handmade friend you can treasure or gift. The detailed rounds, photos and tips make the process approachable and fun for intermediate crocheters. Celebrate your finished corgi with a cozy sweater and playful personality. 🐾🧶