🧢 Beautiful ✨ Detailed πŸ’ Adorable

Rabbit Amigurumi Pattern

Rabbit Amigurumi Pattern
4.1β˜… Rating
5-7 Hours Time Needed
3.1K Made This
βœ‚οΈ

Intermediate Level

Ideal for those with basic crochet experience, featuring slightly more advanced stitches and techniques to expand your skills.

⏱️

Weekend Treat

Takes 5-7 hours, making it an enjoyable project to finish over a couple of days.

🧸

Cute Companion

An adorable friend to cherish, handcrafted with love to bring comfort and joy for years to come.

About This Rabbit Amigurumi Pattern

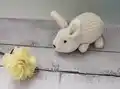
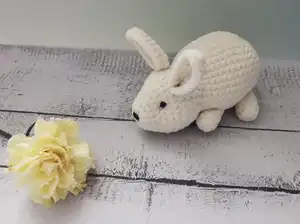
This pattern creates a soft, plush rabbit amigurumi approximately 18 cm tall using chenille-style yarn. It includes clear, row-by-row instructions for the head with torso, ears, paws, tail and nose. The design focuses on simple shaping and a cuddly finish suitable for home decor or gifts. Photos and assembly tips help you place features and sew parts neatly.

Rabbit Amigurumi Pattern crochet pattern - detailed view of completed project

You will learn basic increases, decreases and finishing techniques to shape the body and face. The pattern is written for intermediate crocheters but friendly to ambitious beginners with patience.

Why You'll Love This Rabbit Amigurumi Pattern

I absolutely love this pattern because it turns a few simple shapes into a charming, huggable rabbit that feels special to make. I enjoy how the chenille yarn creates a luxurious, plush texture without complicated stitches. Sewing the parts together and shaping the face gives each rabbit a unique personality, which I find very rewarding. The pattern is efficient and well-photographed, so I can quickly share it with friends and family as thoughtful handmade gifts.

Rabbit Amigurumi Pattern step 1 - construction progress Rabbit Amigurumi Pattern step 2 - assembly progress Rabbit Amigurumi Pattern step 3 - details and accessories Rabbit Amigurumi Pattern step 4 - final assembly and finishing

Switch Things Up

I love experimenting with colors on this rabbit pattern; you can change the main color to pastels for a baby-themed toy or bright shades for a playful look.

I often swap yarn weight and hook size to create different sizes β€” using a bulkier hook gives a chunky, cuddly version while a thinner yarn makes a cute mini version.

I sometimes replace safety eyes with embroidered eyes for a fully soft toy safe for babies; use contrasting yarn and small stitches for expressive eyes.

I like to add accessories like tiny crocheted scarves, bows, or a little pompom tail to personalize each rabbit for gift-giving.

I also vary ear shapes β€” try longer floppy ears or slightly rounded ears for different personalities and silhouettes.

I recommend adding thin wire inside the limbs if you want a posable toy; secure the wire ends tightly and wrap with yarn before stuffing.

I sometimes embroider cheeks and a smile with a different color thread to give the rabbit a sweeter expression.

Want a set? Make three rabbits in coordinating colors and sizes to create a charming nursery display or gift trio.

For a textured effect, try working the ears or paws in back loop only (BLO) for a neat ridge detail that stands out against the plush body.

Lastly, I always pin parts into position and take photos during placement so I can remember the exact spacing and attachment approach for future makes.

Common Mistakes & How to Fix Them

βœ— Skipping stitch markers during rounds can lead to miscounted stitches; place a marker at the start of every round to maintain accurate counts.
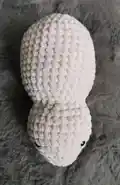
 βœ— Not stuffing as you go causes lumpy shaping and gaps; stuff gradually and evenly while you crochet to match the intended shape.
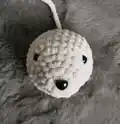
 βœ— Forgetting to place eyes at the correct row makes facial features misaligned; follow the eye placement guidance between rounds and measure spacing before securing. βœ— Pulling decreases too tight can distort the shape of the muzzle; use gentle tension and shape with stuffing before tightening closing stitches. βœ— Leaving ends too short prevents neat sewing and finishing; leave at least 30 cm tails for assembly and weaving in to secure pieces. βœ— Rushing the sewing stage causes uneven placement of ears and limbs; pin parts in place, check symmetry, then sew with small whipstitches for secure seams.

Rabbit Amigurumi Pattern

Make a cuddly rabbit amigurumi with clear step-by-step instructions and helpful photos. This pattern uses soft chenille-style yarn for a plush finish and includes full shaping for head, torso, ears, paws, tail and nose. You'll receive exact row-by-row directions so you can crochet, assemble and finish a charming 18 cm rabbit. Ideal for gifting or decorating nurseries, this pattern guides you through every stitch and detail.

Intermediate 5-7 Hours

Materials Needed for Rabbit Amigurumi Pattern

β€” Main Fabric

  • 01
    Himalaya Dolphin Baby (chenille/velvet-style) - main color (ecru/off-white), approx half a skein (use equivalent super bulky chenille yarn)
  • 02
    Small length of contrasting yarn for the nose (or a small safety nose)
  • 03
    Polyester or anti-allergic silicone filling (small amount to fill head and body)

β€” Tools Required

  • 01
    Crochet hook size 4 (mm)
  • 02
    Row marker or stitch marker
  • 03
    Safety eyes 6 mm (2 pieces)
  • 04
    Small safety nose or short length of different yarn for nose
  • 05
    Needle with a large eye for sewing pieces
  • 06
    Lighter for burning and sealing yarn ends
  • 07
    Scissors
  • 08
    Yarn needle for weaving and assembly
  • 09
    Pins for positioning parts during assembly

Progress Tracker

0% Complete

β€” Head with torso :

Round 1 :

6 mr (6)

Round 2 :

inc x 6 (12)

Round 3 :

(3 sc, inc) x 3 (15)

Round 4 :

(4 sc, inc) x 3 (18)

Round 5 :

(2 sc, inc) x 6 (24)

Round 6 :

(3 sc, inc) x 6 (30)

Round 7-10 :

30 sc (30) - 4 rows

Info :

Place the eyes between the 6 and 7 row at a distance of 9 sc.

Round 11 :

(3 sc, dec) x 6 (24)

Round 12 :

(2 sc, dec) x 6 (18)

Round 13 :

(2 sc, inc) x 6 (24) - slowly we gradually fill

Round 14 :

(3 sc, inc) x 6 (30)

Round 15 :

(4 sc, inc) x 6 (36)

Round 16-25 :

36 sc (36) - 10 rows

Round 26 :

(4 sc, dec) x 6 (30)

Round 27 :

(3 sc, dec) x 6 (24)

Round 28 :

(2 sc, dec) x 6 (18)

Round 29 :

(1 sc, dec) x 6 (12)

Round 30 :

dec x 6 (6). Cut off, leaving 30 cm in length yarns, then thread the needle and pull it successively through each front thread of the stitch from the previous row, tightening it tightly (but not too tightly so as not to break the yarn).

β€” Ears :

Info :

We make 2 pieces. We make 10 chain stitches, then thread into the 2 stitch and make the following rounds.

Round 1 :

Chain 10 and work into 2nd chain from hook (start row)

Round 2 :

8 hdc, 3 hdc in 1 stitch, 8 hdc (19)

Round 3 :

1 dsl, 19 sc (19). Thread the yarn over the needle and sew the shorter edge together, leave 30 cm.

β€” Paws :

Round 1 :

6 mr (6)

Round 2 :

(2 sc, inc) x 2 (8)

Round 3-6 :

8 sc (8) - 4 rows, fill in, then fold the piece in half and connect the 3 sc, pull the yarn over and leave it 30 cm long.

β€” Tail :

Round 1 :

6 mr (6)

Round 2 :

(1 sc, inc) x 3 (9)

Round 3 :

9 sc (9)

Round 4 :

(1 sc, dec) x 3 (6). We pull the yarn, fill it a little and leave 30 cm in length.

β€” Nose (instead of the safe nose) :

Round 1 :

2 mr (2). We pull the yarn and leave 30 cm.

β€” Assembly :

Info :

When we have all the parts ready, we start sewing.

Step 1 :

Sew the ears to the head at a height of 2 sc above the eyes. Fix the thread from the upper part of the ear in the piece and hide it in your head.

Step 2 :

Place the nose piece just above the middle of the knitting of the head with the body and sew it in place.

Step 3 :

On the back of the torso, in the middle, sew the tail according to the photo.

Step 4 :

Sew the paws to the body in such a way as to provide support for the entire body (2 paws at the front and 2 paws at the back).

Step 5 :

To slim down the face, just below the eyes, thread the yarn (the same color as the body), then pull the yarn back, sticking into 1 single crochet and leaving where we started. Pull gently, tie the threads together, tighten them tightly, and then hide them in the knitting.

Assembly Instructions

  • Sew the ears to the head at a height of 2 single crochets above the eyes. Secure the upper thread of the ear inside the head and hide the tail end.
  • Place and sew the nose piece just above the middle join between head and torso, positioning it centrally for a natural muzzle.
  • On the back center of the torso, sew the tail securely, using the 30 cm yarn tail left from the tail piece to attach and fasten.
  • Sew the paws to the body placing two at the front and two at the back to provide stable support so the rabbit can sit upright.
  • Fold and assemble the paw pieces by aligning the edges, joining with three single crochets and pulling the yarn through to close, leaving the 30 cm tail for sewing.
  • Pin parts in position before final sewing to ensure symmetry and correct placement, then stitch securely using small stitches and hide ends inside the body.

Important Notes

  • πŸ’‘Use a stitch marker to mark the beginning of each round so you keep track of increases and decreases accurately.
  • πŸ’‘Stuff the pieces gradually and check the shape frequently to avoid overstuffing or under-stuffing that can distort the profile.
  • πŸ’‘Leave long yarn tails (approx 30 cm) after finishing pieces for easier sewing and secure assembly.

This sweet rabbit pattern is perfect for creating a soft, cuddly companion to brighten any room. Make one in classic ecru or experiment with pastel shades for a nursery-ready friend. Enjoy the relaxing process of crocheting and assembling this charming amigurumi β€” it makes a thoughtful handmade gift. 🧢🐰

You ask,

we answer.

FAQs

What size will the finished piece be?

The finished amigurumi measures approximately 18 cm tall when using Himalaya Dolphin Baby yarn and a 4 mm hook as in the sample.

Can I use different yarn weights for this pattern?

Yes, you can use different yarn weights, but this will affect the final size. Use an appropriate hook for your chosen yarn and adjust stuffing accordingly.

Do I need prior crochet experience for this pattern?

This pattern is rated intermediate, so basic knowledge of single crochet, increases and decreases is recommended for best results.

How long does this project typically take to complete?

Most crocheters complete this project in 5-7 hours, though time may vary based on experience level and working pace.