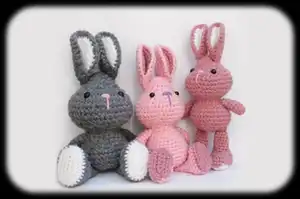
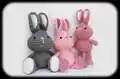
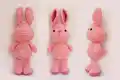
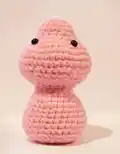
Make a sweet handmade rabbit with this clear, photo-supported crochet pattern. You will make the head and body in one piece and create separate legs, arms, ears and tail to assemble. The pattern includes step-by-step stitching rounds, embroidery instructions for the nose, and sewing tutorials to join pieces like a pro. Perfect for gifting or decorating, this adorable bunny is a satisfying weekend project.
Progress Tracker
0% Complete
— Head and Body :
Info :
Head and Body with light pink yarn. Head and body crochet from one piece, We start from the top of the head and finish at the bottom of the body.
Round 1 :
magic circle with 6st (6)
Round 2 :
2sc in each st (12st)
Round 3 :
1sc then 2sc in next st rep 6 times (18st)
Round 4-5-6 :
1sc in each st for 3 rows (18st)
Round 7 :
1sc in next 2st then 2sc in next st rep 6 times (24st)
Round 8 :
1sc in next 3st then 2sc in next st rep 6 times (30st)
Round 9 :
1sc in next 4st then 2sc in next st rep 6 times (36st)
Round 10 :
1sc in next 5st then 2sc in next st rep 6 times (42st)
Round 11-12 :
1sc in each st for 2 rows (42st)
Info :
Attach safety toy eyes round 8 and leaving 8 stitches (count 7 holes) between them.
Round 13 :
1sc in next 5st then sc2tog rep 6 times (36st)
Round 14 :
1sc in next 4st then sc2tog rep 6 times (30st)
Round 15 :
1sc in next 3st then sc2tog rep 6 times (24st)
Round 16 :
1sc in next 2st then sc2tog rep 6 times (18st)
Round 17 :
1sc in each st for 1 row (18st)
Round 18 :
1sc in next 4st then sc2tog rep 3 times (15st)
Round 19 :
1sc in next 2st then 2sc in next st rep 5 times (20st)
Round 20 :
1sc in next 4st then 2sc in next st rep 4 times (24st)
Info :
Stuff firmly and shape the head.
Round 21 :
1sc in next 3st then 2sc in next st rep 6 times (30st)
Round 22-28 :
1sc in each st for 7 rows (30st)
Round 29 :
1sc in next 3st then sc2tog rep 6 times (24st)
Round 30 :
1sc in next 2st then sc2tog rep 6 times (18st)
Info :
Stuff firmly and shape the body, add more fiberfill into the neck area if needed.
Round 31 :
1sc in next st then sc2tog rep 6 times (12st)
Round 32 :
1sc in next st then sc2tog rep 4 times (8st)
Info :
Before closing the hole, add a little bit more fiberfill if needed and make sure that the bottom is flat so the bunny can sit .
Round 33 :
sc2tog one time fasten off and use yarn tail to weave in and out of the remaining stitches, pull tight until the hole is completely closed, knot off and hide yarn tail inside the body. (see page 10 how to close a hole)
— Legs :
Info :
Legs make 2 start with dark pink yarn. *The foot is an oval shape, we start with a chain.
Round 1 :
Ch (chain) 6 then 2sc into the second chain from hook, then 1sc next 3st then 4sc in the last chain, Turn and work on the other side, 1sc in the next 3st then 2sc into the last chain (14st) Place the Marker!
Round 2 :
1sc in next st then 2sc next st rep 7 times (21st)
Round 3 :
1sc in each BL (Back loop only) st for 1 row (21st)
Info :
Switch color with light pink yarn.
Round 4 :
1sc in each st for 1 row (21st)
Round 5 :
1sc in next 7st then sc2tog 4 times 1sc in next 6st (17st)
Round 6 :
1sc in next 6st then sc2tog 3 times 1sc in next 5st (14st)
Round 7 :
sc2tog then 1sc in next 10st then sc2tog (12st)
Info :
Stuff and shape the foot, leave the top of the leg free of stuffing.
Round 8 :
sc2tog then 1sc in next 8st then sc2tog (10st)
Round 9-10-11 :
1sc in each st for 3 rows (10st)
Round 12 :
sc2tog then 1sc in next 6st then sc2tog (8st)
Round 13 :
1sc in each st for 1 row (8st)
Round 14 :
Press the top of the leg together and 1sc through both sides of the leg across the top for one row. fasten off, leaving a long tail for sewing.
— Arms :
Info :
Arms make 2 with light pink yarn.
Round 1 :
magic circle with 6st (6)
Round 2 :
2sc in each st (12st)
Round 3 :
1sc in each st (12st)
Round 4 :
1sc then sc2tog rep 4 times (8st)
Round 5-6-7-8 :
1sc in each st for 4 rows (8st)
Info :
Stuff lightly the hand and leave the top off the arm free of stuffing.
Info :
sl st in the next st fasten off, leaving a long tail for sewing.
— Ears :
Info :
Ears make 2 with dark pink yarn and 2 with Light pink yarn.
Round 1 :
magic circle with 6st (6)
Round 2 :
2sc in each st (12)
Round 3 :
1sc then 2sc in next st rep 6 times (18st)
Round 4 :
1sc in next 2st then 2sc in next st rep 6 times (24st)
Round 5 :
1sc in next 3st then 2sc in next st rep 6 times (30st)
Info :
Fasten off and weave in the ends on the wrong side.
— Crocheting the two pieces together :
Infos :
1. Face the 2 pieces to one another with the wrong side. 2. SC together one stitch of both pieces at a time, all the way around. 3. sl st in the next st fasten off, leaving a long tail for sewing.
— Fold the ears :
Infos :
1. Fold the ear in half. 2. Sew 4 stitches together. 3. Now sew back to the bottom edge. 4. Finish.
— Tail :
Info :
Tail with light pink yarn.
Round 1 :
magic circle with 6st (6)
Round 2 :
2sc in each st (12st)
Round 3 :
1sc in next st then sc2tog rep 4 times (8st)
Info :
Stuff lightly the tail.
Info :
sl st in the next st fasten off, leaving a long tail for sewing.
— How to Embroider the nose :
Infos :
A. Insert the needle in a hole between stitches some distance away where you want the nose to be. B. Bring the needle to the starting point in the center (row 8) for the embroidering, pull it through and leave a long tail. 2. Make a vertical stitch along 3 stitches in the center line. draw the thread tight, do it twice. 3. Insert the needle horizontal along 2 stitches to form the nose and draw the thread tight. 4. Start embroidering the nose horizontal as showing in the picture until the nose is big enough. 5. Insert the needle and bring it out at the same hole between stitches where you insert the starting thread and pull it through. 6. Knot the two ends together twice. 7. Reinsert the 2 threads into the needle and insert the needle into the same hole where both ends emerge and bring it out in a different point on the head, pull it through and cut them off.
— Assembly :
Item Name (P1) :
Sewing the legs: 1. Sew the leg across the top of the row. 2. place the legs above row 31, a bit more to the front of the body. 3. Sew the legs to the body, fasten and hide yarn tail inside the body. * See how to sew a flat piece to a closed piece (see page 11).
Item Name (P1) :
Sewing the arms: 1. Press both sides of the top arm together and insert the needle through both stitches. 2. Sew the arms just beneath row 19, fasten and hide yarn tail inside the body. *See how to sew a flat piece to a closed piece (see page 11).
Item Name (P1) :
Sewing the ears: Place the ears just beneath row 5, pin the ears to the head, sew in place, fasten and hide yarn tail inside the head. *See how to sew a flat piece to a closed piece (see page 11).
Item Name (P1) :
Sewing the tail: Place the tail at the bottom in the middle, pin the tail to the body, sew in place, fasten and hide yarn tail inside the body. *See how to sew an open piece to a closed piece (see page 10).
— How to close a hole and hide yarn tail inside the piece :
Infos :
1. Cut the yarn, fasten off, leaving a long tail. From the inside of the hole Insert the needle under the front loop only, draw the yarn toward the outside and again next front loop from the inside to the outside, pick up all the remaining stitches. 2. Pull the yarn tail tight until the hole is completely closed and knot. 3. Insert the needle back to the center. 4. Pass the yarn through the piece coming out on a different side through a hole. 5. Cut the yarn tail.
— Sewing an Open Piece to a closed piece :
Infos :
*This technique is good for sewing the tail. Sewing an open piece to a closed piece: 1. First stitch, insert the needle in a hole And bring the needle up below the next stitch on the closed piece and draw the yarn through. 2. Insert the needle under both loops together in the open piece and then insert the needle into the hole where the yarn tail emerge out in the closed piece and bring the needle up below the next stitch and draw the yarn through. Do it all the way around. 3. Draw tight after every stitch and make sure the stitches are parallel to one another.
— Sewing a flat piece to a closed piece :
Infos :
* This technique is good for sewing the arms, legs and ears. Sewing a flat piece to a closed piece: 1. Insert the needle to a hole between stitches and bring the needle up below the next stitch and draw the yarn through. 2. Insert the needle under both loops together in the flat piece and draw the yarn through. 3. Go back to the same hole where the yarn tail emerge out in the closed piece and draw the yarn through tight. 4. Repeat across the top of the flat piece. Note: For this sewing example, I used a contrasting yarn that will be more clear for you to see the technique. For your work used the same yarn you used for the flat piece.
This delightful rabbit is perfect for gifting, decorating nurseries, or keeping as a handmade keepsake. It combines simple stitches with charming shaping and embroidery for a professional finish. Make one in classic pinks or customize the colors to match any nursery or gift theme. 🐰🧶