🧢 Beautiful ✨ Detailed πŸ’ Adorable

Ragdoll Pocket Whale Amigurumi Pattern

Ragdoll Pocket Whale Amigurumi Pattern
3.9β˜… Rating
2-3 Hours Time Needed
1.7K Made This
βœ‚οΈ

Beginner Friendly Level

Perfect for those just starting their crochet journey, with clear instructions and simple techniques

⏱️

Bite-Sized Project

Finishes in 2-4 hoursβ€”perfect for an afternoon of creative relaxation.

🐾

Pocket Pal

A mini friend to carry anywhere, providing comfort and companionship in a perfectly portable size.

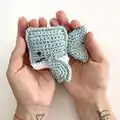
About This Ragdoll Pocket Whale Amigurumi Pattern

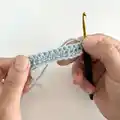
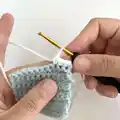
This pattern creates a small ragdoll-style pocket whale that fits in the palm of your hand. It uses DK yarn worked in simple single crochet rows to make two square body pieces which are joined and stuffed. Flippers and a tail are crocheted separately and sewn on to complete the whale.

Ragdoll Pocket Whale Amigurumi Pattern crochet pattern - detailed view of completed project

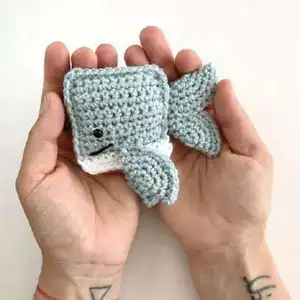
The design is fast to make and great for using yarn scraps or making keyrings. Clear step-by-step rounds and photos are included to guide assembly and finishing.

Why You'll Love This Ragdoll Pocket Whale Amigurumi Pattern

I absolutely love this pattern because it transforms a few simple stitches into an adorable tiny whale that's perfect for gifts and small projects. I enjoy how quick it is to make, allowing me to create several in an afternoon. The design uses minimal materials so it is ideal for using up scrap yarn and trying new color combinations. It is also forgiving for beginners and rewarding to see the little whale come together with simple assembly.

Ragdoll Pocket Whale Amigurumi Pattern step 1 - construction progress Ragdoll Pocket Whale Amigurumi Pattern step 2 - assembly progress Ragdoll Pocket Whale Amigurumi Pattern step 3 - details and accessories Ragdoll Pocket Whale Amigurumi Pattern step 4 - final assembly and finishing

Switch Things Up

I love to experiment with colour when making this pocket whale; try using pastel shades for a softer look or bold hues for a playful finish.

You can change the yarn weight and hook size to make the whale larger or smaller β€” bulky yarn gives a chunky whale while fingering weight makes a tiny keychain friend.

I sometimes embroider a smile or tiny cheeks with contrasting thread to give each whale its own personality.

For a different texture, use cotton yarn instead of acrylic for a firmer, more defined stitch appearance that holds shape well.

Try adding small accessories like a tiny crocheted hat or a felt bow to personalize gifts and make a mini series of whales in different outfits.

If you want a posable version, consider inserting a short piece of wire into each flipper before sewing it closed so you can bend them slightly for expression.

I also like to use safety eye alternatives like French knots if making the whale for very young children to keep it fully soft and safe.

To make a keyring, attach a sturdy keyring through a sewn yarn loop at the top corner so the whale sits nicely when hung from keys or a bag.

Experiment with adding a small loop of contrasting yarn at the top for an instant ornament or bag charm option.

Finally, collect scraps of different colours and make several whales as a matching set β€” they are fast to stitch and make delightful handmade gifts.

Common Mistakes & How to Fix Them

βœ— Skipping the foundation chain count can create a body that is too narrow or too wide; recount your starting CH 12 before working the foundation row to ensure correct gauge and shape. βœ— Failing to change to the white yarn at the end of R10 accurately will make the mouth area look uneven; pull up a loop and join the white yarn with a SC exactly at the last stitch as instructed. βœ— Not inserting safety eyes before finishing the body seam can make eye placement awkward or impossible; insert the 2mm safety eyes before closing the final side and stuffing as recommended. βœ— Overstuffing the body will distort the whale's shape and make seams hard to close; use small amounts of stuffing and tuck ends inside while closing so the shape remains soft and neat.

Ragdoll Pocket Whale Amigurumi Pattern

Create a tiny, cuddly pocket whale with this clear, photo-supported crochet pattern. You will work simple single crochet rows to make a compact square body, then add flippers and a tail for charm. The pattern is quick to make and perfect for gifting or attaching to a keyring. Photos at the end guide assembly and finishing so you can follow along confidently.

Beginner Friendly 2-3 Hours

Materials Needed for Ragdoll Pocket Whale Amigurumi Pattern

β€” Main Fabric

  • 01
    DK acrylic yarn, main colour - small amount (approx 25-50g)
  • 02
    DK acrylic yarn, contrasting white for mouth detail - small scrap (approx 5-10g)
  • 03
    Alternative: cotton yarn of similar DK weight if preferred

β€” Tools Required

  • 01
    Crochet hook size 3.5mm
  • 02
    Black embroidery thread
  • 03
    2mm safety eyes (2 pieces)
  • 04
    Stitch markers
  • 05
    Scissors
  • 06
    Metal yarn needle
  • 07
    Polyester fibrefill or scraps of yarn
  • 08
    Keyring

Progress Tracker

0% Complete

β€” General :

Info :

Written in US terms; Pictures are at the end of pattern to make it printer friendly.

Infos :

ABBREVIATIONS: CH - chain. ST - stitch. SC - single crochet. INC - increase = single crochet 2 times in the same stitch or chain.

Infos :

MATERIALS: DK acrylic yarn is what I used, but you are free to use cotton yarn as well. 3.5mm hook. Black embroidery thread. 2mm safety eyes. Stitch markers. Scissors. Metal yarn needle. Polyester fibrefill, or scraps of yarn. Keyring.

β€” Body :

Info :

BODY (MAKE 2): -slipknot, CH 12 and turn – this is the foundation row

Round 1 :

R1 – SC in the 2nd CH from hook and then SC until the end of row, CH 1, turn

Round 2 :

R2 – SC in each ST of the row, CH 1, turn

Round 3-9 :

R3 to R9 – SC in each ST of the row, CH 1, turn

Round 10 :

R10 – SC in each ST of the row, at the last ST pull up a loop and join the white yarn with a SC, then CH 1 and turn

Round 11 :

R11 – now working with the white yarn, SC in each ST of the row, CH 1, turn

Round 12 :

R12 – SC in each ST of the row, fasten and cut yarn

Infos :

Bring the 2 sides together. Starting from the right side of your main colour, join new yarn in the same colour and start to SC along all 3 sides. At every corner ST you will need to do 2 SC. Before reaching the white part, you need to insert the safety eyes. Join the white yarn and continue to SC the last side – here you can tuck all the yarn ends inside and use some extra stuffing as well, but not much is needed. Fasten yarn and weave in ends.

β€” Flippers and Tail :

Info :

FLIPPERS and TAIL (MAKE 4): -Slipknot, CH 2

Round 1 :

R1 – SC 6 times in the 2nd CH from hook

Round 2 :

R2 – SC 2 times in each ST around (12 sts total)

Round 3 :

R3 – SC 1, INC – all around (18 sts total)

Round 4 :

R4 – SC 2, INC - all around (24 sts total), don’t fasten

Infos :

Fold circle, turn it with the rounded part to face your left hand and start to SC the sides together. Tuck inside the starting yarn tail. Fasten and leave length of yarn for attaching to the body.

Info :

For the tail you need to sew the bottom edges, overlapping, with rounded sides facing each other.

Infos :

Attach tail to the middle of the back side. Attach flippers to either side right above the white stitches. You can either sew on a mouth or not. If you do add a mouth make sure to knot the ends, tuck in and cut remaining yarn.

Assembly Instructions

  • Bring the 2 sides of each body piece together and join new yarn on the right side of your main colour; SC along three sides, doing 2 SC at each corner to shape the body opening.
  • Before closing the final side, insert the 2mm safety eyes in position on the main colour just above the white mouth area, then join white yarn and SC the last side while tucking ends inside and adding minimal stuffing.
  • Fold each flipper circle so the rounded edges face together and SC the sides together, then fasten and leave a length of yarn for sewing; attach flippers to either side of the body just above the white stitches.
  • For the tail, sew bottom edges overlapping with rounded sides facing; attach the finished tail to the middle of the back side of the whale securely with the yarn tail left from finishing.
  • Sew any remaining yarn ends inside the body and weave in ends; if adding a mouth with embroidery thread, knot the ends, tuck them in, and trim remaining yarn for a clean finish.

Important Notes

  • πŸ’‘Work in rows for the body pieces, turning at the end of each row as instructed to maintain the square shape.
  • πŸ’‘Insert safety eyes before fully closing the body so placement is accurate and secure; do this before final stuffing and joining the last side.
  • πŸ’‘Leave a yarn tail when fastening off flippers and tail to allow easy sewing to the body and to secure parts firmly.

This tiny Ragdoll Pocket Whale is a sweet, quick-to-make amigurumi that fits perfectly in your palm or on a keyring. It's ideal for using leftover yarn and makes a thoughtful handmade gift for friends and family. Enjoy the satisfying process of simple stitches turning into a charming little companion. πŸ§Άβœ¨πŸ‹

You ask,

we answer.

FAQs

What size will the finished piece be?

The finished amigurumi measures approximately 6-8 cm wide depending on tension and yarn choice when using DK yarn and a 3.5mm hook.

Can I use different yarn weights for this pattern?

Yes, you can use different yarn weights but this will affect the final size; use a smaller hook for lighter yarn and a larger hook for bulkier yarn and adjust finishing accordingly.

Do I need prior crochet experience for this pattern?

This pattern is rated beginner friendly and uses basic single crochet stitches and simple shaping, making it suitable for crocheters who know how to chain, single crochet, and increase.

How long does this project typically take to complete?

Most crocheters complete this project in 2-3 hours, though time may vary based on experience level and how much time is spent on assembly and finishing.