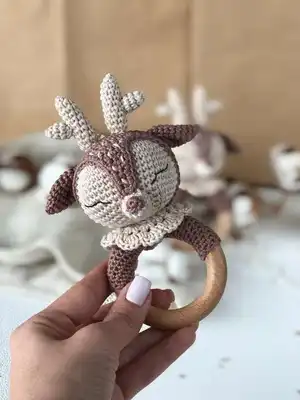
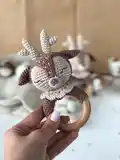
Make an adorable rattle deer for babies and gift-giving with this detailed crochet pattern. You will follow clear step-by-step rounds, photo-guided assembly, and helpful tips to create a charming wooden-ring rattle. The pattern uses cotton yarn and simple amigurumi shaping to form a soft head, horns, ears and collar. Perfect for crafters who enjoy small, thoughtful handmade toys.
Progress Tracker
0% Complete
— Notes :
Info :
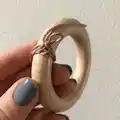
All pieces worked in a continuous spiral. Do not join to work in the rnd, just work sc in the next st. Place marker or use contrasting color yarn to mark beg of rnd. Use hook 2.5 mm or size matching your yarn and obtaining gauge. When work around the wooden ring, use smaller size hook, it will be easier to work.
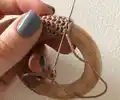
— Working around the ring. Option 1 :
Info :
Work around the ring in a continuous spiral. The total number of sts depends on the size of your wooden ring and yarn. For my size ch10 using hook 2.5mm, then work around the ring using hook 2mm.
Info :
Join chain with sl st around the ring. Then sc in each st around. The first rnd is the most difficult. Then start to work in a continuous spiral, sc in each st. If it`s still uncomfortable to work, try to use smaller size hook. Pay attention to your tension, crochet around the ring tightly. If the fabric is moving loosely, rip it out and start over again with one st less.
Info :
Cont to work until the half or a bit less than half of the ring is covered. End with sl st. The beginning and the end of work should be inside of the ring. Weave in ends. Pull the end through the last rnd to tighten the fabric around the ring, and then pull it through the fabric inside the ring.
— Working around the ring. Option 2 :
Info :
If option 1 is too complicated for you, you can crochet a rectangle, working sc. For my ring size, ch20 and work for 9 rows. When the rectangle is finished, fold it over the ring and sew it, the fabric should be tight around the ring. The seam should be inside the ring. Weave in ends using tapestry needle.
— Head :
Info :
With MC work the head. Hereafter, the hook 2.5 mm
Round 1 :
6 sc in magic ring (6)
Round 2 :
(inc) * 6 times (12)
Round 3 :
(inc, sc in next st) * 6 times (18)
Round 4 :
(inc, sc in next 2 sts) * 6 times (24)
Round 5 :
(inc, sc in next 3 sts) * 6 times (30)
Round 6 :
(inc, sc in next 4 sts) * 6 times (36)
Round 7 :
(inc, sc in next 5 sts) * 6 times (42)
Round 8 :
(inc, sc in next 6 sts) * 6 times (48)
Round 9-15 :
48 sc (work even for 7 rnds) (48)
Round 16 :
(dec, sc in next 6 sts) * 6 times (42)
Round 17 :
(dec, sc in next 5 sts) * 6 times (36)
Round 18 :
(dec, sc in next 4 sts) * 6 times (30)
Round 19 :
(dec, sc in next 3 sts) * 6 times (24)
Info :
Stuff the head and put rattle inside.
Round 20 :
(dec, sc in next 2 sts) * 6 times (18)
Info :
Stuff the head tightly, for your convenience you can use tweezers.
Round 21 :
(dec, sc in next st) * 6 times (12)
Round 22 :
(dec) * 6 times (6)
Info :
Bind off rem 6 sts using a needle. Leave a long tail to sewing around a ring (approx 18-20 in / 45-50 cm). The head is done.
— Upper head piece :
Info :
With CC work the upper head piece
Round 1 :
6 sc into magic ring (6)
Round 2 :
(inc) * 6 times (12)
Round 3 :
(inc, sc in next st) * 6 times (18)
Round 4 :
(inc, sc in next 2 sts) * 6 times (24)
Round 5 :
(inc, sc in next 3 sts) * 6 times (30)
Round 6 :
(inc, sc in next 4 sts) * 6 times (36)
Round 7 :
(inc, sc in next 5 sts) * 6 times (42)
Round 8 :
(inc, sc in next 6 sts) * 6 times (48)
Round 9-13 :
sc in every st (work even for 5 rnds) (48)
Round 14 :
(dec, sc in next 6 sts) * 6 times (42)
Round 15 :
sc in every st (work 1 rnd even) (42)
Info :
Turn the piece and start to work flat.
Row 16 :
ch1, sc in next 6 sts, turn.
Row 17 :
ch1, sc in next 6 sts, turn.
Row 18 :
sc in next 5 sts starting from the 2nd st from the hook, turn.
Row 19 :
sc in next 4 sts starting from the 2nd st from the hook, turn.
Row 20 :
ch1, sc in next 4 sts, turn.
Row 21 :
sc in next 3 sts starting from the 2nd st from the hook, turn.
Row 22 :
sc in next 2 sts starting from the 2nd st from the hook, turn.
Rows 23-25 :
ch1, sc in next 2 sts, turn.
Info :
Sc in every st to end of upper head piece. Sl st in next st, fasten off leaving a long tail approx 25-27 in (65-70 cm) for sewing to the head.
— Nose :
Info :
Work with MC yarn (beige).
Round 1 :
5 sc into magic ring (5)
Round 2 :
(inc) * 5 times (10)
Round 3-5 :
sc in next 10 (work even for 3 rnds) (10)
Info :
Sl st in next st, fasten off leaving a tail for sewing.
Info :
With CC yarn (brown) work 6 sc into magic ring for the nose tip, fasten off and sew it to the nose or embroider the tip of the nose using A yarn. Stuff the nose firmly.
— Horn :
Info :
Small horn (Make 2). With MC yarn work as foll:
Round 1 :
6 sc into magic ring (6)
Round 2 :
inc, sc in next 5 sts (7)
Round 3-4 :
sc in every st (work even for 2 rnds) (7)
Info :
Sl st in next st, fasten off leaving a long tail for sewing. Stuff the horn. Rep for the 2nd horn.
Info :
Large horn (Make 2). With MC yarn work as foll:
Round 1 :
6 sc into magic ring (6)
Round 2 :
(inc, sc in next 2 sts) * 2 times (8)
Round 3-10 :
sc in every st (work even for 8 rnds) (8)
Info :
Sl st in next st, fasten off leaving a long tail approx 27 in (70 cm) to embroider the stripes above the nose. Rep for the 2nd horn. Stuff the horns.
— Ears (Make 2) :
Info :
With CC yarn work as foll:
Round 1 :
6 sc into magic ring (6)
Round 2 :
(inc, sc in next 2 sts) * 2 times (8)
Round 3 :
(inc, sc in next 3 sts) * 2 times (10)
Round 4 :
(inc, sc in next 4 sts) * 2 times (12)
Round 5 :
(inc, sc in next 5 sts) * 2 times (14)
Round 6-9 :
sc in every st (work even for 4 rnds) (14)
Info :
Sl st in next st, fasten off leaving a long tail for sewing to the head. Rep the same for the 2nd ear.
— Assembling :
Info :
Sew the nose to the head at level of row 6 from the last inc, attaching the upper head piece to the head, checking the right place for embroidering the nose. See photo-instructions for sewing the upper head piece and the nose.
Info :
Then outline the eyes and remove the upper head piece. With black embroidery floss or fingering weight yarn embroider sleepy eyes. You can bring the needle from the back side of the head. The upper head piece will hide all the knots, when attaching it. Embroider the eyes as it's shown on the photo, mirror the 2nd eye. Pay attention to the symmetrical position of the eyes regarding to the nose. For your convenience attach the upper head piece. When eyes are finished, secure the thread on the back of the head and cut it.
Info :
Now sew the upper head piece. Attach it as it's shown on the photo and sew it to the head around the edge.
Info :
Then sew small horns pieces to the large ones. Sew the horns to the head as it's shown on the photo. Using a long tail, randomly embroider stripes on the nose. Check photo-instructions.
Info :
Fold ears as it's shown on the photo and fix them in such position, then sew them to the head counting approx 2 sts from the horns. Mirror the same for the 2nd ear. The head is done.
Info :
With MC yarn tail sew the head to the wooden ring. When you sew the head to the ring, push it slightly, the neck shouldn't be too thin. The head should be tightly attached to the ring, I recommend to sew it around twice.
Info :
Now make a collar. With MC yarn ch22. Then work flat as foll: Row 1: sc in 2nd st from the hook, sc in next 20 sts, turn. Row 2: ch4, dc in 1st st, [sk1, dc in next st, ch1, dc in the same st] 10 times, turn. Row 3: ch2, 2 dc in next ch space, sc in next st, [5 dc in next ch space, sc in next st] 10 times, 3 dc in last post. The collar is ready. Sew it as it's shown on the photo.
This charming Rattle Deer pattern creates a cozy, handcrafted baby gift that becomes a tiny keepsake. 🧶
Made with cotton yarn and a wooden ring for natural texture and durability. ❤️
Follow every photo and round to achieve a polished, professional finish. ✨