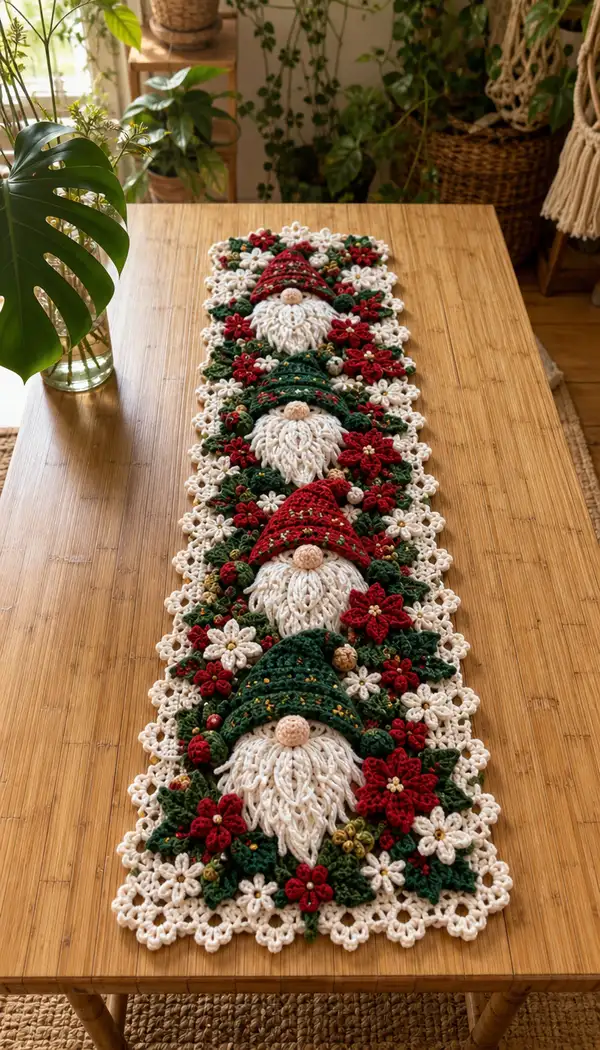
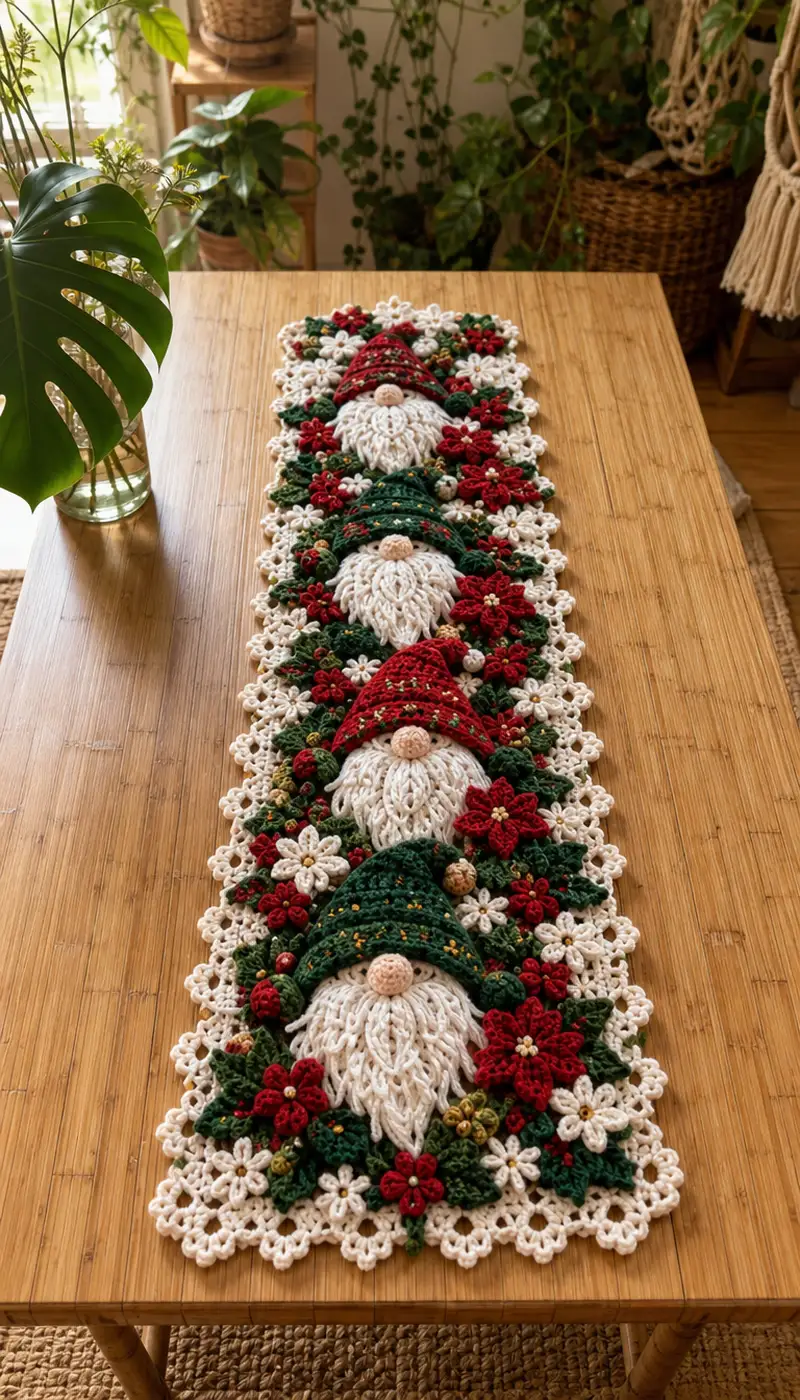
Create a festive Red and Forest Green Gnome Table Runner featuring five adorable gnome motifs, layered loop-stitch beards, textured hats, poinsettia-style flowers and a delicate lacy cream border. This full-color runner combines crochet motifs joined as you go for a rich, dimensional holiday centerpiece. Includes detailed instructions for heads, noses, hats, beards, flowers, leaves, berries and the scalloped border — perfect for gifting or seasonal decorating.
Progress Tracker
0% Complete
— Overview :
Info :
This runner is built from repeated gnome medallions plus flower and leaf motifs joined-as-you-go into a long panel. Pattern covers one gnome unit; make 5 units and join with floral connector rounds. Use worsted weight yarn and 3.5mm hook unless otherwise noted. Work tightly for amigurumi-style motifs to avoid stuffing showing. Bead noses are 10-12mm and sewn through base motif.
— Gnome Head (Make 5) :
Round 1 :
6 sc in magic ring (6)
Round 3 :
(1 sc, inc) x 6 (18)
Round 4 :
(2 sc, inc) x 6 (24)
Round 5 :
(3 sc, inc) x 6 (30)
Round 6 :
(4 sc, inc) x 6 (36)
Round 7 :
(5 sc, inc) x 6 (42)
Round 8 :
(6 sc, inc) x 6 (48)
Round 9-14 :
1 sc in each st (48)
Info :
Place the nose later between rounds 12-13. Keep rounds 9-14 even to create a wide forehead and to sit the hat comfortably. Use stitch marker to mark round starts and eye/nose placement.
Round 15 :
(6 sc, 1 dec) x 6 (42)
Round 16 :
(5 sc, 1 dec) x 6 (36)
Round 17 :
(4 sc, 1 dec) x 6 (30)
Info :
Start stuffing the head gently here. Use small amounts of fiberfill and push into the head with a stuffing tool so the shape rounds nicely. Keep the top slightly domed but not overstuffed to allow hat to sit.
Round 18 :
(3 sc, 1 dec) x 6 (24)
Round 19 :
(2 sc, 1 dec) x 6 (18)
Round 20 :
(1 sc, 1 dec) x 6 (12)
Info :
Fasten off leaving a long tail for sewing the head base to the beard panel later. Finish stuffing if needed so the head is firm but soft. We will not fully close; leave an opening to stitch to the beard base if desired.
— Nose (Make 5) :
Round 1 :
6 sc in magic ring (6)
Round 3 :
1 sc in each st (12)
Info :
Stuff very lightly; just enough to give the bead-like nose shape. Alternatively, you may use a wooden bead (10-12mm) as shown in photo for authentic look. If using bead, cover by sewing simple round scallop or skip stuffing and sew bead into place through center of head front between rounds 12-13.
Round 4 :
(1 sc, 1 dec) x 4, sc in next 4 (8)
Round 6 :
Dec 4 times (4). Fasten off leaving long tail.
Info :
Sew nose to head front between rounds 12 and 13, centered horizontally on the head. If using covered bead, sew through bead and knot on the inside of head for security. Hide tail by weaving through several stitches.
— Beard Panel (Make 5) :
Info :
The beard is worked flat as a semicircular panel using loop stitch rows to create long textured strands that mimic the look in the photo. The panel will be sewn behind the nose and mounted to the front of the head. Work in rows; join at edges to create full beard.
Foundation Row :
Ch 30, sc in 2nd ch from hook and across (29)
Row 1 :
Ch 1, turn, sc in next 29 (29)
Row 2 :
Ch 2, turn, *lp st (pull loop to 2.5-3 cm) in next st and secure with 1 sc on top of the loop, sc in next st* rep across (29 loops)
Row 3 :
Ch 2, turn, sc in each st across (29)
Row 4 :
Ch 2, turn, *lp st in next st, sc in next st* rep across (29 loops)
Row 5 :
Ch 2, turn, sc across (29)
Row 6 :
Repeat Row 2 for second band of loops to create dense beard (29 loops)
Row 7 :
Ch 1, turn, sc across (29)
Info :
Trim loops if you want a shorter beard or leave long for the dramatic look shown. For the photo effect, loops are combed gently with a wire brush or wide-tooth comb to fluff and separate strands. The beard panel will curve slightly when sewn; pin into place before final sewing.
Row 8 :
Ch 1, turn, (dec every 6 sts) to shape lower semicircle: (4 sc, dec) x 4, sc at end (25)
Row 9 :
Ch 1, turn, sc across (25)
Row 10 :
Ch 1, turn, (3 sc, dec) x 4, sc at end (21)
Row 11 :
Ch 1, turn, sc across (21)
Row 12 :
Ch 1, turn, (2 sc, dec) x 4, sc end (17)
Row 13 :
Ch 1, turn, sc across (17)
Row 14 :
Ch 1, turn, (1 sc, dec) x 4, sc end (13)
Row 15 :
Ch 1, turn, sc across (13). Fasten off leaving long tail for sewing to head base.
Info :
Sew beard panel to lower front of head leaving an opening to slip a few loops behind nose for a natural overlay. Adjust how much of the top of the panel tucks under the nose to match the photo — about 3-4 rows of loops overlap under the nose. Comb loops gently and trim to shape the beard's tapered point.
— Hat (Make 5; alternate colors red/forest green) :
Info :
Hats are worked in continuous rounds from the brim up forming a shallow cone. The hat sits over the head starting around round 9 of head and covers top down to just above the nose. Alternate color per gnome: Gnome 1 green, Gnome 2 red, etc.
Round 1 :
6 sc in magic ring (6)
Round 3 :
(1 sc, inc) x 6 (18)
Round 4 :
(2 sc, inc) x 6 (24)
Round 5 :
(3 sc, inc) x 6 (30)
Round 6 :
(4 sc, inc) x 6 (36)
Round 7 :
(5 sc, inc) x 6 (42)
Round 8 :
(6 sc, inc) x 6 (48)
Info :
This creates the hat crown. Try on the hat base over the head to ensure it will cover the head front appropriately. If you prefer a slouchier hat reduce later decreases to shorten the cone. Add simple star-like embroidery in contrasting gold here if desired.
Round 9-13 :
1 sc in each st (48)
Info :
Optional: add a round of 1 sc BLO to create a subtle brim ridge before working cone decreases. For the look in the photo the brim is soft and slightly curved; do not fold it up sharply.
Round 14 :
(6 sc, 1 dec) x 6 (42)
Round 15 :
(5 sc, 1 dec) x 6 (36)
Round 16 :
(4 sc, 1 dec) x 6 (30)
Round 17 :
(3 sc, 1 dec) x 6 (24)
Round 18 :
(2 sc, 1 dec) x 6 (18)
Round 19 :
(1 sc, 1 dec) x 6 (12)
Info :
Leave long tail for sewing to head top if you want the hat fixed, or fasten off and stitch base to head opening leaving a small pleat at the top for the toe-like curve. Embellish later with tiny gold embroidered dots or beads across the hat to mimic the speckled detail in the photo.
Round 21 :
Fasten off and weave in ends. If you prefer a pompom, do not close completely; instead affix a small crocheted bobble or a yarn pom pinned to the point.
— Hat Decorative Stitches & Embellishments :
Info :
Use contrast gold or mustard yarn to embroider tiny star/dot accents by bringing yarn through hat surface and making small french-knot-style stitches or tiny surface sl st. Attach small seed beads with thread through the fabric then knot inside hat for the delicate metallic highlights.
— Large Poinsettia Flower (Make 12) :
Round 1 :
6 sc in magic ring (6)
Round 3 :
(1 sc, inc) x 6 (18)
Round 4 :
Ch 2, *5 dc in same st, sl st in next st* rep around to create 6 petals. Fasten off petals and weave ends. (6 petals)
Round 5 :
Join center with small gold bead cluster: sew three 2mm gold beads into center and secure tightly.
Info :
For the layered look, make a slightly smaller red flower to layer under or over with offset petals. Use a few green stitches at petals base to anchor to leaves.
— Medium Layer Flower (Make 12) :
Round 1 :
Ch 6, sl st to form ring, ch2, (2 dc, ch2, 3 dc) in ring; rep 5 times to create 5 small petals. Fasten off (5 petals)
Round 2 :
Sew this small layer onto the large poinsettia slightly offset to create fullness. Add single gold bead or small french knot with gold thread in center.
Info :
Work petals densely so the flower holds shape. Using two different sizes yields the lush layered appearance visible in the finished runner.
— Small Daisy/White Blossom (Make 30) :
Round 1 :
Ch 6, sl st to form ring, ch 1, *sc, ch 3, sl st in next st* repeat 6 times to create 6 loops that form petals (6 tiny petals)
Round 2 :
Sew tiny gold bead in center, fasten off leaving tail to sew to runner.
Info :
These small blossoms fill gaps and create the airy cream lattice effect; make extra as fillers. Work tightly so centers are neat.
— Leaves (Make 30-40) :
Round 1 :
Ch 8, sc in 2nd ch from hook, hdc, 3 dc, hdc, sc, sl st to tip (7 stitches across) Fasten off. (1 leaf)
Round 2 :
Optional: Work 1 sc across base to make small stem. Repeat to make varying sizes by starting ch 6 (smaller) to ch 10 (larger).
Info :
Leaves are placed around flowers and behind beards to provide greenery. Use darker green for main leaves and a lighter green for a few accent leaves to mimic natural depth.
— Tiny Berry/Bud (Make 20) :
Round 1 :
6 sc in magic ring (6)
Round 4 :
dec around to 6 (6) Fasten off leaving tail to sew; stuff very lightly
Info :
Sew berries into flower clusters or between leaves; use a single bead instead if you prefer. For metallic berries use small gold beads in clusters of three.
— Small Decorative Bobble (Make 5) :
Round 1 :
5 sc in magic ring (5)
Round 4 :
dec around to 5 (5) Fasten off. Stuff lightly and sew to hat side as shown in photo to create ear-like side bobbles
— Cream Lacy Border Motif (Make 24 modules) :
Round 1 :
Ch 8, sl st to first ch to form ring, ch3 (counts as dc), work 11 dc into ring, sl st to top of ch3 (12 dc)
Round 2 :
Ch1, *sc in next dc, ch3, sc in next dc* rep around to create 12 picot-like loops. Fasten off leaving tail for join-as-you-go.
Info :
Border modules are joined with join-as-you-go technique during final assembly to make a scalloped lace that frames the runner. Make extras for edging corners and to fill in any gaps when attaching flower clusters.
— Assembly Prep & Join-As-You-Go Strategy :
Info :
Arrange motifs on a blocking mat in the final runner layout: five gnomes spaced evenly along length with flower clusters bridging the gnome tops and bottoms. Use pins to secure placement. Join flowers and leaves to each other first to form medallions, then attach medallions to the gnome heads/beards. Finally join border motifs to the outer edges to frame the runner, working join-as-you-go sl st or single crochet joins so seams are tidy.
— Detailed Join & Finishing Rounds (Overall) :
Round 1 :
With cream yarn and 3.5mm hook, join two border modules by aligning picot loops and joining with sl st through both loops every 4-5 sts to create a neat seam. Repeat to form long scalloped strip equal to runner length.
Round 2 :
Lay floral medallions and gnome motifs on top of scalloped strip and pin. Using cream or matching yarn, work single crochet through border loops and outer shell of motifs to anchor them. Work slowly, catching small loops of motif edges to stabilize without flattening texture.
Info :
Where motifs meet (flower to gnome, flower to flower) use invisible whip stitch or ladder stitch to join edges tightly. For highly textured areas (beard loops) sew only through the non-loop foundation rows to avoid trimming or pulling loops tight.
Round 3 :
Once all motifs are sewn to border strip, weave in all loose ends and secure beads by stitching through yarn and knotting on inside of seams. Trim beard loops to even length and fluff with comb.
— Extra Techniques & Tips :
Info :
Use a 3.0mm hook for small motifs if you prefer neater, firmer petals. Carry unused yarn inside motifs only if you plan to block and steam lightly; otherwise cut ends short and weave in. For long runner stability, you may add a backing fabric adhered with fabric glue and small whip stitches if you want a flatter underside for table use.
— Final Decorative Embroidery :
Info :
Add small gold or mustard french knots across hats and tiny metallic beads in flower centers. Use thin tapestry needle to pull thread through motifs and secure beads. These small details make the runner look elevated and cohesive.
— Blocking & Care :
Info :
Block motifs lightly with pins on a blocking mat to square edges and encourage flatter seams. Use a cool steam iron at distance or a garment steamer. Wash gently by hand and reshape; do not tumble dry. Store flat for best results.
This Red and Forest Green Gnome Table Runner is a labor of love that transforms simple motifs into a spellbinding holiday centerpiece. Each gnome, carefully layered with loop-stitch beards and cozy hats, becomes a charming vignette among the poinsettias and leaves. As you assemble the motifs into the long, lacy runner, you’ll watch small pieces become a stunning, cohesive display — a festive heirloom to treasure. 🧶✨🌲