— Ears / Side Frills (Make 4 small, 2 medium) :
Round 1 :
6 sc in magic ring (6)
Round 3 :
(1 sc, 1 inc) x 6 (18)
Round 4 :
1 sc in each st (18)
Round 5 :
BLO 1 sc in each st (18) to create a ridge for frill edge
Round 6 :
Fasten off leaving long tail for sewing. Pin smaller frills symmetrically along head sides (around head rounds 8-12) and sew securely. Add small gold bead at tip of each frill with a few whip stitches.
Info :
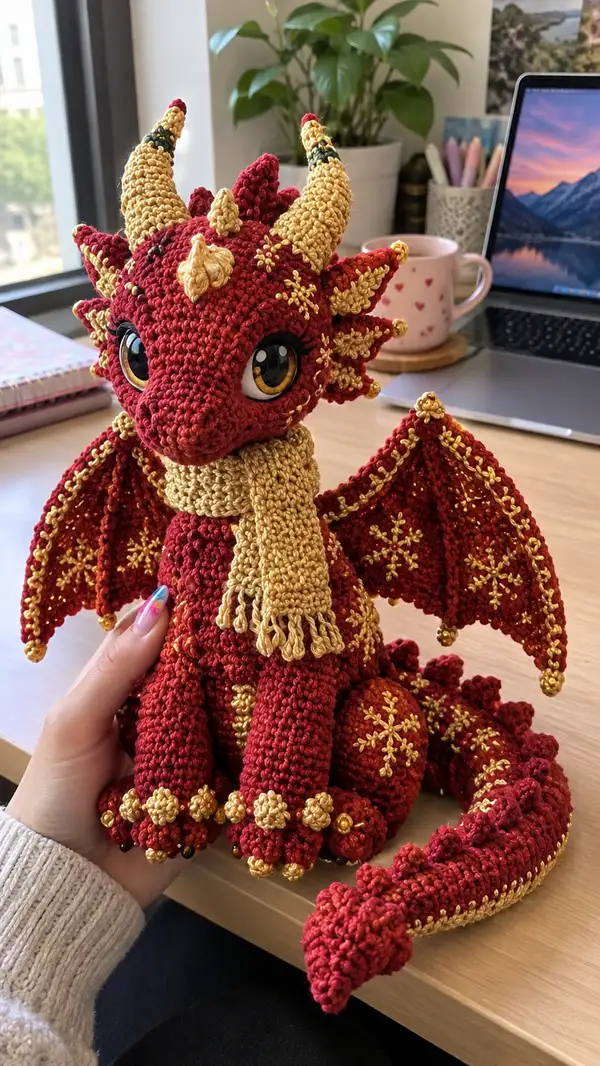
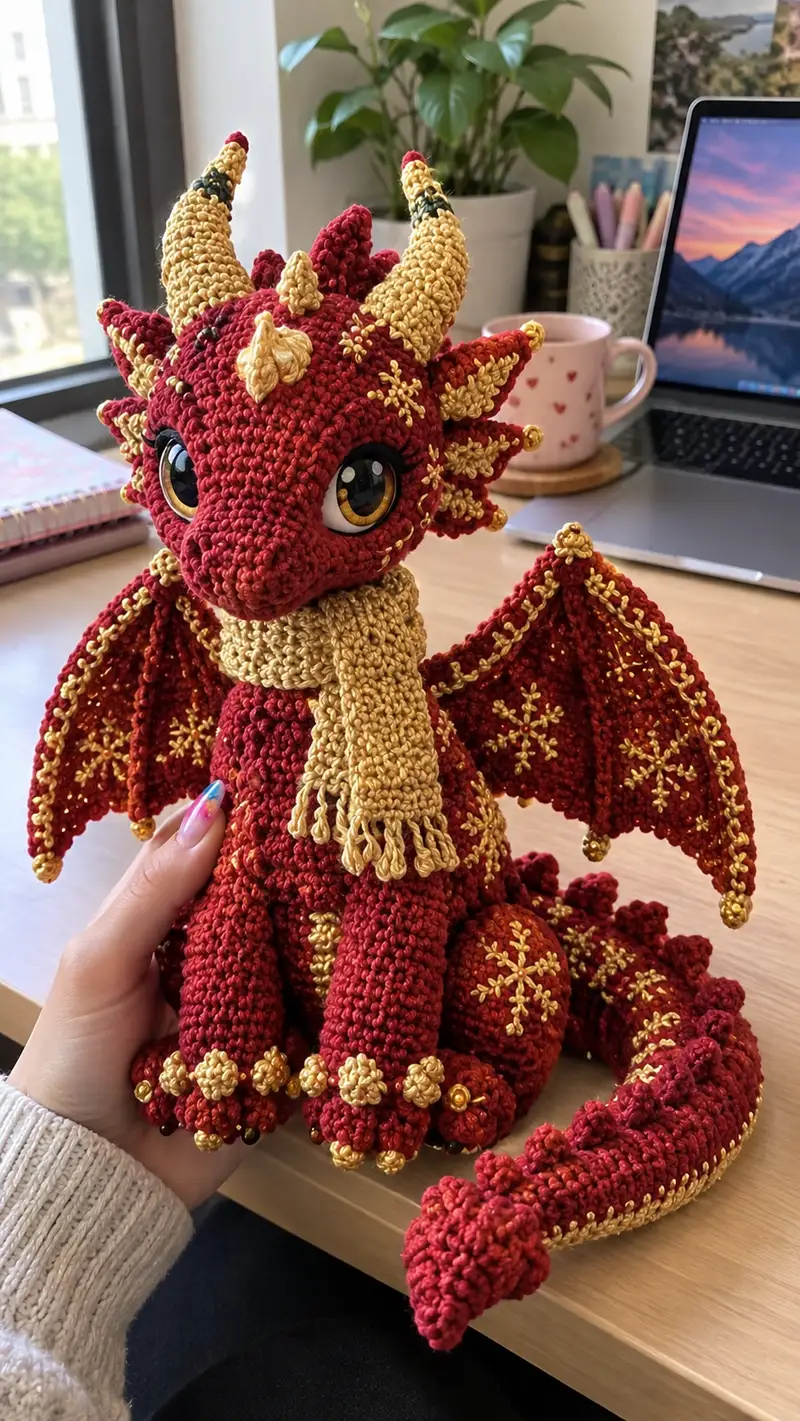
The dragon pictured shows layered frills around the head's mane. Vary size of frills: make two medium frills (work an extra round increasing to 24 sts before BLO) and four small frills for layered effect.
— Horns (Make 2) :
Round 1 :
6 sc in magic ring (6)
Round 3 :
(1 sc, 1 inc) x 6 (18)
Round 4 :
(2 sc, 1 inc) x 6 (24)
Round 5 :
1 sc in each st (24)
Round 6 :
(3 sc, 1 inc) x 6 (30)
Round 7 :
1 sc in each st (30)
Round 8 :
(3 sc, 1 dec) x 6 (24)
Round 9 :
(2 sc, 1 dec) x 6 (18)
Round 10 :
(1 sc, 1 dec) x 6 (12)
Round 12 :
Fasten off leaving long tail for sewing. Stuff lightly — horns should be firm but slightly pliable. Sew horns to top of head symmetrically behind eye line. Add a small gold cap (a tiny bead on top) by sewing a gold bead to the tip.
Info :
Using alternating rows of gold and main yarn can create striped horns like in the picture. Carry the gold yarn inside and switch color at the start of a round to make banding.
— Body :
Round 1 :
6 sc in magic ring (6)
Round 3 :
(1 sc, 1 inc) x 6 (18)
Round 4 :
(2 sc, 1 inc) x 6 (24)
Round 5 :
(3 sc, 1 inc) x 6 (30)
Round 6 :
(4 sc, 1 inc) x 6 (36)
Round 7-10 :
1 sc in each st (36)
Info :
At round 11 change to gold accent yarn for belly panel if you want a gold belly. Carry yarn along inside rows, or cut and join for a clean color block. Use BLO for one round to create a subtle ridge for belly line.
Round 11 :
Change to gold yarn. 1 sc in each st BLO (36)
Round 12-16 :
Change back to main red yarn. 1 sc in each st (36)
Info :
Begin stuffing body lightly at round 13-14, adding more stuffing as you approach the bottom. The body should be firm enough to hold the head but still squeezable for cute posture.
Round 17 :
(4 sc, 1 dec) x 6 (30)
Round 18-20 :
1 sc in each st (30)
Round 21 :
(3 sc, 1 dec) x 6 (24)
Round 22-24 :
1 sc in each st (24)
Round 25 :
(2 sc, 1 dec) x 6 (18)
Round 26 :
(1 sc, 1 dec) x 6 (12)
Info :
Fasten off leaving a long tail for sewing. Stuff body firmly but leave the neck opening large enough to sew head neck opening neatly. Head neck should insert and be sewn around the final body round for a neat join.
— Front Legs / Arms (Make 2) :
Round 1 :
6 sc in magic ring (6)
Round 3 :
(1 sc, 1 inc) x 6 (18)
Round 4 :
1 sc in each st (18)
Round 5 :
1 sc in each st BLO (18) to create a wrist ridge
Info :
Stuff the paw area firmly to create weight-bearing feet. The photographed dragon has beaded claws — add beads on the last round of the paw by threading beads onto yarn and crocheting them into each stitch as you go.
Round 6-10 :
1 sc in each st (18)
Round 11 :
(2 sc, 1 dec) x 4 + 2 sc (14)
Round 12-14 :
1 sc in each st (14)
Round 15 :
(1 sc, 1 dec) x 4 + 2 sc (10)
Round 16-18 :
1 sc in each st (10)
Info :
Before closing, insert a small amount of fiberfill and a short length of wire if you want poseable arms. Fold top of arm opening flat and leave long tail for sewing to body at body rounds 12-16 level for a natural seated posture.
Round 19 :
Fasten off leaving long tail for sewing. Sew paw bead decorations around end: alternate small gold beads and slightly larger gold bead clusters as pictured.
— Back Legs (Make 2) :
Round 1 :
7 sc in magic ring (7) to create a slightly wider foot base
Round 3 :
(1 sc, 1 inc) x 7 (21)
Round 4 :
(2 sc, 1 inc) x 7 (28)
Round 5 :
1 sc in each st (28)
Round 6 :
(3 sc, 1 inc) x 7 (35)
Round 7-10 :
1 sc in each st (35)
Info :
Foot shaping: add ridges or small bumps for toes by making clusters on the foot edge. Thread beads onto some toe tips like on pictured feet for weighted tips; secure beads with thread and a knot inside the foot.
Round 11 :
(3 sc, 1 dec) x 7 (28)
Round 12-14 :
1 sc in each st (28)
Round 15 :
(2 sc, 1 dec) x 7 (21)
Round 16 :
1 sc in each st (21)
Round 17 :
(1 sc, 1 dec) x 7 (14)
Round 18 :
1 sc in each st (14)
Round 19 :
(1 sc, 1 dec) x 4 + 2 sc (10)
Round 20 :
Fasten off leaving long tail for sewing. Insert fiberfill firmly into foot and lower leg; sew leg to body at round 1-3 bottom edge for a seated look. Ensure legs are spaced evenly and support weight.
— Tail :
Round 1 :
6 sc in magic ring (6)
Round 3 :
(1 sc, 1 inc) x 6 (18)
Round 4 :
(2 sc, 1 inc) x 6 (24)
Round 5-8 :
1 sc in each st (24)
Info :
Tail construction is a long tapered tube. After round 8, begin alternating a round of even stitches with a round of slight decrease to shape taper. Add raised ridge of gold along underside by working a row in gold in FLO every 6 rounds to mimic pictured gold seam.
Round 9 :
(3 sc, 1 dec) x 6 (18)
Round 10 :
1 sc in each st (18)
Round 11 :
(2 sc, 1 dec) x 6 (12)
Round 12 :
1 sc in each st (12)
Round 13 :
(1 sc, 1 dec) x 6 (6)
Round 14-15 :
1 sc in each st (6)
Round 16 :
Fasten off leaving long tail for sewing. Stuff tail gradually as you work. For the pictured curled tail, make the tail slightly overstuffed near the base and a little firmer near the tip so it curls naturally when joined to body.
Info :
Create a row of small spike bases along the top of the tail by sewing on small spike motifs (pattern below) every 6-8 stitches; alternate full spikes and small bumps for the textured look in the photo.
— Tail Spikes / Scales (Make 18-22) :
Round 1 :
6 sc in magic ring (6)
Round 3 :
1 sc in each st (12)
Round 4 :
BLO 1 sc in each st (12) to create a flat base
Round 5 :
Fasten off leaving long tail for sewing. Flatten base and whip stitch to the tail top at intervals of 6-8 sts. Position spikes so they graduate smaller towards the tip.
Info :
Sew a gold bead or bead cluster onto the tip of every third spike to mirror the photo. Use matching thread and secure with several passes through the spike base and tail body for long-term durability.
— Wings (Make 2) :
Info :
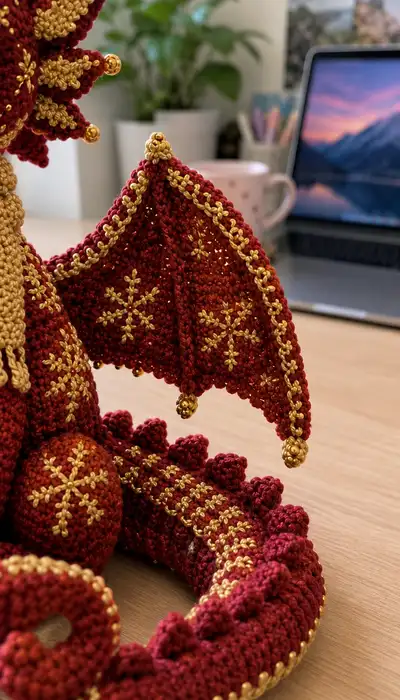
Wings are crocheted flat in the round to create a triangular panel with three ridged sections. The pictured wings have a gold edge and embroidered snowflakes inside. Work with main red yarn, then use gold for edging and surface embroidery afterwards.
Round 1 :
6 sc in magic ring (6)
Round 3 :
(1 sc, 1 inc) x 6 (18)
Round 4 :
(2 sc, 1 inc) x 6 (24)
Round 5 :
(3 sc, 1 inc) x 6 (30)
Round 6 :
1 sc in each st (30)
Round 7 :
(4 sc, 1 inc) x 5 + 5 sc (35)
Round 8 :
1 sc in each st (35)
Round 9 :
Increase at three points to create wing corners: *work 6 sc, (inc x3)* repeat 4 times (47)
Round 10-12 :
1 sc in each st (47)
Info :
Work three straight ridges by folding wing panel and joining at points later to form the bat-like wing sections. Add internal wire or stay stitch in the wing seam if you want the wings to hold a spread pose.
Round 13 :
BLO 1 sc in each st (47) to emphasize edge detail
Round 14 :
Switch to gold accent yarn. 1 sc in each st (47)
Round 15 :
Fasten off leaving long tail for sewing. Use gold yarn and metallic thread to embroider snowflake/star motifs inside the wing panels: perform surface chains and small star stitches to replicate the picture.
Info :
For embroidery: anchor metallic thread inside the wing with a small knot or weave anchoring tail through stitches so the metallic does not pull out. Create symmetrical motifs on each wing by marking centers with pins before stitching.
— Wing Edge Beads & Fringe :
Info :
Sew a gold bead at each wing tip and along the bottom edge at even intervals. To make the hanging bead at the wing tip, attach a tiny spike (see spike pattern) and sew a medium gold bead onto its tip. Add gold picot loops along the outer edge by using small chains and a sl st back into the body to mimic the decorative scalloped trim.
— Decorative Surface Embroidery :
Info :
Use metallic gold embroidery thread to embroider snowflake/star motifs on the wings, body sides and tail round discs. Technique: bring needle from inside to outside, pull a short chain of 3-4 stitches, anchor with a backstitch and create radial spokes to form star shapes. Keep stitches small and consistent — practice on a scrap panel first.
— Claw & Paw Beads :
Info :
Sew small gold beads on paw tips. Thread beads on yarn before your final round and slip bead down then sc into stitch to lock bead in place, or sew beads on after with embroidery thread. Secure beads with several passes of thread and knot inside the paw.
— Scarf :
Info :
Scarf is worked flat in rows with gold yarn. Dimensions approx. 5cm wide x 22cm long for pictured scale. Work hdc for a warm, textured fabric then add fringe by making small loops of chain and securing them along the short ends.
Row 1 :
Ch 18, hdc in 2nd ch from hook and across (17 hdc)
Row 2-40 :
Ch 1, turn, hdc across (17)
Info :
Fasten off and weave in ends. Create fringe by cutting 6cm strands, folding in half, pulling loop through edge and pulling ends through loop. Attach 6-8 fringe groups on each end for the pictured thick scarf.
— Decorative Round Panels (Optional, Make 3) :
Round 1 :
6 sc in magic ring (6)
Round 3 :
(1 sc, 1 inc) x 6 (18)
Round 4 :
1 sc in each st (18)
Info :
Embroider snowflake motif on panel center using gold metallic thread. Sew panels to hips or shoulders as decorative medallions shown in photo.
— Small Decorative Spikes (Head & Back, Make 10-12) :
Round 1 :
4 sc in magic ring (4)
Round 3 :
1 sc in each st (8)
Round 4 :
Fasten off leaving long tail for sewing. Place these spikes along the head crest and down the back every 4-6 stitches for the layered maned look.
Info :
Top spikes on the head often have a small bead at the tip — stitch a tiny gold bead onto the spike point and secure with a few passes of thread.
— Assembly Instructions Overview :
Info :
Weave in all loose ends leaving long tails for sewing. Pin all pieces in place before stitching to check symmetry, especially head-to-body and wing placement. Use ladder stitch or whip stitch with matching yarn for invisible joins.
Round 1 :
Sew head onto body: insert head neck opening into body top opening and whip stitch all around through both rounds. Use a circular, even tension to avoid a crooked neck.
Round 2 :
Sew arms to body at side seams around body rounds 12-15. Make sure both arms are level and at a slight forward angle for the seated pose.
Round 3 :
Sew legs to bottom of body spaced evenly to support seated posture. Reinforce with extra stitches through the leg base and body for stability.
Round 4 :
Attach tail to back lower body center and sew securely around 6-8 rounds of tail base and body bottom. Curve tail into a spiral and tack at a few points if you want it to hold position.
Round 5 :
Sew wings to shoulder area at body rounds 6-9. Position them slightly angled outward. If you inserted wire, ensure the wire ends are tucked and secured inside so they do not poke through.
Round 6 :
Sew spikes along the head crest and tail, securing each spike with several passes of yarn. Add bead accents to wing tips and paw tips. Adjust any embroidery to ensure symmetry.
Info :
Once assembled, check overall balance. If the dragon leans, reposition stuffing or add a small bead-weight to the bottom of the body stuffed into a fabric pouch sewn in to stabilize the base.
This regal dragon is a delightful blend of sculptural crochet and decorative embroidery — a perfect creative centerpiece that showcases your skills. The combination of rich garnet yarn and metallic gold accents gives a festive, magical feel that makes this piece a wonderful gift or display item. Enjoy the slow, satisfying process of stitching spines, shaping the face, and adding shimmering snowflake details. 🧶✨ Your finished dragon will be a treasured, hand-crafted companion — share your creation with pride! 🐉