🧶 Beautiful ✨ Detailed 💝 Adorable

Reversible Cat Amigurumi Pattern

Reversible Cat Amigurumi Pattern
4.6★ Rating
2-4 Hours Time Needed
2.8K Made This
✂️

Intermediate Level

Ideal for those with basic crochet experience, featuring slightly more advanced stitches and techniques to expand your skills.

⏱️

Bite-Sized Project

Finishes in 2-4 hours—perfect for an afternoon of creative relaxation.

🧸

Cute Companion

An adorable friend to cherish, handcrafted with love to bring comfort and joy for years to come.

About This Reversible Cat Amigurumi Pattern

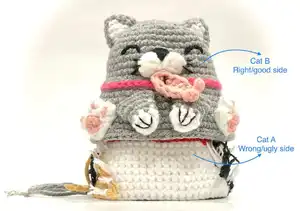
This instruction set shows how to join two finished chibiscraft reversible cat amigurumies to create a single reversible toy. It covers turning pieces inside out, tying the magic-ring tails, nesting one cat inside the other, and sewing the last rounds together through the back loops. The technique requires no extra stuffing and keeps both faces crisp and reversible.

Reversible Cat Amigurumi Pattern crochet pattern - detailed view of completed project

Follow each step carefully to ensure correct alignment and a neat finish. The method is adaptable to other small amigurumi pairs with magic-ring tails.

Why You'll Love This Reversible Cat Amigurumi Pattern

I absolutely love this pattern because it transforms two individual amigurumi into one playful reversible piece, doubling the charm with minimal effort. I enjoy how tidy the final join looks when you sew through the back loops, and I love that there is no need to re-stuff the pieces. I find the nesting method surprisingly sturdy and satisfying, especially when the faces are lined up well. Making reversible toys like this always delights both kids and adults, and I love gifting them.

Reversible Cat Amigurumi Pattern step 1 - construction progress Reversible Cat Amigurumi Pattern step 2 - assembly progress Reversible Cat Amigurumi Pattern step 3 - details and accessories Reversible Cat Amigurumi Pattern step 4 - final assembly and finishing

Switch Things Up

I like to personalize the reversible cat by changing color combinations for Cat A and Cat B so each side has a distinct personality.

I often add a small bell or ribbon to one cat for extra charm, making one side more playful than the other.

I sometimes embroider different expressions (smile versus wink) on each face to make the reversible action more dramatic.

To change the size, I experiment with different yarn weights and corresponding hook sizes; a thicker yarn creates a chunkier reversible toy.

I also try adding tiny accessories like a crocheted fish or a mini scarf to one side to tell a story between the two faces.

For a safer child-friendly version, I use embroidered eyes instead of safety eyes and double the yarn tails when knotting for extra durability.

I occasionally line up faces differently—offsetting slightly—for a quirky look, just be sure to pin and check alignment before sewing.

If I want a sturdier seam, I use a second pass of whipstitch through the back loops only, which hides the stitching but reinforces the join.

I like to experiment with mixing textures: try pairing a plush chenille cat with a standard acrylic cat to see how the reversible effect changes the feel.

Finally, I create small matching sets with different color schemes as gifts—each reversible pair tells a different little story and makes a unique present.

Common Mistakes & How to Fix Them

✗ Not using matching yarn weight and hook sizes for both cats leads to uneven sizes; always use the same yarn weight, hook size, and tension for both pieces. 
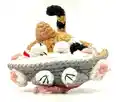
✗ Tying the magic-ring tails too tightly can distort the shape and prevent proper nesting; leave a 1-2 cm space between knots to allow alignment and smoothing. 
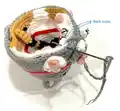
✗ Forgetting to work through the back loops when sewing will make the seam bulky and visible; sew through the back loops of each piece as instructed for a neat join. ✗ Removing the wrong side or stuffing Cat A incorrectly can create lumps; leave Cat A wrong/ugly side intact and do not add fiberfill while joining to preserve the reversible function. ✗ Failing to hide and secure the yarn tail at the end can lead to unraveling over time; finish with a secure knot and weave the tail into the seam to hide it properly.

Reversible Cat Amigurumi Pattern

Make a charming reversible cat amigurumi you can flip for two different faces. These instructions focus on joining two finished chibiscraft cat amigurumies into one reversible toy using the yarn tails from their magic rings. You'll learn the simple knotting, nesting, and final sewing technique to secure both cats together. Perfect for gifting or displaying, this reversible design is playful and practical.

Intermediate 2-4 Hours

Materials Needed for Reversible Cat Amigurumi Pattern

— Main Fabric

  • 01
    2 chibiscraft cat amigurumies (Cat A and Cat B) - finished amigurumi pieces used for joining
  • 02
    Cat A: finished cat with a short yarn tail from the last stitch of its body
  • 03
    Cat B: finished cat with a long yarn tail from the last stitch of its body (this long tail will be used to join both cats)

— Tools Required

  • 01
    Tapestry needle
  • 02
    Scissors
  • 03
    Long yarn tail from Cat B (used for sewing the pieces together)

Progress Tracker

0% Complete

— Tips :

Infos :

Each cat amigurumi should be worked using the same weight of yarn, same hook size, and same stitch tension to maintain their similarities in size. It is highly recommended that you read through the pattern completely before beginning to make your reversible amigurumi.

— Material :

Infos :

Tapestry needle. Scissors. 2 chibiscraft's cat amigurumies: Cat A : has short yarn tail from the last stitch of its body. Cat B : has long yarn tail from the last stitch of its body. This tail will be used to join both cats.

— Procedure to Join Both Cats :

Step 1 :

Turn both cats inside out with the wrong/ugly sides facing you.

Step 2 :

Tie a knot with the yarn tails from the magic rings of both of them, leaving a space between them (about 1-2 cm).

Step 3 :

Turn the cat B back with the right/good side facing you, and leave the cat A intact at the wrong/ugly side.

Step 4 :

No need to stuff with fiberfill.

Step 5 :

Push the cat A inside the cat B.

Step 6 :

Since there is not any shared part between them, you have the option to line up both faces.

Step 7 :

Join the last rounds of both cats.

Step 8 :

Sew them together with yarn tail of cat B through the back loops of each piece.

Step 9 :

To finish, make a knot and hide the tail.

Info :

Congratulations! Your reversible cat amigurumi is ready.

Assembly Instructions

  • Turn both cats inside out so the wrong/ugly sides face you before joining to ensure the seam will be hidden.
  • Tie the yarn tails from the magic rings of Cat A and Cat B together, leaving about 1-2 cm space between knots to allow for alignment.
  • Turn Cat B back to the right/good side while leaving Cat A on the wrong/ugly side, then push Cat A inside Cat B so their bodies nest.
  • Line up both faces as needed since there is no shared part; adjust placement before sewing for best alignment.
  • Sew the last rounds of both cats together using the long yarn tail of Cat B, working through the back loops of each piece for a tidy seam.
  • Finish by making a secure knot and hiding the tail inside the seam so it is not visible and will not unravel.

Important Notes

  • 💡Use the same yarn weight, hook size, and tension for both cats to ensure a consistent fit when joining them.
  • 💡Leave a 1-2 cm gap when knotting the magic-ring tails so you can easily line up and adjust both faces before final sewing.
  • 💡Sew through the back loops of each piece to create a neat, less visible seam; hide and secure the tail with a final knot.
  • 💡There is no need to add fiberfill while joining—do not stuff Cat A when nesting it inside Cat B to preserve the reversible function.

This reversible cat amigurumi creates two delightful faces in one playful toy, perfect for gifts and cozy displays. The joining technique is simple yet effective, leaving a clean seam and secure connection between both cats. Make one for a friend or keep it for yourself — it's a tiny handmade treasure full of charm. 🧶🐱

You ask,

we answer.

FAQs

What size will the finished piece be?

The finished reversible amigurumi size depends on the original cats used; using two identical chibiscraft cat amigurumies will produce a compact reversible toy roughly the size of the original cats stacked together.

Can I use different yarn weights for this pattern?

It is not recommended to mix yarn weights for the two cats because differences in yarn thickness will affect how well the pieces nest and align; use the same yarn weight and hook size for both cats.

Do I need prior crochet experience for this pattern?

This joining instruction is rated intermediate because it assumes you have completed two amigurumi cats and are comfortable with basic finishing techniques like tying, sewing through loops, and hiding yarn tails.

How long does this project typically take to complete?

The joining process itself is quick and typically takes less than an hour, but creating the two cats will add time; overall, this project can be completed in about 2-4 hours depending on experience.