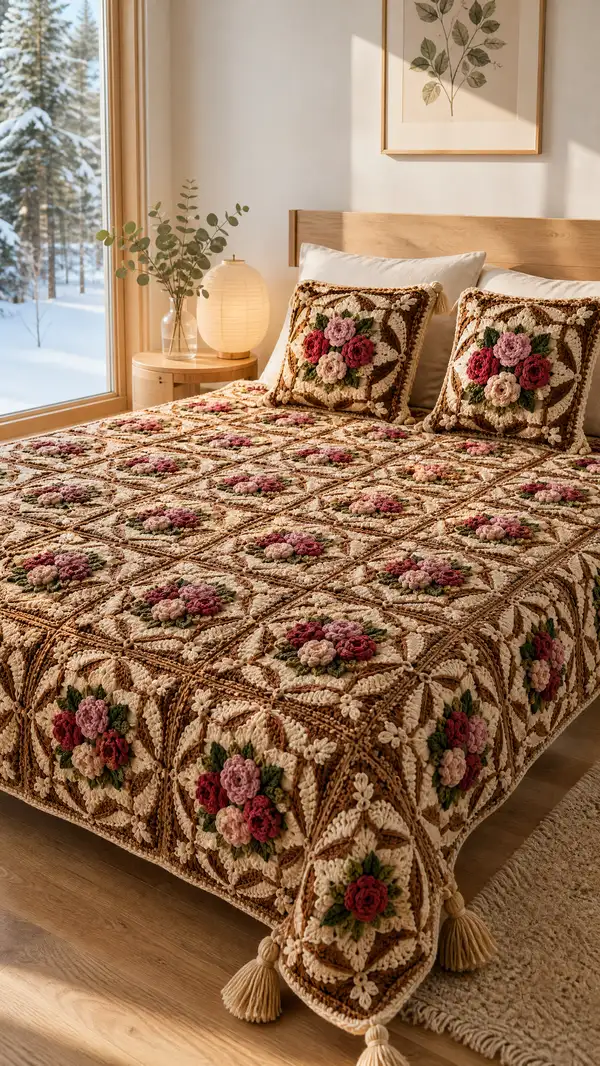
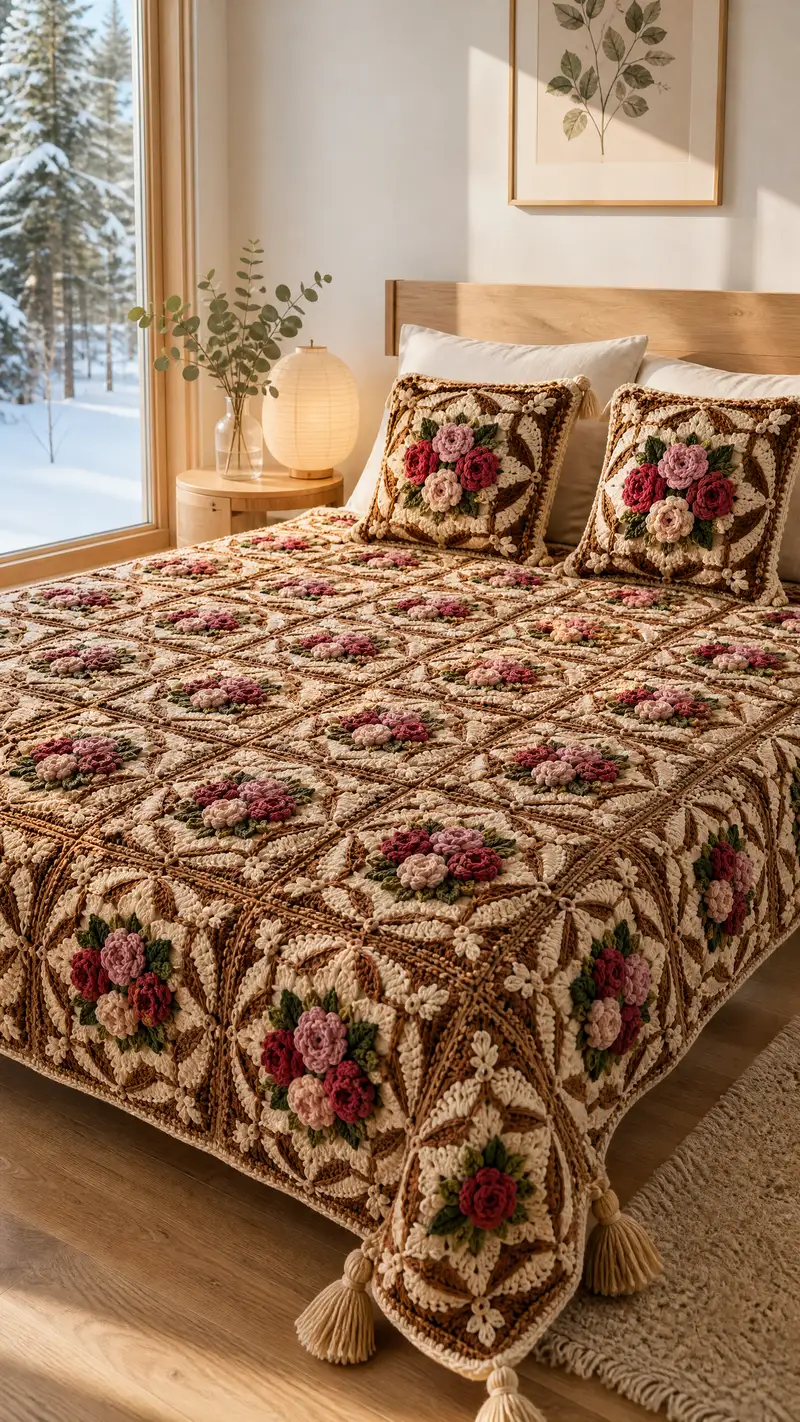
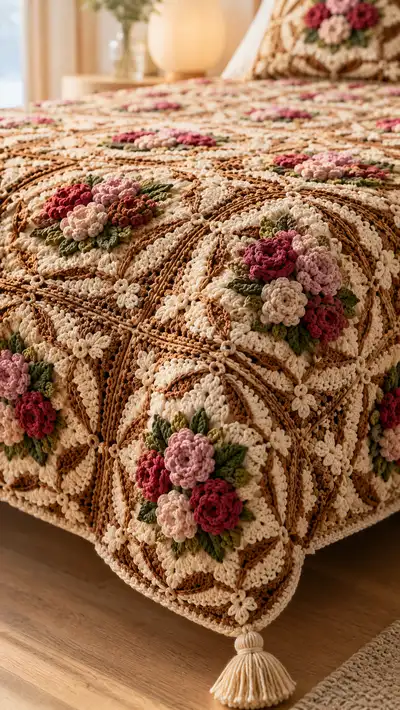
A vintage-inspired Rose Medallion Granny Square Bedspread assembled from textured 3D roses, layered leaves and scalloped lattice squares. Warm neutrals framed with soft pinks and deep rose tones create a romantic bedspread that lays beautifully on a queen or full bed. Each motif is a multi-part construction (3D rose, leaves, square frame) joined with a raised lattice and finished with a wide scalloped border and tassels at the corners.
Progress Tracker
0% Complete
— Overview :
Info :
This bedspread is constructed from a repeated 3D Rose Medallion Granny Square. Each square is made in parts: 3D roses (a small, medium and large rose grouped), layered leaves, a textured inner round, a framed lattice round, and outer scallop rounds. Squares are joined using a flat slip-stitch lattice or whip-stitch seam. The pattern below gives step-by-step rounds for each part; repeat quantities are noted where applicable. Tension and hook size will affect final size; sample gauge: one completed square (all rounds through outer scallop but before border) measures approximately 10.5" (26.5 cm) when worked with recommended yarn and hook. For a queen bedspread shown (approx. 88"x92") you will need approximately 8x9 = 72 squares (adjust to bed size).
Info :
Terminology: This pattern uses US stitch names. If you prefer denser roses, use the 3.5mm hook for rose and leaf parts. Carry color changes carefully or fasten off to avoid messy backs — many textured elements are sewn on and will hide tails, but tidy weaving is still recommended.
— 3D Rose - Small (Make 1 for each small central rose) :
Round 1 :
ch 3, join with sl st to form ring, ch 1, 6 sc in ring (6)
Round 2 :
(1 sc, inc) x 3 (9)
Round 3 :
(2 sc, inc) x 3 (12)
Info :
Switch to 3.5mm hook for petal rounds if you want the petals tighter and more sculptural. Leave a 12-14" tail for sewing the rose to inner square layer at the end of construction.
Round 4 :
Ch 1, sc in same st, *ch 2, 3 dc in next st, ch 2, sc in next st* repeat around to form 6 petals; join with sl st (12 petals counted as spaces)
Round 5 :
Working in spaces: sl st into first ch-2 space, (ch 1, 5 dc, ch 1, sl st) in same space to create a fuller petal, sl st in next sc, rep around to enlarge petals (6 larger petals)
Round 6 :
Fasten off leaving long tail; shape petals by folding slightly and tack-stitching base to create cupped rose shape. Make 1 small rose per motif in deep rose color.
Info :
To create a spiral rose (alternative method), after Round 3 work a long strip of sc and puff clusters, then roll and sew; the above layered-petal method gives a consistent 3D look that matches the photo.
— 3D Rose - Medium (Make 1 per motif) :
Round 1 :
mr, 8 sc in mr, pull tight (8)
Round 2 :
(1 sc, inc) x 4 (12)
Round 3 :
(2 sc, inc) x 4 (16)
Round 4 :
Ch 1, sc in same st, *ch 2, 3 dc in next st, ch 2, sc in next 2 sts* rep around; join with sl st to establish 8 petal spaces
Round 5 :
In each ch-2 space: (sl st, ch 1, 7 dc, ch 1, sl st) to form larger petal clusters (8 petals)
Round 6 :
Optionally add a third petal row: sl st into a petal, ch 1, (9 dc in petal base cluster) around to create extra fullness; fasten off and leave long tail for sewing into place.
Info :
Make the medium rose in mid-pink. When assembling the rose cluster on the square, group small+medium+large roses tightly and sew only at bases to maintain a full bloom effect.
— 3D Rose - Large (Make 1 per motif) :
Round 1 :
mr, 10 sc in mr (10)
Round 2 :
(2 sc, inc) x 5 (15)
Round 3 :
(3 sc, inc) x 5 (20)
Round 4 :
Ch 1, sc in same st, *ch 2, 3 dc in next st, ch 2, sc in next 3 sts* rep around; join (10 petal spaces)
Round 5 :
In each ch-2 space: (sl st, ch 1, 9 dc, ch 1, sl st) to create deep, rounded petals (10 petals)
Round 6 :
Finish with a final petal trim: *sl st into top of a petal, ch 1, (1 sc, hdc, 3 dc, hdc, 1 sc) across petal* rep around for sculpted petal edges. Fasten off and leave long tail for sewing. Use darkest rose color for this layer to create depth.
Info :
Block each rose lightly if petals curl oddly — gentle steam and shaping will flatten and sculpt petals. Use a small amount of starch or spray if you prefer more rigid petals for sewing.
— Leaves (Make 6 per motif: 4 large, 2 small) :
Large Leaf - Round 1 :
ch 10, sc in 2nd ch from hook, hdc, (dc, tr, dc) across to center, hdc, sc, turn and work down opposite side: sc, hdc, (dc, tr, dc), hdc, sc — do not join; fasten off (leaf outline)
Large Leaf - Round 2 :
Rejoin at base, BLO: sc in each st across to give a defined ridge; sl st to base and finish. Make 4 large leaves in olive green.
Small Leaf :
ch 7, sc in 2nd ch from hook, hdc, dc, tr, dc, hdc, sc across; fasten off leaving tail. Make 2 small leaves in sage green.
Info :
Stitch veins with spare yarn using surface slip-stitch: run a contrasting slightly darker green down the center then two short veins on each side to mimic the leaves in the photo.
— Inner Round & Petal Base (Attach roses and leaves onto this base) :
Round 1 :
Using cream/ecru, mr, 8 sc in mr (8)
Round 2 :
Inc in each st around (16)
Round 3 :
(1 sc, inc) x 8 (24)
Round 4 :
(2 sc, inc) x 8 (32)
Round 5 :
1 sc in each st around (32)
Info :
On this inner round you will sew the 3D roses: position the large rose at the lower-left of the group, medium center-right, small tucked near top center to form a compact cluster. Pin roses and leaves in place with staggered depths so petals overlap slightly, then tack sew around bases using long tails left from rose pieces.
Round 6 :
After sewing roses, with same color work picot ring: *ch 3, sl st in next st* around to form decorative picot border (32 picots). Fasten off and change to caramel for framing round.
— Square Frame & Textured Lattice (Square rounds form the medallion background) :
Info :
Change to caramel/brown for the lattice and framing. This section creates the raised corded lattice that outlines diagonal petals in each corner and intersecting arcs seen in the photos. Work in joined rounds, turning as required to keep raised ridges on RS.
Round 1 :
Join caramel to any st on Round 5 of inner base. Ch 1, sc evenly around the inner circle, placing 8 sc in each quarter to create a squaring foundation. Work 40 sc total (estimate depending on tension) — adjust to keep square allowances even.
Round 2 :
1 sc in each st (40) maintaining marks at quarters; this stabilizes the base for corner shaping.
Round 3 :
Start corner shaping: *(ch 3, 2 dc in same st, ch 3, sl st) in quarter marker to create corner arch, then 6 sc along edge between corners* repeat around forming 4 corner arches and edge sc (40+ corner sts)
Round 4 :
With same color, work 1 sc in each sc and (ch 3, sl st across arch) over arch to build raised arches. Use FLO on the arch rows (work 1 sc in each st FLO) to create a visible ridge on RS.
Info :
Use stitch markers to mark corner arches and keep counts consistent. The objective is to create space for the raised cathedral-style ropes (see following rounds) that cross diagonally across the square.
Round 5 :
Change to cream. Work 1 sc in each st around (use same count as previous; if necessary add or remove sc evenly between corner arches to maintain square shape) (approx 48)
Round 6 :
Switch back to caramel. Working in BLO: *(ch 6, sk 6 sc, sl st in next sc) repeat to create long chain loops that will be anchored in next round to form lattice ribs across the square.*
Round 7 :
With caramel, anchor loops: in each chain-6 loop work (sl st, sc, hdc, sc, sl st) to create a raised rope; this gives a corded look. Work evenly across to make diagonal ribs — create four ribs that meet near the center but do not overlap the rose cluster, leaving a circular space that frames the rose.
Round 8 :
Change to cream and work 1 sc in each st around (count will vary slightly depending on rib anchors) to balance edges. Use markers at corners.
Info :
If your ribs pucker, ease tension or use a slightly larger hook for the corded rounds. The lattice ribs should sit on top of the cream field as a raised outline, not sink into it.
Round 9 :
Work decorative petal frames: join brown at midpoint of each side, *(ch 3, sl st to create a small picot arch over side), 8 sc in between,* repeat around to create the diamond petal shapes seen around the rose cluster. Fasten off and weave ends.
Round 10 :
With cream, sc evenly around and begin flattening square to exact 10.5" measurement; adjust by adding sc in corners or edges as needed to make square flat (approx 60 sc depending on adjustments)
Round 11 :
Work an ornamental cluster round: *in each side space work (3 dc cluster, ch 1, sc) to add texture and match the little flower junction motifs between squares shown in photo.*
Round 12 :
Switch to caramel and create raised diagonal ribs across each quadrant: join caramel in a corner arch base, ch 1, 1 sc in next 4 sts, BLO 3 sc to form ridge, then anchor to opposite arch. Repeat to make an X-shaped rib across the square. Fasten off and weave ends. This is the most textural part of the square and should echo the photograph's corded lines.
Info :
At completion each square should show a circular rose cluster center with four raised diagonal ribs and delicate petal junctions at corners. Block each square to shape before joining to ensure even edges and matching stitch counts.
— Corner Petal Junction Motif (Make 1 at each corner of square) :
Round 1 :
In cream, mr, ch 1, 6 sc in mr (6)
Round 2 :
(1 sc, inc) x 3 (9)
Round 3 :
Ch 2, 3 dc in next; sl st to form a small flower petal; repeat 4 times to create a rosette (4 small petals)
Round 4 :
Fasten off leaving long tail for sewing into corner. Sew junction motifs to corners, sandwiching lattice ribs to create the little 4-petal connectors visible in photos.
Info :
These small junction motifs also act as join points when assembling squares—if using join-as-you-go (JAYGO), work the junction motif in place at final rounds of each square to secure neighbors.
— Making the Full Square (Assembly of parts) :
Round 1 :
Complete inner base (with sewn roses) and work all square frame rounds up to Round 12 above. Ensure corners and ribs are fully blocked and shaped.
Info :
Make exactly 72 squares for a queen-sized layout of 8 x 9. For larger/smaller beds, add or remove rows and columns while maintaining symmetrical border counts. Keep color placement consistent across the bedspread for visual harmony.
Round 2 :
Weave in ends from rose bases on the WS, trimming tails close. Press each square flat with pins so edges are true and corners match across all squares.
Info :
Number each square with a small scrap of paper pinned to the back to keep your layout organized as you join. Arrange roses in alternating orientations for a more organic look.
— Joining Squares (Choose one method):
Method A - Join-As-You-Go (JAYGO) :
When working final round 12 of square A, align square B on adjacent side, slip-stitch to corresponding stitches of square B every third stitch, and continue final round to attach directly. At each corner junction work small junction motif or sl st clusters to match photo's decorative four-petal joins.
Info :
JAYGO creates a nearly invisible seam and locks the lattice junctions in place. Work slowly and use pins to align motifs. If squares are slightly different in gauge, ease in extra stitches at join points.
Method B - Whip-Stitch Join (Alternative) :
Block squares and pin them RS together, aligning lattice ribs and corner junctions. With tapestry needle and matching cream yarn, whip-stitch through back loops only of both squares to create a defined ridge reminiscent of the photograph. Work a second pass of slip stitches in caramel along seam for raised outline if desired.
Info :
Whip-stitch gives more flexibility if your squares are slightly out of shape. Reinforce seam at points where many textures meet to prevent sagging in the bedspread center.
— Border (Work after joining all squares) :
Round 1 :
With RS facing, in cream work 1 sc evenly around entire assembled blanket, placing 3 sc in each outer corner to turn (work in continuous round; use markers for corners). Fasten off and join caramel for decorative rounds.
Round 2 :
Caramel: ch 3 (counts as dc), *skip 2 sc, (5 dc in next st) shell, skip 2 sc, dc in next sc* repeat around to create scallop texture; place shells evenly along edges. Fasten off cream and rejoin to work row that stitches into scallops for depth.
Round 3 :
Cream: sc in each st and work picot trim into tip of each caramel shell: (ch 3, sl st into top dc of shell). This creates the small dot-like trim echoed in the photo's border edges.
Round 4 :
With caramel, work a final rope row: 1 sc BLO across to create a raised braided effect. Work two rows if you want a more pronounced frame. Fasten off and weave ends.
Info :
The border both stabilizes the assembled bedspread and provides the crisp final frame seen in the photo. If you prefer a heavier-weight border, add 1-2 more rows of sc in cream before working the caramel scallops.
— Pillow Shams (Make 2 to match photo - each uses 4 squares) :
Round 1 :
Create four full squares (rose cluster + square frame) and join them 2 x 2 using whip stitch, aligning rib lines to create a mirrored medallion.
Round 2 :
Border the assembled sham with 3 rounds: cream sc round, caramel scallop round (5 dc shells), and cream picot finish as used for blanket border. Add tassels to each corner by folding yarn bundles and securing with wrap knot as described below.
Info :
Insert a pillow form into the sham and secure with hidden whip-stitches or a zipper if preferred. For a more tailored look, insert a cardboard template to square edges before final seaming.
— Tassels (Make 4 per bedspread corner and 4 for each sham corner) :
Round 1 :
Cut 100-150 strands of cream yarn to double the desired tassel length (for a 4" tassel trim to 8" strand length before fold). Fold and tie tightly near fold with a strong small piece of yarn or embroidery thread to form the head.
Round 2 :
Wrap additional yarn around the head about 3/4" down to create a neck; secure and stitch the binding thread tightly. Trim ends evenly. Attach tassel by stitching through the knot and anchor to blanket corner through several stitches of final border round.
Info :
To make chunky tassels that match the sample, fold multiple layers of a doubled worsted yarn. Use a comb or carding brush lightly to fluff out ends for a fuller look if desired.
— Finishing Touches & Blocking :
Info :
Wash gently by hand or sponge-block each square while pinned to a blocking board to exact measurements. Use steam blocking for final shaping on the roses and ribs, but avoid direct heat on synthetic blends. Secure all ends by weaving through at least 20 sts on the WS before trimming.
Round 1 :
Inspect seams and reinforce areas that feel loose using matching yarn and small whip-stitches through back loops only to preserve raised fronts.
Round 2 :
Attach tassels to corners and tuft with a few extra stitches to ensure they will not pull loose under regular use.
Info :
For long-term durability, consider lining the inside of the spread with a lightweight cotton backing sewn to the WS: pin the backing to match seams, whip-stitch around edges leaving small venting openings for drying if washed.
— Optional Modifications & Gauge Considerations :
Info :
Use 3.5mm hook for more sculptural roses or if you work loose; use 4.5mm if you need a larger square and want a drapier bedspread. Changing yarn weight will alter the number of squares needed—always make a gauge square: 1 finished square (all rounds before border) should measure approx 10.5" with recommended yarn and hook.
Info :
To make a smaller throw, reduce the number of squares to a 4 x 5 layout or scale the design by choosing a smaller hook/yarn. For a denser heirloom look, add an extra border row of shells and a final crab stitch in caramel to finish edges.
Final Notes :
Care: Hand wash cold, lay flat to dry. Store folded in a breathable cotton bag to protect the raised petals and tassels.
This Rose Medallion Granny Square Bedspread is a truly rewarding project that blends sculptural floral motifs with textured lattice and a classic scalloped border. Each square is a small piece of art, and joining them sings with tactile depth and vintage romance. The slow, meditative work of crafting each 3D rose and sewing leaves in place makes the final reveal especially satisfying. 🧶 Wrap yourself in the warmth of handmade details and enjoy every stitch of this cozy creation. 🌹✨