🧶 Beautiful ✨ Detailed 💝 Adorable

Ruffled By The Wind Shawl Pattern

Ruffled By The Wind Shawl Pattern
4.1★ Rating
5-7 Hours Time Needed
2.9K Made This
✂️

Intermediate Level

Ideal for those with basic crochet experience, featuring slightly more advanced stitches and techniques to expand your skills.

⏱️

Weekend Treat

Takes 5-7 hours, making it an enjoyable project to finish over a couple of days.

🧣

Snug Essential

Everyday comfort with practical charm, designed for both functionality and style through changing seasons.

About This Ruffled By The Wind Shawl Pattern

This pattern creates a crescent shaped knitted shawl with a ruffled edge, designed around hand-dyed fingering/4ply yarn. The shawl is worked from a small set-up tab and increases to create a gentle crescent, with contrast rows and ruffle shaping for a finished frilly edge. It is perfect for using a full skein with a contrasting mini skein for the ruffle detail.

Ruffled By The Wind Shawl Pattern crochet pattern - detailed view of completed project

Worked flat from a 3-stitch set-up, the pattern includes clear row-by-row instructions and suggested blocking tips. The finished shawl measures approximately 113cm wingspan by 34cm when blocked to a point.

Why You'll Love This Ruffled By The Wind Shawl Pattern

I absolutely love this pattern because it combines simple shaping with a playful ruffled finish that really elevates a hand-dyed skein. I enjoy how the contrast section pops against the main colour and gives the shawl a focal point. I designed it to use the majority of a 100g fingering skein with a small mini for the ruffle so it feels satisfying to use up special yarn. I also love how the crescent shape becomes more elegant after blocking, giving you choices for styling.

Ruffled By The Wind Shawl Pattern step 1 - construction progress Ruffled By The Wind Shawl Pattern step 2 - assembly progress Ruffled By The Wind Shawl Pattern step 3 - details and accessories Ruffled By The Wind Shawl Pattern step 4 - final assembly and finishing

Switch Things Up

I love how easy it is to customise this shawl by changing colours; try a tonal fade instead of a single contrast stripe for a subtle effect.

I sometimes swap the contrast mini for two narrow stripes of a different colour to echo the ruffle hue without using a mini skein.

If you want a larger shawl I change to a thicker fingering or sport weight yarn and increase needle size, which makes the ruffle more dramatic.

For a miniature keychain version I use thinner yarn and smaller needles to knit a tiny ruffle-trimmed scarf for a doll or decoration.

I like to add small beads into the eyelet contrast section before blocking for a touch of sparkle and weight to the ruffle.

Try knitting the ruffle using a lacier bind-off or a picot edge instead of the doubled rows for a different finish.

To make the shawl less frilly, omit one of the doubling rows and the final repeat to reduce the ruffle depth for a gentler edge.

I sometimes change the body stitch from stocking stitch to garter stitch to give a squishier drape and a thicker fabric.

For a reversible look, pick two contrasting but harmonious yarns and alternate more frequently between them for stripes that match both sides.

I often experiment with needle sizes for the ruffle rows to alter how loose or tight the frill forms; smaller needles make tighter ruffles.

Consider felting the main body slightly (if using a wool that felts) for a textured background that contrasts nicely with an unfelted ruffle.

Finally, I like to personalise mine with a crocheted flower or tiny tassels attached at the point for an added handmade touch.

Common Mistakes & How to Fix Them

✗ Picking up the edge stitches unevenly while creating the set-up tab; pick up one stitch in each garter ridge and check counts after the pick-up to ensure an even edge. ✗ Failing to maintain consistent tension during increases and yarn overs; keep a steady, moderate tension to avoid lumps or uneven ruffle formation. ✗ Forgetting to drop the YO stitch where instructed in the contrast rows; follow the exact row text and drop the YO when directed to create the intended eyelet effect. ✗ Over-blocking the ruffle by pulling it flat which loses the ruffle effect; block the body flat but pin the ruffle gently or leave it rounded as suggested to preserve the frill. ✗ Not checking the stitch count after the doubling rows which creates uneven ruffles; count stitches after the doubling rows to confirm the increases have been applied correctly. ✗ Skipping weaving in ends before blocking which can make finishing messy; sew in loose ends before blocking so they are secured and tidy when you shape the shawl.

Ruffled By The Wind Shawl Pattern

Make a delicate crescent-shaped shawl with a playful ruffled edge that blooms when blocked. This pattern guides you step-by-step through the set-up tab, colour change section and ruffle creation using fingering/4ply yarn. It is written in clear row-by-row instructions so you can follow along and create a beautiful, wearable accessory.

Intermediate 5-7 Hours

Materials Needed for Ruffled By The Wind Shawl Pattern

— Main Fabric

  • 01
    Family Tree Yarns 'Fiddle Tee Dee' fingering/4ply - 100g / 425m (75% superwash merino, 25% nylon) - main skein
  • 02
    Family Tree Yarns 'This Charming Man' mini skein - 20g / 80m - contrast mini skein for ruffle
  • 03
    Any fingering/4ply yarn of similar meterage - approximately 425m total 4ply required

— Tools Required

  • 01
    Knitting needles 3.75mm (US 5)
  • 02
    Tapestry/yarn needle for weaving in ends
  • 03
    Stitch markers
  • 04
    Scissors
  • 05
    Blocking pins and blocking mats
  • 06
    Pins for pulling the ruffle centre down (optional)

Progress Tracker

0% Complete

— Set Up Tab :

Infos :

Cast on 3 stitches. Knit 6 rows. Turn the work 90 deg and pick up and knit 3 stitches along the edge, one in each garter ridge. Turn the work another 90 deg and pick up and knit 3 stitches in the cast on edge. (9sts)

Round 1 :

Row 1. K1, k1m1, k5, k1m1, k1

Round 2 :

Row 2. K2, yo, k7, yo, k2

Round 3 :

Row 3. K2, k1, yo, knit to the last 3 stitches, yo, k1, k2

Round 4 :

Row 4. K2, k1m1, knit to the last 3 stitches, k1m1, k2

Info :

Repeat rows 3 and 4 until your work measures 17cm.

— Contrast Section :

Round 1 :

Change to your contrast colour.. Row 1. K2, k1, yo, (k1, yo) repeat bracket to the last 3 stitches, yo, k1, k2

Round 2 :

Row 2. K2, k1m1, k1, (p1, drop the yo stitch) repeat bracket to the last 4 stitches, k1, k1m1, k2

Round 3 :

Row 3. K2, k1, yo, knit to the last 3 stitches, yo, k1, k2

Round 4 :

Row 4. K2, k1m1, knit to the last 3 stitches, k1m1, k2

Round 5 :

Row 5. K2, k1, yo, knit to the last 3 stitches, yo, k1, k2

Round 6 :

Row 6. K2, k1m1, knit to the last 3 stitches, k1m1, k2

Round 7 :

Row 7. K2, k1, yo, (k1, yo) repeat bracket to the last 3 stitches, yo, k1, k2

Round 8 :

Row 8. K2, k1m1, k1, (p1, drop the yo stitch) repeat bracket to the last 4 stitches, k1, k1m1, k2

Round 9 :

Row 9. K2, k1, yo, knit to the last 3 stitches, yo, k1, k2

Round 10 :

Row 10. Return to main colour and work…. K2, k1m1, purl to the last 3 stitches, k1m1, k2

— Main Colour Repeat Section :

Round 1 :

Now work the following…. Row 1. K2, k1, yo, knit to the last 3 stitches, yo, k1, k2

Round 2 :

Row 2. K2, k1m1, purl to the last 3 stitches, yo, k1, k2

Info :

Repeat these two rows another 7 times

— Contrast Repeat and Ruffle Start :

Round 1 :

Change to contrast yarn and work…. Row 1. K2, k1. Yo, (k1, yo) repeat bracket to last 3 stitches, yo, k1, k2

Round 2 :

Row 2. K2, k1m1, knit all stitches to last 3 stitches, k1m1, k2……..this row is doubling your stitch count to begin making the ruffle edge.

— Main Colour Ruffle Build :

Round 1 :

Change to main colour and work…. Row 1. K2, k1, yo, knit to the last 3 stitches, yo, k1, k2

Round 2 :

Row 2. K2, k1m1, purl to the last 3 stitches, yo, k1, k2

Info :

Repeat these 2 rows once more.

Round 1 :

Now work…. Row 1. K2, k1, yo, (k1, yo) repeat bracket to last 3 stitches, yo, k1, k2

Round 2 :

Row 2. K2, k1m1, knit all stitches to last 3 stitches, k1m1, k2…….this row is doubling your stitch count again

Round 1 :

Now work… Row 1. K2, k1, yo, knit to the last 3 stitches, yo, k1, k2

Round 2 :

Row 2. K2, k1m1, knit to the last 3 stitches, k1m1, k2

Info :

Repeat the above 2 rows a further 4 times.

Round :

Then work next row… K2, k1, yo, knit to the last 3 stitches, yo, k1, k2

Info :

Then cast off all the stitches

— Finishing :

Info :

Sew in the loose ends and the shawl will need to be blocked…..however don’t block the ruffle edge by pulling it flat or you will loose the effect of the ruffle.

Info :

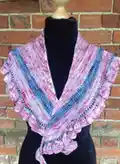
I placed the pins just under the eyelets in the contrast section and pulled the centre of the ruffle down to give a finishing point, as can be seen in the photo below…you can choose not to do this and leave the edge rounded.

Info :

The shawl measures approx. 113cm wingspan by 34cm when blocked into a point.

Assembly Instructions

  • Sew in all loose ends securely using a yarn needle and weave them into the wrong side of the work so they are hidden before blocking.
  • Block the shawl flat to open the lace and shape the crescent, but avoid flattening the ruffle edge; pin the body flat and leave the ruffle slightly relaxed.
  • Place pins just under the eyelets in the contrast section and pull the centre of the ruffle down to create a pointed finishing detail if desired.
  • Cast off all stitches as instructed, then shape the shawl into the final crescent by adjusting pin placement while wet during blocking.
  • Use blocking mats and rust-proof pins to secure the shawl; allow it to dry completely before removing pins to retain shape.

Important Notes

  • 💡Work in the order provided — from the casting on point to the final cast off — to achieve the correct crescent shaping and ruffle placement.
  • 💡Gauge is not vital for this pattern but maintaining consistent tension will ensure the ruffle and eyelet sections behave as intended.
  • 💡When doubling stitch count for the ruffle, count your stitches after the doubling row to confirm increases were applied correctly.
  • 💡Do not over-stretch or pull the ruffle flat when blocking, as this will remove the three-dimensional frilly effect.

This Ruffled By The Wind shawl is a joyful blend of hand-dyed colour and playful texture that blooms after blocking. It uses a full fingering skein with a tiny contrast mini for an elegant frill that frames the crescent. Make one as a treat for yourself or a thoughtful handmade gift. 🧶🧵

You ask,

we answer.

FAQs

What size will the finished piece be?

The shawl measures approximately 113cm wingspan by 34cm when blocked into a point as stated in the pattern.

Can I use different yarn weights for this pattern?

Yes, you can use different yarn weights but this will change the final size and drape; adjust needle size accordingly and expect a different ruffle effect.

Do I need prior knitting experience for this pattern?

This pattern is rated intermediate and assumes familiarity with knitting basics like picking up stitches, yarn overs and simple increases.

How long does this project typically take to complete?

Most knitters finish this shawl in 5-7 hours depending on experience, yarn, and how quickly you work the repeating rows.