🧢 Beautiful ✨ Detailed πŸ’ Adorable

Sailor Girl Amigurumi Pattern

Sailor Girl Amigurumi Pattern
4.4β˜… Rating
8-10 Hours Time Needed
1.3K Made This
βœ‚οΈ

Intermediate Level

Ideal for those with basic crochet experience, featuring slightly more advanced stitches and techniques to expand your skills.

⏱️

All-Day Adventure

Requires 8-10 hours, ideal for a full day of immersive crocheting.

🧸

Cute Companion

An adorable friend to cherish, handcrafted with love to bring comfort and joy for years to come.

About This Sailor Girl Amigurumi Pattern

This pattern creates a delightful sailor-themed amigurumi girl complete with curly orange hair, sailor hat, full skirt and a little bag. It includes step-by-step rounds for the head, hair layers, body, legs, skirt, arms, hat and bag. You will work in rounds, change colors for details, and add safety eyes and stitched features for personality.

Sailor Girl Amigurumi Pattern crochet pattern - detailed view of completed project

The pattern provides clear round-by-round instructions and helpful photos to guide assembly and finishing. Accessories and small details are explained so your finished doll looks professional.

Why You'll Love This Sailor Girl Amigurumi Pattern

I absolutely love this pattern because it blends classic amigurumi shaping with playful costume details that make the doll feel complete. I enjoy designing the spiraled curls for the hair β€” they give so much character and movement to the finished piece. The skirt and hat details are satisfying to crochet and make the outfit feel like a real sailor uniform. I also love that the pattern includes small accessories like the bag and shoes which let you personalise the doll. Sewing all the parts together and seeing her take shape is one of my favourite parts of the process.

Sailor Girl Amigurumi Pattern step 1 - construction progress Sailor Girl Amigurumi Pattern step 2 - assembly progress Sailor Girl Amigurumi Pattern step 3 - details and accessories Sailor Girl Amigurumi Pattern step 4 - final assembly and finishing

Switch Things Up

I love how easy it is to customize this sailor girl by changing colors; try pastel tones for a softer look or bright primaries for a bold sailor style.

I often make the doll larger by using a thicker yarn and a larger hook β€” this makes a cuddlier, more display-friendly version.

I sometimes swap the spiral curls for straight yarn strands or short bangs to change the hairstyle and personality of the doll.

I like adding embroidery details to the face or switching safety eyes for embroidered eyes for a softer, child-safe toy.

If you want posable limbs, I add a thin wire inside the arms and legs before stuffing so they hold poses better.

You can create sets by crocheting alternate outfits β€” a raincoat, dress, or tiny sweater β€” to give the doll seasonal looks.

I recommend experimenting with different skirt lengths and adding a trim or lace to make the outfit more detailed and unique.

Try using sparkly or textured yarn for accessories like the bag or hat trim to add visual interest and a unique finish.

I sometimes add tiny buttons, beads, or felt appliques as final touches β€” just be mindful of safety if giving to children.

Most importantly, I encourage you to make it your own by combining techniques and colors you love β€” each variation becomes a special handmade gift.

Common Mistakes & How to Fix Them

βœ— Skipping stitch markers during rounds can cause you to lose the start of the round; place a marker at the beginning of each round to keep your count accurate. βœ— Forgetting to attach the safety eyes at the recommended rounds will make facial placement difficult later; attach safety eyes between rounds 18-19 with 8 stitches between them as instructed. βœ— Not stuffing as you go leads to awkward shapes and lumps; stuff the legs and head gradually and keep filling as you work to maintain smooth shapes. βœ— Ignoring front loop/back loop instructions will change the texture of the skirt and shoes; work only in BLO or FLO when specified to achieve the correct detail. βœ— Not leaving long tails when instructed makes sewing parts together harder; fasten off with a long thread for sewing the head and leave tails where noted for assembly.

Sailor Girl Amigurumi Pattern

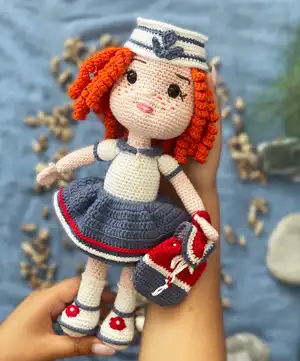
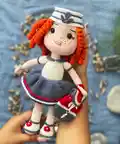
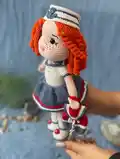
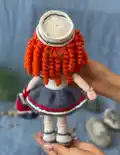
Make a charming sailor girl amigurumi with bright curly hair, a full skirt, hat and matching bag. This pattern guides you through shaping the head, body, legs, arms and detailed accessories so you can create a polished finished doll. You will learn textured skirt rows, spiral curls for hair, and assembly techniques to bring the character to life. Perfect for gifting or displaying as a handmade collectible.

Intermediate 8-10 Hours

Materials Needed for Sailor Girl Amigurumi Pattern

β€” Main Fabric

  • 01
    Yarn - choose a yarn that fits a 2.5 mm hook (sample uses colors listed below)
  • 02
    Main Color: Light Pink
  • 03
    A Color: White
  • 04
    B Color: Sailor Blue
  • 05
    C Color: Orange
  • 06
    D Color: Red

β€” Tools Required

  • 01
    Crochet hook size 2.5 mm (or a size that fits your yarn)
  • 02
    Scissors
  • 03
    Polyester stuffing
  • 04
    Tapestry/yarn needle for sewing
  • 05
    Stitch markers
  • 06
    Pins for assembly
  • 07
    Safety eyes (2 pieces)
  • 08
    Awl (for turning/creating openings when instructed)

Progress Tracker

0% Complete

β€” Head :

Info :

Main Color

Round 1 :

6 sc in a magic ring

Round 2 :

6 sc inc(12 sc)

Round 3 :

1 sc into sc next inc(18 sc)

Round 4 :

2 sc into sc next inc(24 sc)

Round 5 :

3 sc into sc next inc(30 sc)

Round 6 :

4 sc into sc next inc(36 sc)

Round 7 :

5 sc into sc next inc(42 sc)

Round 8 :

6 sc into sc next inc(48 sc)

Round 9 :

7 sc into sc next inc(54 sc)

Round 10-20 :

(11 ring)sc into sc(54 sc)

Round 21 :

18 sc into sc(6 sc inc)6 sc into sc(6 sc inc)18 sc into sc(66 sc)

Info :

A Color

Round 22-27 :

(6 ring)sc into sc(66 sc)

Round 28 :

(6 times)9 sc into sc next dec(60 sc)

Round 29 :

(6 times)8 sc into sc next dec(54 sc)

Round 30 :

(6 times)7 sc into sc next dec(48 sc)

Info :

Attach the safety eyes to rnd 18-19. There should be 8 sc between them.

Round 31 :

(6 times)6 sc into sc next dec(42 sc)

Round 32 :

(6 times)5 sc into sc next dec(36 sc)

Round 33 :

(6 times)4 sc into sc next dec(30 sc)

Round 34 :

(6 times)3 sc into sc next dec(24 sc)

Round 35 :

(6 times)2 sc into sc next dec(18 sc)

Round 36-39 :

(4 ring)sc into sc(18 sc)fo. Leave a long thread for sewing.

β€” HAIRS :

Info :

C Color

Round 1 :

8 sc in a magic ring

Round 2 :

8 sc inc(18 sc)

Round 3 :

45 ch.turn 35 ch into 2 sc(70 sc)10 sc into sc 11 strand.

Round 4 :

Top Layer -50 ch 40 ch into 2 sc(80 sc)10 ch into sc 11 strand.(22 strand)

β€” LEGS and BODY :

Info :

A Color

Round 1 :

6 ch

Round 2 :

6 ch inc (12 sc)

Round 3 :

3 sc into sc (6 sc inc)3 sc into sc(18 sc)

Round 4 :

6 sc into sc(6 sc inc)6 sc into sc (24 sc)

Round 5 :

8 sc into sc(8 sc inc)8 sc into sc(32 sc)

Round 6 :

Only in flo sc into sc(32 sc)

Round 7-8 :

(2 ring)sc into sc(32 sc)

Round 9 :

8 sc into sc(8 sc dec)8 sc into sc(24 sc)

Round 10 :

8 sc into sc(6 sc dec)8 sc into sc(18 sc)

Round 11-12 :

(2 ring)sc into sc(18 sc)

Round 13 :

Only in flo sc into sc(18 sc)

Round 14 :

(2 times)8 sc into sc next dec(16 sc)

Round 15-20 :

(6 ring)sc into sc(16 sc)

Info :

Main Color

Round 21 :

Only in flo sc into sc(16 sc)

Info :

Stuff the legs tightly. Keep filling as you go.

Round 22-34 :

(13 ring)sc into sc(16 sc)

Round 35 :

(2 times)8 sc into sc next inc(18 sc)

Round 36 :

(2 times)9 sc into sc next inc(20 sc)

Round 37 :

sc into sc(20 sc)

Round 38 :

Join the legs. 20 sc into sc 4 ch 20 sc into sc

Round 39 :

20 sc into sc 4 ch into sc 20 sc into sc ch's unworked rnd sc(48 sc)

Round 40-49 :

(10 ring)sc into sc(48 sc)

Round 50 :

(6 times)6 sc into sc next dec(42 sc)

Info :

A Color

Round 51 :

Only in flo sc into sc (42 sc)

Round 52-58 :

(7 ring)sc into sc(42 sc)

Round 59 :

(6 times)5 sc into sc next dec(36 sc)

Round 60 :

sc into sc(36 sc)

Round 61 :

(6 times)4 sc into sc next dec(30 sc)

Round 62 :

(6 times)3 sc into sc next dec(24 sc)

Round 63 :

Only in flo sc into sc(24 sc)

Info :

Main Color

Round 64 :

sc into sc (24 sc)

Round 65 :

(6 times)2 sc into sc next dec(18 sc)

Round 66 :

(6 times)1 sc into sc next dec(12 sc)

Round 67-68 :

(2 ring)sc into sc(12 sc)fo.

β€” SKIRT :

Info :

B Color

Round 1 :

(rnd-51 in blo sc into sc (42 sc)

Round 2 :

1 sc into 2 cr(84 cr)

Round 3-4 :

(2 times)cr into cr(84 cr)

Round 5 :

(15 times)5 cr into cr next inc(99 cr)

Round 6 :

Only in flo cr into cr(99 cr)

Round 7 :

Only in flo cr into cr(99 cr)

Round 8 :

Only in flo hdc into sc(99 hdc)

Round 9 :

Only in blo hdc into sc(99 sc)fo.

Info :

SKIRT DETAIL - D Color

Round (Detail) :

Rnd 6- in blo sc into sc(99 sc)

Info :

A Color

Round (Detail) :

Rnd 7- in blo sc into sc(99 sc)fo.

β€” ARMS :

Info :

Main Color - Make 2

Round 1 :

6 sc in a magic ring

Round 2 :

6 sc inc(12 sc)

Round 3-7 :

(5 ring)sc into sc(12 sc)

Round 8 :

6 sc into sc (3 ch)6 sc into sc(12 sc)

Round 9 :

6 sc into sc(3 ch out)6 sc into sc(12 sc)

Round 10 :

6 sc dec(6 sc)

Round 11 :

6 sc into sc

Round 12 :

6 sc inc (12 sc)

Round 13-25 :

(13 ring)sc into sc(12 sc)

Round 26 :

A color - only in flo sc into(12 sc)

Info :

Fill the sleeves a little

Round 27 :

(6 times)1 sc into sc next inc(18 sc)

Round 28-31 :

(4 ring)sc into sc(18 sc)

Round 32 :

(6 times)1 sc into sc next dec(12 sc)

Round 33 :

Straighten it.

Info :

Dip the awl into both layers. 6 sc fo.

β€” DETAILS :

Item Name (Shoes Detail) :

Rnd 6 - B color - Only in blo sc into sc(32 sc)

Round 13 :

only in blo sc into sc(16 sc)

Item Name (Socks Detail) :

Rnd 21 - A color - only in blo sc into sc(16 sc)

β€” HAT :

Info :

A Color

Round 1 :

6 sc in a magic ring

Round 2 :

6 sc inc(12 sc)

Round 3 :

(6 times)1 sc into sc next inc(18 sc)

Round 4 :

(6 times)2 sc into sc next inc(24 sc)

Round 5 :

(6 times)3 sc into sc next inc(30 sc)

Round 6 :

(6 times)4 sc into sc next inc(36 sc)

Round 7 :

(6 times)5 sc into sc next inc(42 sc)

Round 8 :

(6 times)6 sc into sc next inc(48 sc)

Round 9 :

(6 times)7 sc into sc next inc(54 sc)

Round 10 :

Only in flo sc into sc(54 sc)

Round 11-12 :

(2 ring)sc into sc(54 sc)

Round 13 :

B color - sc into sc(54 sc)

Round 14 :

A Color - sc into sc(54 sc)

Round 15 :

sc into sc(54 sc)fo.

Round 10 (Detail) :

only in blo B color -sc into sc(54 sc)

Round 2 (Detail) :

A color - (2 ring)sc into sc(54 sc)fo.

β€” BAG :

Info :

B Color

Round 1 :

10 ch.

Round 2 :

10 ch into 20 sc

Round 3 :

10 sc into sc next inc(22 sc)

Round 4 :

(2 times)11 sc into sc next inc(24 sc)

Round 5 :

only in flo sc into sc(24 sc)

Round 6 :

(12 times)1 sc into sc next inc(36 sc)

Round 7-11 :

(5 ring)sc into sc36 sc

Round 12-13 :

(2 ring)A color-sc into sc(36 sc)

Round 14-18 :

D color (5 ring)sc into sc(36 sc)

Round 19 :

sc into hdc(36 hdc)fo.

Item Name (Cover of the Bag - D Color) :

Rnd 1- 12 ch.

Round 2 :

12 ch into 24 sc

Round 3 :

1 sc into sc next inc(36 sc)

Round 4 :

sc into sc(36 sc)

Round 5 :

A color - sc into sc (36 sc)

Round 6 :

2 sc into sc next inc(48 sc)

Round 7 :

B color - sc into sc(48 sc)fo.

Assembly Instructions

  • Attach the safety eyes to the head between rounds 18-19 with 8 stitches separating them, then secure and continue stuffing the head before closing.
  • Sew the head to the body using the long thread left at Round 36-39 of the head; align center and stitch firmly so the seam is neat.
  • Join the legs as described in Rnd 38-39, then stuff and continue working the body rounds, ensuring even filling and symmetry between legs.
  • Pin arms and sleeves in position before sewing; insert a little stuffing into the sleeves then sew the arm openings to the body for a clean join.
  • Attach hat, skirt and bag after main assembly and pin pieces first to check placement; weave in ends and secure all small details (buttons, beads) last.

Important Notes

  • πŸ’‘Use stitch markers to mark the beginning of each round for accurate stitch counts and easier shaping.
  • πŸ’‘Stuff firmly but gradually; overstuffing can distort shaping while under-stuffing can make the doll floppy.
  • πŸ’‘Pin all parts in place and check symmetry before sewing to get even, professional-looking assembly.
  • πŸ’‘Work BLO and FLO rounds carefully exactly where instructed to achieve the correct textures on the skirt and shoes.
  • πŸ’‘Leave long tails when fasten off where sewing will be required; it makes assembly faster and more secure.

This sailor girl amigurumi pattern brings a playful nautical charm with curls, a full skirt and tiny accessories. It is perfect for gifting, display, or growing your handmade toy collection. Have fun customizing colors and details to make each doll uniquely yours! 🧢🧡

You ask,

we answer.

FAQs

What size will the finished piece be?

The finished amigurumi measures around 20 cm in circumference and about 10 cm in length as noted in the pattern.

Can I use different yarn weights for this pattern?

Yes, you can use different yarn weights but that will change the finished size; choose an appropriate hook for your yarn and expect the doll to scale accordingly.

Do I need prior crochet experience for this pattern?

This pattern is rated intermediate, so basic knowledge of crochet stitches and working in rounds is recommended for best results.

How long does this project typically take to complete?

Most crocheters finish this project in 8-10 hours, depending on experience, speed, and time spent on details and assembly.