🧢 Beautiful ✨ Detailed πŸ’ Adorable

Simple Basket Pattern

Simple Basket Pattern
4.6β˜… Rating
2-3 Hours Time Needed
2.6K Made This
βœ‚οΈ

Beginner Friendly Level

Perfect for those just starting their crochet journey, with clear instructions and simple techniques

⏱️

Bite-Sized Project

Finishes in 2-4 hoursβ€”perfect for an afternoon of creative relaxation.

🏑

Cozy Accent

A warm touch for your space that transforms ordinary corners into inviting nooks filled with handmade charm.

About This Simple Basket Pattern

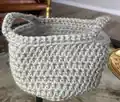
This pattern creates a small, sturdy crochet basket approximately 3.5 inches tall by 4 inches wide using medium weight yarn. It is worked in the round using single crochet and half double crochet stitches with a finishing row to form handles. The design is simple, functional, and customizable so you can make it taller or shorter as desired.

Simple Basket Pattern crochet pattern - detailed view of completed project

Perfect for using up spare yarn balls, this basket makes a lovely home accessory or gift. The pattern includes special stitch notes and an abbreviation guide for clarity.

Why You'll Love This Simple Basket Pattern

I absolutely love this pattern because it turns a tiny amount of yarn into a practical and beautiful home accessory. I enjoy how quickly it comes together β€” you can finish one in an afternoon and instantly have a useful piece. The construction is simple but satisfying, and I often customize the height to fit the spot I have in mind. I also love that it is a great scrap-busting project that makes a lovely handmade gift.

Simple Basket Pattern step 1 - construction progress Simple Basket Pattern step 2 - assembly progress Simple Basket Pattern step 3 - details and accessories Simple Basket Pattern step 4 - final assembly and finishing

Switch Things Up

I love customizing this pattern by changing colors every few rounds to create stripes and a more decorative look.

I often use a bulkier yarn and a larger hook to make a chunkier, larger basket for blankets or throws.

I sometimes make the basket smaller by working fewer hdc rounds or larger by continuing round 11 until I reach the height I want.

I try different stitch textures like alternating rounds of single crochet and half double crochet to add subtle visual interest.

I like to line the basket with fabric for a cleaner finish and more structure when I plan to store small items.

I occasionally add a contrasting top edge by working one round of slip stitch or reverse single crochet for a polished rim.

I experiment with the handle size by changing the chain length in Round 19 to make wider or narrower openings for different uses.

I also embellish with buttons, embroidered initials, or small crocheted flowers to personalize each basket as a gift.

I sometimes add a plastic canvas or interfacing layer in the base to make the basket extra sturdy for heavier contents.

I recommend trying different yarn fibers β€” cotton for a firm, washable basket or acrylic for a softer, more flexible finish β€” depending on the basket's purpose.

Common Mistakes & How to Fix Them

βœ— Counting rounds only at the end can leave you with the wrong stitch count; count your stitches at the end of every round to catch errors early. βœ— Forgetting to move the stitch marker makes it hard to know the start of the round; place a marker and move it up after each completed round. βœ— Crocheting into the wrong loop (front vs back) can change the texture unintentionally; check the pattern note and insert your hook into the correct loop each time. βœ— Making your chains for handles too loose will look uneven; tighten the chains and add or remove stitches around the handle to make them uniform. βœ— Skipping a gauge swatch will change the finished size unexpectedly; make the 4x4 inch swatch and adjust hook size to match the pattern gauge. βœ— Not weaving in ends as you go can leave many loose tails at the end; tie off and weave in ends immediately after finishing the handle row.

Simple Basket Pattern

Create a charming, small crochet basket perfect for organizing small items or using up scrap yarn. This pattern uses basic stitches worked in the round and is easy to customize for height and color. Youll enjoy a quick project that yields a useful, attractive home accent. Ideal for gifting or sprucing up your space with handmade charm.

Beginner Friendly 2-3 Hours

Materials Needed for Simple Basket Pattern

β€” Main Fabric

  • 01
    Medium weight yarn (Worsted/Aran) - 1 oz (approximately 45 yards)
  • 02
    Caron One Pound Yarn in Soft Grey Mix (color used as an example; use spare yarn balls)

β€” Tools Required

  • 01
    Crochet hook US I9/5.5mm (or size needed to achieve gauge)
  • 02
    Tapestry needle
  • 03
    Stitch marker (to mark beginning of rounds)
  • 04
    Scissors
  • 05
    Measuring tape or ruler (for gauge swatch)

Progress Tracker

0% Complete

β€” Materials Needed :

Info :

US I9/5.5mm crochet hook or size needed to achieve gauge. Medium weight yarn: 1 oz or 45 yards. Tapestry needle. *Color used: Caron One Pound Yarn in Soft Grey Mix

Info :

Gauge swatch: 14 hdc x 12 rows = 4x4 inch square swatch

β€” Special note :

Info :

Add soft texture and functionality to your home. This simple basket can be as tall or as short as you like and can be completed with those spare yarn balls. It is worked in the round with simple stitches. Experiment with color changes to make this basket all your own. To make this basket taller, continue working round 11 until desired measurements. To make is shorter, work round 11 until it reaches your desired height.

β€” Special Stitches :

Infos :

back loop: Traditional crochet stitches create a side > pattern. Rather than inserting the crochet hook through the > pattern, ONLY insert the crochet hook underneath the back loop of the > pattern (the loop furthest away from you). front loop: ONLY insert the crochet hook underneath the front loop of the > pattern (the loop closest to you).

β€” Simple Basket :

Info :

Simple Basket: approximately 3.5 inches tall x 4 inches wide

Info :

Foundation: ch. 2.

Round 1 :

work 6 sc in 2nd ch from hook. Place marker for beg of rnd; move marker up as each rnd is completed.

Round 2 :

2 sc in each st around – 12 sts

Round 3 :

[2 sc in next st, sc in next st] 6 times – 18 sts

Round 4 :

[2 sc in next st, sc in next 2 sts] 6 times – 24 sts

Round 5 :

[2 sc in next st, sc in next 3 sts] 6 times – 30 sts

Round 6 :

[2 sc in next st, sc in next 4 sts] 6 times – 36 sts

Round 7 :

[2 sc in next st, sc in next 5 sts] 6 times – 42 sts

Round 8 :

[2 sc in next st, sc in next 6 sts] 6 times – 48 sts

Round 9 :

[2 sc in next st, sc in next 7 sts] 6 times – 54 sts

Round 10 :

sc in back loop of each sc – 54 sts

Round 11-18 :

hdc in each sc around – 54 sts

Round 19 :

sc in next 15 sts, ch 12, sk 12 sts, sc in next 15 sts, ch 12, sk 11 sts, sc in next st – 54 sts

Finishing row :

End of working in the round

Row 1 :

ch 1, turn, sc in front loop of sc, place 12 sc around chs (add more to look uniform if your chs are loose), sc front loop in next 15 scs, 12 sc around chs, sc front loop in next 15 scs, sl st into starting sc, tie off, sew in ends.

β€” Abbreviation guide :

Info :

bl = back loop (see special stitches on page 2) ch= chain fl = front loop (see special stitches on page 2) hdc= half double crochet rnd= round sc = single crochet sl st= slip stitch st= stitch

β€” Pattern notes :

Info :

Brackets i.e. [2 sc in next st, sc in next st] 6 times explain what will be worked for a set amount of times. Repeat the instructions 2 sc in next st, sc in next six, six times.

Assembly Instructions

  • Place a stitch marker at the beginning of each round and move it up as you complete each round to keep your rounds aligned and even.
  • After completing Round 19 and the finishing row, tie off and sew in tails securely with a tapestry needle to prevent unraveling.
  • When creating the handle chains, place 12 sc evenly around the chains as instructed to make the handle openings look uniform, adding more if chains are loose.
  • Block or shape the basket gently with your hands after finishing to help it sit flat and maintain its round shape when placed on a surface.

Important Notes

  • πŸ’‘Use a stitch marker to mark the beginning of each round and move it up after each round to maintain correct stitch placement.
  • πŸ’‘Make a gauge swatch (14 hdc x 12 rows = 4x4 inch square) and adjust your hook size if necessary to achieve the correct finished size.
  • πŸ’‘When working Round 10 and the finishing row, be mindful of back loop and front loop instructions to achieve the intended texture and handle placement.
  • πŸ’‘Tie off and sew in ends immediately after finishing to secure stitches and keep the interior tidy.

This Simple Basket pattern is a quick and satisfying project that turns spare yarn into a useful home accent.🧢 Make them in different colors and sizes to create a coordinated set for any room.🧡 Perfect for gifting or organizing small items around the house β€” such a lovely handmade touch!✨

You ask,

we answer.

FAQs

What size will the finished piece be?

The finished basket is approximately 3.5 inches tall x 4 inches wide when using the recommended hook and yarn.

Can I use different yarn weights for this pattern?

Yes, you can use different yarn weights but this will affect the final size; adjust your hook size accordingly and check gauge before starting.

Do I need prior crochet experience for this pattern?

This pattern is rated beginner friendly and uses basic stitches like single crochet and half double crochet, so basic crochet knowledge is sufficient.

How long does this project typically take to complete?

Most crocheters finish this small basket in 2-3 hours, though time may vary depending on experience and customization.