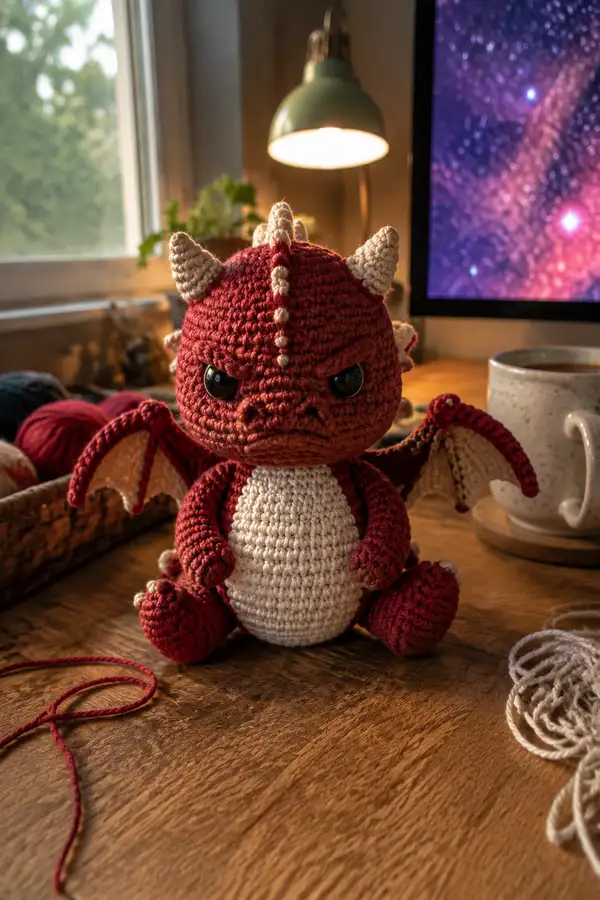
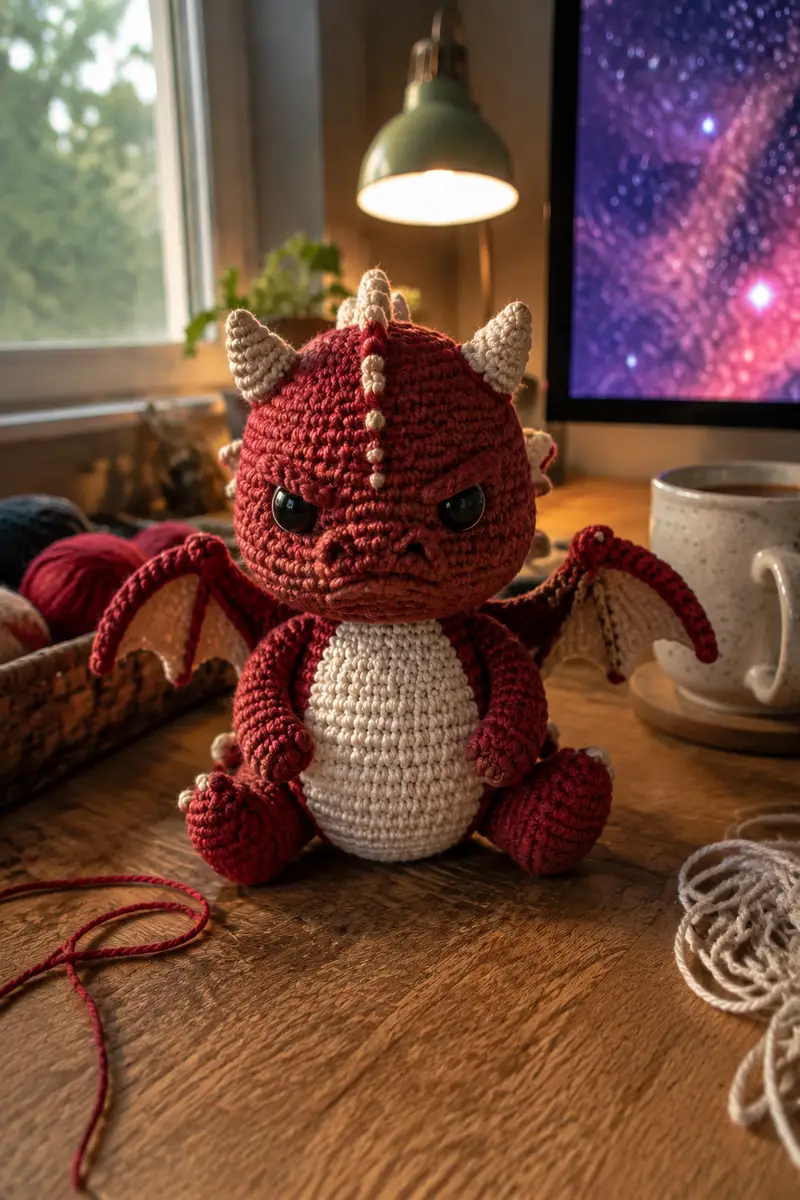
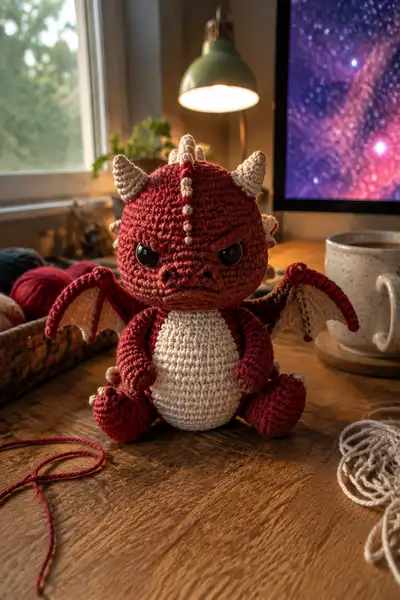
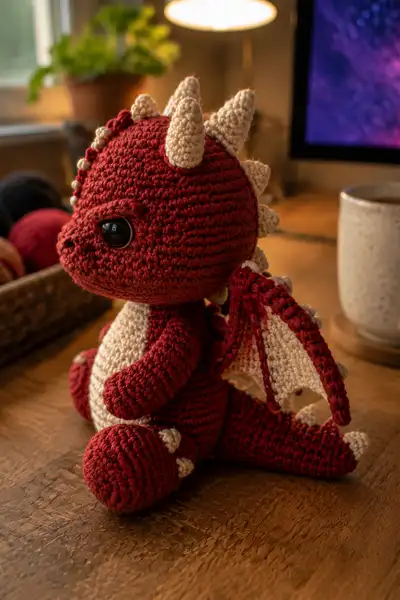
A cuddly yet fierce little dragon with a scowling expression, stubby membraned wings, cream belly and cream horns and spikes. This amigurumi features large expressive safety eyes, a pronounced snout, and textured ridges along the head and back. Designed to sit upright with rounded limbs and a chunky tail, it makes a charming gift or desk companion.
Progress Tracker
0% Complete
— Head :
Round 1 :
6 sc in magic ring (6)
Round 3 :
(1 sc, 1 inc) x 6 (18)
Round 4 :
(2 sc, 1 inc) x 6 (24)
Round 5 :
(3 sc, 1 inc) x 6 (30)
Round 6 :
(4 sc, 1 inc) x 6 (36)
Round 7 :
(5 sc, 1 inc) x 6 (42)
Round 8 :
(6 sc, 1 inc) x 6 (48)
Info :
Work in continuous rounds (spiral) to avoid visible seams. Use a stitch marker at the first stitch of each round and move it up each round. Adjust hook size if your fabric looks too loose; the head should be firm to prevent the stuffing from showing.
Round 9-12 :
1 sc in each st (48)
Info :
Place safety eyes between rounds 13-14, approximately 12-14 stitches apart (counting across the front). For this pattern use 14mm safety eyes centered slightly lower than halfway down the head to achieve the 'scowling' expression.
Round 13 :
1 sc in each st (48)
Round 14 :
1 sc in each st (48)
Info :
Mark placement for a later snout attachment: the snout will be sewn on spanning rounds 11-15 centered between the eyes. Use pins to mark the bottom row for snout alignment.
Round 15-18 :
1 sc in each st (48)
Info :
Begin shallow shaping for brow and cheek definition by working the next two rounds using short decreases on the front section only (see rounds 19-22). Keep the back rounds even to maintain volume for attachment to the body later.
Round 19 :
(6 sc, 1 dec) x 6 (42)
Round 20 :
(5 sc, 1 dec) x 6 (36)
Round 21 :
(4 sc, 1 dec) x 6 (30)
Info :
Begin stuffing the head firmly but not rigidly. Use small amounts of fiberfill and press into the brow and cheek areas with a stuffing tool or blunt pencil to achieve firm, sculpted contours. Continue stuffing gradually as you work the next decreasing rounds.
Round 22 :
(3 sc, 1 dec) x 6 (24)
Round 23 :
(2 sc, 1 dec) x 6 (18)
Round 24 :
(1 sc, 1 dec) x 6 (12)
Info :
Fasten off leaving a long tail for sewing the head to the body. Do not close the last small hole fully if you will insert a little extra stuffing while sewing. Finish shaping the eyebrow ridge by surface stitching a few shallow slip stitches over the front area if desired.
— Snout (Make 1) :
Round 1 :
6 sc in magic ring (6)
Round 3 :
(1 sc, 1 inc) x 6 (18)
Round 4 :
(2 sc, 1 inc) x 6 (24)
Info :
We will shape the snout with a slightly flattened front: after round 4, fold the piece and use a couple of slip stitches across the base to compress slightly and create a squat shape that resembles the nose and nostril area.
Round 5 :
1 sc in each st (24)
Round 6 :
1 sc in first 6 sts, dec over next 2 sts, 1 sc in next 6 sts, dec over next 2 sts, 1 sc in remaining 6 sts (22)
Round 7 :
(3 sc, 1 dec) x 5, 2 sc (18)
Round 8 :
1 sc in each st (18)
Info :
Pin snout onto the head between rounds 11-15 as previously marked. Stuff the snout lightly to keep it rounded but not stiff—this helps it hug the face when sewn in place.
Round 9 :
1 sc in each st (18)
Round 10 :
Dec around to 9 sts if you want a smaller base for sewing (9) or fasten off and leave long tail for sewing; we will flatten the base slightly when attaching.
Info :
Sew snout to head using mattress stitch or whip stitch. Shape nostrils with two small embroidered stitches using darker red/brown yarn centered on the snout front. Add a couple of short surface stitches under the brow to suggest the scowl crease.
— Body :
Round 1 :
6 sc in magic ring (6)
Round 3 :
(1 sc, 1 inc) x 6 (18)
Round 4 :
(2 sc, 1 inc) x 6 (24)
Round 5 :
(3 sc, 1 inc) x 6 (30)
Round 6 :
(4 sc, 1 inc) x 6 (36)
Round 7-9 :
1 sc in each st (36)
Info :
Change to cream yarn at the front for the belly panel starting in round 10. Carry the unused yarn up the inside if you prefer hidden ends, or fasten off and join to keep the back fully red. Pin the front stitches (approx. 12-14 sts across center front) to be worked in cream.
Round 10 :
Change to cream; 1 sc in each st (36)
Round 11-16 :
1 sc in each st (36)
Info :
To create a distinct belly plate, after round 12 work the next rounds in FLO for the cream stitches only to create a subtle ridge where the belly meets the red. Alternatively, work a separate oval belly piece and sew on later (instructions for separate belly follow below).
Round 17 :
(4 sc, 1 dec) x 6 (30)
Round 18 :
(3 sc, 1 dec) x 6 (24)
Info :
Start stuffing the body moderately. Fill firmly enough so the dragon sits upright but leave a little softness to allow the head seam to sit flush. Use small stuffing amounts and shape the bottom to be slightly flattened for stability.
Round 19 :
(2 sc, 1 dec) x 6 (18)
Round 20 :
(1 sc, 1 dec) x 6 (12)
Info :
Fasten off leaving a long tail for sewing the head. Do not close body completely if you plan to attach legs from the inside later—some crocheters leave a large opening to position legs from inside the body before closing.
— Separate Belly Panel (Optional) :
Round 1 :
6 sc in magic ring (6)
Round 3 :
(1 sc, 1 inc) x 6 (18)
Round 4 :
1 sc in each st (18)
Round 5 :
(2 sc, 1 inc) x 6 (24)
Round 6-8 :
1 sc in each st (24)
Info :
Flatten the oval if desired using a couple of slip stitches across the middle then sew the panel centered on the front of the body between rounds 10-16. This method produces a neater color join and allows you to shape the belly precisely.
— Arms (Make 2) :
Round 1 :
6 sc in magic ring (6)
Round 3 :
(1 sc, 1 inc) x 6 (18)
Round 4-6 :
1 sc in each st (18)
Info :
Stuff the hand/paw area firmly to create a rounded shape. Keep stuffing compact and concentrated in the 'hand' so the arm can bend slightly when sewn to the body.
Round 7 :
(3 sc, 1 dec) x 4, 2 sc (14)
Round 8-12 :
1 sc in each st (14)
Round 13 :
(2 sc, 1 dec) x 3, 2 sc (11)
Round 14-16 :
1 sc in each st (11)
Info :
For a nicer seam when attaching, create a flat top on the shoulder by working 1 sc in next 3 sts, ch 1, sc in next 3 sts and fasten off leaving a long tail for sewing. Alternatively, leave the tube open to sew directly into the body round and reinforce with ladder stitch.
Round 17 :
Dec gradually to close the shoulder opening slightly if you'd like (optional), or leave round count as is for sewing (11)
Info :
Sew arms to body at approx. body rounds 14-18 on either side. Pin them slightly forward so the dragon's stubby arms appear to rest on the belly. Use hidden stitches to create an invisible seam.
— Legs (Make 2) :
Round 1 :
6 sc in magic ring (6)
Round 3 :
(1 sc, 1 inc) x 6 (18)
Round 4 :
(2 sc, 1 inc) x 6 (24)
Round 5-8 :
1 sc in each st (24)
Info :
To create a rounded foot, stuff firmly at the toe and shape the base slightly flattened. The leg should be stout to support sitting. Add toe spike positions: three small spikes on the top of the foot spaced evenly.
Round 9 :
(3 sc, 1 dec) x 6 (18)
Round 10-14 :
1 sc in each st (18)
Round 15 :
(2 sc, 1 dec) x 6 (12)
Round 16 :
(1 sc, 1 dec) x 6 (6)
Info :
Pin legs to body at bottom opening—space them evenly so the dragon sits balanced. Sew through the body rounds 1-4 area securing thoroughly; reinforce with extra stitches at the heel if needed for stability.
Round 17 :
Fasten off leaving long tail for sewing; make sure foot is stuffed firmly but not overpacked (6)
— Tail :
Round 1 :
6 sc in magic ring (6)
Round 3 :
(1 sc, 1 inc) x 6 (18)
Round 4-8 :
1 sc in each st (18)
Info :
The tail is worked longer and tapered; add spike bases along the top by sewing on small cones after the tail is finished. If you want a curvature, stuff unevenly (more near the base) and sew to the body at an angle.
Round 9 :
(3 sc, 1 dec) x 4, 2 sc (14)
Round 10-12 :
1 sc in each st (14)
Round 13 :
(2 sc, 1 dec) x 3, 2 sc (11)
Round 14-16 :
1 sc in each st (11)
Round 17 :
(1 sc, 1 dec) x 3, 2 sc (8)
Round 18 :
1 sc in each st (8)
Round 19 :
Dec around to 4 sts or fasten off leaving long tail for sewing to body (4)
Info :
Sew tail to back center at approx. body round 8-10. Add cream spikes along top: three medium cones spaced evenly and a small tip cone at the end. Sew securely using tight stitches.
— Horns and Spikes (Make 7 total: 3 large horns + 4 small spikes) :
Large Horn - Round 1 :
6 sc in magic ring (6)
Large Horn - Round 2 :
6 inc (12)
Large Horn - Round 3 :
(1 sc, 1 inc) x 6 (18)
Large Horn - Round 4 :
(2 sc, 1 inc) x 6 (24)
Large Horn - Round 5 :
1 sc in each st (24)
Large Horn - Round 6 :
(3 sc, 1 dec) x 6 (18)
Large Horn - Round 7 :
(2 sc, 1 dec) x 6 (12)
Large Horn - Round 8 :
(1 sc, 1 dec) x 6 (6)
Large Horn - Round 9 :
Fasten off leaving long tail for sewing; stuff lightly and shape into a cone (6)
Small Spike - Round 1 :
6 sc in magic ring (6)
Small Spike - Round 2 :
6 inc (12)
Small Spike - Round 3 :
(1 sc, 1 inc) x 6 (18)
Small Spike - Round 4 :
(2 sc, 1 dec) x 6 (12)
Small Spike - Round 5 :
Dec around to 6 sts, fasten off leaving tail for sewing (6)
Info :
Make 3 large horns (for top of head) and 4 small spikes (3 along back and 1 tail tip). Pin them to the head/back to test spacing: center large horn on top, one slightly forward and one slightly back to create a crown; place small spikes evenly along the midline of the head and tail. Sew tightly and stuff lightly so cones keep shape.
— Wings (Make 2 main ribs + 2 membranes) :
Wing Rib - Round 1 :
6 sc in magic ring (6)
Wing Rib - Round 2 :
6 inc (12)
Wing Rib - Round 3 :
(1 sc, 1 inc) x 6 (18)
Wing Rib - Round 4-6 :
1 sc in each st (18)
Wing Rib - Round 7 :
(3 sc, 1 dec) x 4, 2 sc (14)
Wing Rib - Round 8 :
1 sc in each st (14)
Info :
The wing rib forms the stiff outer edge and 'finger' bones. For sturdier wings, insert a short piece of floral wire along the rib before closing and secure by stitching around it. Make two ribs (left and right).
Wing Membrane - Round 1 :
Ch 15 to start a flat semicircular membrane or work from a magic ring with 12 sc then increase
Wing Membrane - Round 2 :
Work a row of hdc along chains and increase at the ends to create a gentle curve; repeat turning rows to form a shallow triangle approx 14-16 rows high
Info :
Make the membrane in cream and the rib in red. When seams are hidden, sew the rib along the outer edge of the membrane with whip stitch, leaving the inner edge open to attach to the body. Add scallop detail by working picots or small shells along the outer edge in cream to echo the spikes.
Wing Assembly - Round 1 :
With rib and membrane aligned, sew membrane to rib using matching yarn. Reinforce the inner edge by folding slightly and stitching to create a 3D wing impression
Info :
Attach wings to the back at approx. body rounds 12-16; space them evenly from the midline. If using wire, ensure ends are wrapped and secured to avoid poking out. Position wings slightly angled up for a natural look.
— Wing Edge Spikes and Decorative Ridges :
Round 1 :
Make 6 small spike cones (see small spike instructions) and 6 tiny bobbles by chaining 2, then 5 dc in second chain from hook and join to base with sl st to form a small bump
Info :
Sew small spikes and bobbles along the outer wing ridge and head midline in alternating sequence. These little details add the characteristic textured ridge visible in the photos.
— Facial & Surface Details :
Info :
Embroider nostrils on the snout with 2 short satin stitch dots in darker red or brown. To emphasize the scowl, use a short row of surface slip stitches or short chain loop over the forehead to create furrowed brows. You can couch a thin chain stitch across the brow area for more dramatic expression.
Round 1 :
For eyelids, with red yarn, surface crochet 6-8 slip stitches over the top of each eye and attach ends into the fabric behind the eye to create a heavy brow ridge
Info :
If using safety eyes, secure their backs before finishing the head. If embroidering eyes, place them slightly lower and use satin stitch to shape an oval reflective eye, leaving a small white stitched highlight for expression.
— Toes & Foot Spikes (Make 6 small cones for toes) :
Round 1 :
6 sc in magic ring (6)
Round 3 :
(1 sc, 1 inc) x 6 (18)
Round 4 :
Dec to 6 sts and fasten off leaving long tail for sewing (6)
Info :
Sew three small cones onto each foot top spaced evenly. These can be stitched through the foot fabric and secured with back-and-forth passes for durability.
— Finishing Touches :
Info :
Weave in all ends carefully. For a cleaner look, thread tails through a yarn needle and pass them through multiple stitches inside the piece before trimming. If you want blush on cheeks, dab a tiny bit of pastel chalk powder or fabric paint and blend lightly.
Round 1 :
Use the last long tails from head and body to sew the head to the body with mattress stitch, aligning body round 10-12 to head round 25-27 for a snug join
Info :
Double-check symmetry: before final sewing, pin head, wings, arms, legs, tail and horns in place. Step back and make small adjustments. Sew each piece securely with multiple passes to ensure durability for play or display.
This little scowling dragon is a joy to make and a delight to display — full of attitude and sweet, stubby charm. Each small spike and wing membrane adds character and gives you opportunities to customize colors and textures. The compact construction makes it a satisfying weekend project, and the finished piece is sturdy enough to keep on a shelf or brighten a desk. Have fun stitching every detail and enjoy sharing this feisty friend! 🐉🧶