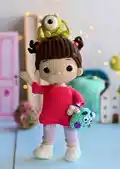
Make an adorable Doll Boo amigurumi with this full step-by-step pattern. You will crochet a sweet doll with hair, dress, leggings and a tiny Mike Wazowski friend. The pattern includes detailed rounds for each piece, helpful photos, and assembly tips so you can create a charming handmade toy to keep or give as a gift.
Progress Tracker
0% Complete
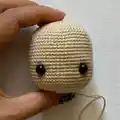
— Head :
Round 3 :
(1 sc, inc) x6 (18)
Round 4 :
(2 sc, inc) x6 (24)
Round 5 :
(3 sc, inc) x6 (30)
Round 6 :
(4 sc, inc) x6 (36)
Round 7 :
(5 sc, inc) x6 (42)
Round 8 :
(6 sc, inc) x6 (48)
Round 9 :
(7 sc, inc) x6 (54)
Round 10 :
(8 sc, inc) x6 (60)
Round 11 :
(9 sc, inc) x6 (66)
Round 12-27 :
60 sc (16 rounds)
Info :
Insert eyes between 21-22 rows in the distance of 13 sc
Round 28 :
(9 sc, dec) x6 (60)
Round 29 :
(8 sc, dec) x6 (54)
Round 30 :
(7 sc, dec) x6 (48)
Round 31 :
(6 sc, dec) x6 (42)
Round 32 :
(5 sc, dec) x6 (36)
Round 33 :
(2 sc, dec) x6 (18)
Info :
Cut the yarn. Hide the thread.
— Hairstyle (2 pcs) :
Round 3 :
(1 sc, inc) x6 (18)
Round 4 :
(2 sc, inc) x6 (24)
Round 5 :
(3 sc, inc) x6 (30)
Round 6 :
(4 sc, inc) x6 (36)
Round 7 :
(5 sc, inc) x6 (42)
Round 8 :
(6 sc, inc) x6 (48)
Round 9 :
(7 sc, inc) x6 (54)
Round 10 :
(8 sc, inc) x6 (60)
Round 11 :
(9 sc, inc) x6 (66)
Round 12 :
(10 sc, inc) x6 (72)
Round 13-15 :
72 sc (3 rounds)
Info :
Leave a long end for sewing.
— Bang :
Info :
Hook No2, begin crocheting in brown color; turning rounds:
Round 1 :
11 ch, from second 10 sc, ch, turn
Info :
Next, we always crochet BLO, turning rounds
Round 2-17 :
10 sc, ch, turn (16 rounds)
Info :
Leave a long end for sewing.
— Ponytail (2 pcs) :
Round 2 :
(9 sc, from second 8 sc,1 sc about 1 rnd of MR) x4
Info :
Leave a long end for sewing.
— Ears (2 pcs) :
Round 1 :
3 ch in MR, 4 hdc
Info :
Leave a long end for sewing.
— Face Decoration :
Info :
Head design can be viewed by clicking on the button below. Needle sculpting for the eyes area and the eyes details.
Info :
Making the nose we make a stitch 3 sc long between 21-22 rows, the distance from the eye to the nose on each side is 5 sc
— Hands (2 pcs) :
Round 4 :
5 sc, bubble, 4 sc (10)
Round 5 :
(3 sc, dec) x2 (8)
Round 6-18 :
8 sc (13 rounds)
Info :
Cut the thread and hide.
— Legs (2 pcs) :
Round 1 :
8 ch, from second 6 sc, 3 sc in the last chain, on the other side of the chain 5 sc, inc (16)
Round 2 :
inc, 5 sc, inc, 1 sc, inc, 5 sc, inc, 1 sc (20)
Round 3 :
1 sc, inc, 5 sc, inc, 3 sc, inc, 5 sc, inc, 2 sc (24)
Round 4 :
2 sc, inc, 5 sc, inc, 5 sc, inc, 5 sc, inc, 3 sc (28)
Info :
Prepare the insoles. On thick cardboard or plastic (for example, a cover from cotton swabs), we circle the part, cut it out, try it on and put it aside. We make 2 insoles for 2 shoes at once, glue after we crochet the fifth row.
Round 5 :
28 sc (For both loops)
Round 8 :
8 sc, 6 dec, 8 sc (22)
Round 9 :
7 sc, 4 dec, 7 sc (18)
Info :
BLO, Change color for main
Round 11 :
(4 sc, dec) x3 (15) (For both loops)
Round 12-15 :
15 sc (4 rounds)
Info :
Change color for lilac
Round 16 :
(4 sc, inc) x3 (18)
Round 17 :
18 sc (BLO) For both loops
Round 19 :
4 sc, inc, 8 sc, inc, 4 sc (20)
Round 20-21 :
20 sc (2 rounds)
Round 22 :
dec, 16 sc, dec (18)
Info :
Next, we crochet knees inc strictly in the center
Round 23 :
2 sc, dec, 3 sc, 4 inc, 3 sc, dec, 2 sc (20)
Round 25 :
2 sc, inc, 3 sc, 4 dec, 3 sc, inc, 2 sc (18)
Round 26-27 :
18 sc (2 rounds)
Round 28 :
(8 sc, inc) x2 (20)
Round 29-32 :
20 sc (4 rounds)
Info :
Cut the thread and hide.
Info :
We crochet the front loops of the 10th row with a white thread, keep the foot with the foot towards us: 10 rnd: 18 sc, Cut the thread and hide.
Info :
We crochet the front loops of the 16th row with a purple thread, keep the foot with the foot away from us: 16 rnd: 18 sc, Cut the thread and hide.
— Body :
Round 3 :
(1 sc, inc) x6 (18)
Round 4 :
2 sc in a circle, 4 sc with the leg (so that the legs are facing straight ahead) 6 sc in a circle, 4 sc with the leg, 2 sc in a circle (18)
Round 5 :
2 sc in a circle, on the remaining 16 sc of the legs, 6 sc in a circle, on the remaining 16 sc of the legs, 2 sc in a circle (42)
Round 6-12 :
42 sc (7 rounds)
Round 13 :
Change color for main. (12 sc, dec) x3 (39)
Round 14-17 :
39 sc (4 rounds) Attach the arms.
Round 18 :
7 sc in a circle, 4 sc in a circle, 16 sc in a circle, 4 sc in a circle, 8 sc in a circle (39)(39)
Round 19 :
7 sc in a circle, in the remaining 4 sc of the hand, 16 sc in a circle, in the remaining 4 sc of the hand, 8 sc in a circle (39)
Round 21 :
(11 sc, dec) x3 (36)
Round 22 :
(1 sc, dec) x12 (24)
Round 23 :
(2 sc, dec) x6 (18)
Round 24-26 :
18 sc (3 rounds)
Info :
Leave a long tail thread for piece attaching
— Sleeves (2 pcs) :
Round 1 :
18 ch, sl st, close in a circle
Round 2-4 :
18 sc (3 rounds)
Round 5 :
(7 sc, dec) x2 (16)
Round 6-7 :
16 sc (2 rounds)
Info :
Cut the thread and hide.
— Dress :
Round 1 :
54 ch, sl st, close in a circle
Round 3 :
(16 sc, dec) x3 (51)
Round 5 :
(15 sc, dec) x3 (48)
Round 6-15 :
48 sc (10 rounds)
Round 16 :
9 sc, 6 sc with sleeve, 18 sc, 6 sc with sleeve, 9 sc (48)
Round 17 :
9 sc, 10 sc in remaining sleeve loops, 18 sc, 10 sc in remaining sleeve loops, 9 sc (56)
Round 19 :
6 sc, 2 dec, 8 sc, 2 dec, 12 sc, 2 dec, 8 sc, 2 dec, 6 sc (48)
Round 20 :
5 sc, 2 dec, 6 sc, 2 dec, 12 sc, 2 dec, 6 sc, 2 dec, 5 sc (40)
Info :
Cut the thread and hide. Crochet the dress in the first row, keep as shown in the photo
Info :
Cut the thread and hide.
— Mike Wazowski (Head + Body) :
Round 3 :
(1 sc, inc) x6 (18)
Round 4 :
(2 sc, inc) x6 (24)
Round 5 :
(3 sc, inc) x6 (30)
Round 6-7 :
30 sc (2 rounds)
Round 8 :
(9 sc, inc) x3 (33)
Round 9-10 :
33 sc (2 rounds)
Round 11 :
(10 sc, inc) x3 (36)
Round 12-13 :
36 sc (2 rounds)
Round 14 :
(2 sc, dec) x9 (27)
Round 15 :
(1 sc, dec) x9 (18)
Round 16 :
(1 sc, dec) x6 (12)
Info :
Pull the hole through the front loops, cut the thread and hide.
— Eye :
Round 3 :
(1 sc, inc) x6 (18)
Round 4-5 :
18 sc (2 rounds)
Info :
Leave a long end for sewing. We insert the eye into the center of the MR, burn the leg with a lighter. Sew the eye to the body, fill during sewing.
— Mike Legs (2 pcs) :
Info :
Hook No2, crocheting with green color, 2 pcs. :
Round 1 :
14 ch , from third 3 dc, 2 hdc, 8 sc
Info :
Leave a long end for sewing.
This Doll Boo amigurumi pattern is full of personality and little details that make it extra special. Follow the complete rounds and assembly notes to create a polished, gift-ready toy. Enjoy customizing colors and accessories to make your own unique creation. 🧶🧵