🧢 Beautiful ✨ Detailed πŸ’ Adorable

Sorting bees Amigurumi Pattern

Sorting bees Amigurumi Pattern
4.2β˜… Rating
5-7 Hours Time Needed
2.0K Made This
βœ‚οΈ

Intermediate Level

Ideal for those with basic crochet experience, featuring slightly more advanced stitches and techniques to expand your skills.

⏱️

Weekend Treat

Takes 5-7 hours, making it an enjoyable project to finish over a couple of days.

🧸

Cute Companion

An adorable friend to cherish, handcrafted with love to bring comfort and joy for years to come.

About This Sorting bees Amigurumi Pattern

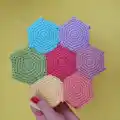
This pattern makes a set of seven hexagon bowls, seven matching bees, and seven flowers for a magnetic sorting toy. It uses small magnets so bees connect to flowers and teaches sorting and color matching. The pattern includes magnet pockets, tiny wings, and simple color-change stripes for the bees.

Sorting bees Amigurumi Pattern crochet pattern - detailed view of completed project

You will work in continuous rounds using US terminology and simple shaping techniques. The layout includes clear steps for bowls, bees, and flowers with photos and tips.

Why You'll Love This Sorting bees Amigurumi Pattern

I absolutely love this pattern because it brings together playfulness and practicality in a small, delightful set. I enjoy designing tiny pieces that are colorful and educational, and these bees and bowls are perfect for both. The use of magnets makes the toy interactive and satisfying for little hands to use. I also love how customizable the set is β€” you can change colors, sizes, and textures to make a truly personal gift.

Sorting bees Amigurumi Pattern step 1 - construction progress Sorting bees Amigurumi Pattern step 2 - assembly progress Sorting bees Amigurumi Pattern step 3 - details and accessories Sorting bees Amigurumi Pattern step 4 - final assembly and finishing

Switch Things Up

I love how easily this pattern can be customized β€” change the palette to pastels for a softer look or neon brights for maximum pop.

You can make the set larger or smaller by switching yarn weight and hook size; bulky yarn with a larger hook makes a chunky, cuddly version while finer yarn makes tiny keychain bees.

I often swap the magnet size based on the yarn thickness; for thicker yarn use slightly larger magnets and add an extra round to the pocket for a secure fit.

Try embroidering small smiles or freckles on the bees to give each one a unique personality instead of using safety eyes.

Make seasonal variations β€” autumn tones for a fall set, or Christmas colors for a holiday version with tiny bell accents.

If you want poseable bees, consider adding thin wire into them before final stuffing to bend the body slightly for display.

Mix and match flower petal counts or shapes β€” use larger petals or add a second row of petals for a rufflier bloom.

For a quieter toddler-safe toy, skip magnets and sew a crocheted loop and button system to attach bees to flowers instead.

Create matching patterns on bees by changing stripe frequency β€” more black rows for a chunkier striped look, or single-row accents for subtle striping.

I also like assembling the bowls into different layouts β€” a straight row, circle, or honeycomb clusters β€” and sewing them together when making a display or mobile.

Common Mistakes & How to Fix Them

βœ— Not checking magnet polarity before sewing them into pockets can make pieces not connect; always test each magnet orientation against another magnet before closing the pocket to ensure consistent polarity.
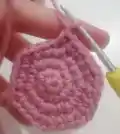
 βœ— Forgetting to work the special increase as [sc + ch + sc] will make the bowl edges rounded instead of polygonal; follow the special increase exactly and ignore the extra chain in the following rounds. βœ— Changing color abruptly without the half-stitch technique can leave an obvious join; when switching color finish the last single crochet half with the new color as instructed to get a neat color change. βœ— Skipping the back loop only row on the bowl will lose the defined edge shape; work the BLO round and count the adjusted stitch total (48) before continuing. βœ— Overstuffing the bees will distort their striped shaping and closing rounds; stuff gradually while crocheting and stop stuffing before decreasing rounds so the shape remains smooth.

Sorting bees Amigurumi Pattern

Create a colorful, educational sorting toy set with tiny crochet bees, flowers, and hexagon bowls. This pattern teaches color matching and fine motor skills while giving you a fun, portable project. You will love the magnetic connection between bees and flowers for hands-on play. Clear step-by-step instructions make this set a joyful make for gifting or playtime.

Intermediate 5-7 Hours

Materials Needed for Sorting bees Amigurumi Pattern

β€” Main Fabric

  • 01
    280 grams total of yarn (10 ply / DK weight recommended)
  • 02
    35 g for each rainbow color (7 colors)
  • 03
    20 g white for wings and flower centers
  • 04
    15 g black for stripes and details
  • 05
    Suggested yarn: DROPS PARIS (10 ply) or any similar 10 ply yarn

β€” Tools Required

  • 01
    Crochet hook size 12 UK = 2.5 mm = C2 US
  • 02
    Optional larger hook: up to 6 UK / 5 mm / H8 US for looser tension
  • 03
    Polyester fiberfill for stuffing
  • 04
    Magnets, small 2 cm (0.8 inches) diameter β€” author used 28 pcs (14 may be enough if strong)
  • 05
    Stitch markers
  • 06
    Needle for sewing and weaving ends
  • 07
    Scissors
  • 08
    Safety eyes (optional) around 5 mm if desired

Progress Tracker

0% Complete

β€” Bowls :

Info :

Make 7 in your favorite rainbow colors.

Info :

Tip! Before pulling the tail to close the ring, insert the hook in the first stitch; in this way you will keep it loose enough for the hook to be inserted in the next row.

Round 1 :

MR + sc X 6 => 6

Round 2 :

inc X 6 => 12

Infos :

From this row down you should make "special increases - splnc" instead of normal ones. A special increase is a [sc + ch + sc] in the same stitch. You should add the extra chain in the increase to make your bowl more like a polygon. Do not count or work in the extra chain when working the next rows - it just helps with the shape so just ignore it.

Round 3 :

(1 sc + 1 splnc) X 6 => 18

Round 4 :

(2 sc + 1 splnc) X 6 => 24

Round 5 :

(3 sc + 1 splnc) X 6 => 30

Round 6 :

(4 sc + 1 splnc) X 6 => 36

Round 7 :

(5 sc + 1 splnc) X 6 => 42

Info :

The next row is a back loop only, with no increases. In this row we will also consider the extra chain from the special increase. So instead of 42 single chains we will have 48 sc as we go round.

Round 8 :

BLO sc X 48 => 48

Round 9-16 :

sc X 48 => 48

Edges :

Now we are going to do the 6 edges on the sides of the bowls. Repeat X 6: SL X 8. Like in the 3rd picture below go down with 9 X sc (you will be working over rows 16-8) (make sure your last sc is in the front loop of row 8). Go back up with 10 X SL - the slip stitches should be on the back of the single chains you just made (the last one should be at the top).

Info :

Optionally you can sew the bowls together like I did. There is no technique for this, but you will need a lot of patience.

β€” Bee :

Magnet support :

R1: MR + sc X 6 => 6, slip stitch in the first sc, leave a tail for sewing. (the magnet should be small enough to fit in this pocket; however if yours is bigger just make an extra row to cover it - R2: inc X 6 => 12)

Wings :

R1: MR + sc X 6 => 6

Round 2 :

inc X 6 => 12, slip stitch in the first sc, leave a tail for sewing; sew the two wings together and leave the tail for sewing into the bee

Bee body R1 :

MR + sc X 6 => 6

Round 2 :

inc X 6 => 12

Round 3 :

(1 sc + 1 inc) X 6 => 18

Info :

Stop and sew the magnet socket (with the magnet inside) around rows 1/2. Make sure all your magnets are inserted in the same direction. To test this, use another magnet that should connect with all the bees on the same side.

Round 4-5 :

sc X 18 => 18

Info :

Sew also the eyes in increases 1 and 3 of row 2, using black needle. If you choose safety eyes go for the smallest you can find (5 mm or smaller).

With black - Round 6 :

sc X 18

Info :

When changing the color: at row 6, in the last single crochet, make half of the stitch with your main color but then finish with the other color (black in this case) like in the pictures below.

With main color - Round 7 :

sc X 18 => 18

With black - Round 8 :

sc X 18 => 18

With main color - Round 9 :

sc X 18 => 18

With black - Round 10 :

(4 sc + 1 dec) X 3 => 15

Info :

Sew the wings between rows 7 and 9. Make sure they are centered between the eyes. Start stuffing the bee, stuff as you go.

With main color - Round 11 :

(3 sc + 1 dec) X 3 => 12

With black - Round 12 :

(2 sc + 1 dec) X 3 => 9

Round 13 :

(1 sc + 1 dec) X 3 => 6

Round 14 :

Close the bee with a needle: insert a needle in the front loop of every stitch from the exterior to the middle of the stitch; after covering all 6 stitches pull firmly to close the ring. Insert the needle a couple of extra times under the stitches to make sure it's well secured. Hide the yarn.

β€” Flower :

Magnet support :

R1: MR + sc X 6 => 6, slip stitch in the first sc, leave a tail for sewing. (the magnet should be small enough to fit in this pocket; however if yours is bigger just make an extra row to cover it - R2: inc X 6 => 12)

Flower center - Round 1 :

MR + DC X 13 => 13, sl stitch in the second DC

Info :

We will not work on the first DC, so we will consider 12 DC; we will use them for 6 petals.

Petals - Repeat X 6 :

With the main color (change color at the slip stitch as learned before) repeat 6 times: Sc X 2 in the current stitch. 3 TREBLE CROCHET in the next stitch, sc X 2 in the current stitch. Slip stitch in the next stitch.

Info :

Sew the magnet cover, containing the magnet in the back of the flower - make sure the magnet is in the correct direction - to test this just place the bee in front of the flower and they should connect like in the picture.

Info :

Your Sorting toy is now finished!

Assembly Instructions

  • Sew the magnet socket into the bee around rows 1-2, insert the magnet and secure so it sits inside the small pocket before continuing to the next rounds.
  • Sew the wings between rows 7 and 9 of the bee, centering them between the eyes and securing with the tail left from the wings.
  • Sew the magnet cover to the back of the flower ensuring all magnets are inserted in the same orientation so bees connect consistently.
  • Position bowls as desired and, if you choose, sew adjacent hexagon bowl edges together to form a cluster; pin first to check placement and symmetry.
  • Test every bee and flower connection before final sewing; adjust magnet direction if one does not connect with the set.

Important Notes

  • πŸ’‘Work in continuous rounds and use stitch markers to keep track of the start of each round, especially during color changes and shaping.
  • πŸ’‘Make sure magnets are well inserted and oriented consistently; test polarity before closing pockets to ensure pieces connect.
  • πŸ’‘Supervise children while playing with this set due to small magnets and parts, and make sure safety eyes or small parts are well secured.

This colorful Sorting Bees set makes a playful learning toy that encourages color matching and fine motor skills. The tiny bees, flowers, and hexagon bowls connect with small magnets for satisfying play. Perfect as a handmade gift or activity set, it is cheerful, compact, and endlessly customizable. 🐝🌈🧢

You ask,

we answer.

FAQs

What size will the finished pieces be?

Each bee measures approximately 3-4 cm tall and bowls are small hexagons suitable for little hands when using the recommended 10 ply yarn and 2.5 mm hook; exact size will vary with yarn and tension.

Can I use different yarn weights for this pattern?

Yes, you can change yarn weight, but it will affect final size and magnet fit; adjust hook size accordingly and consider larger magnets or extra rows for bigger pieces.

Do I need prior crochet experience for this pattern?

This pattern is rated intermediateβ€”basic knowledge of magic ring, single crochet, increases and decreases, and working in the back loop only is recommended.

How many magnets do I need and what size?

Author used 28 small round magnets (2 cm / 0.8 inches) because they were not very strong; if your magnets are strong you may need only 14. Test each magnet and ensure they are well inserted and secured.