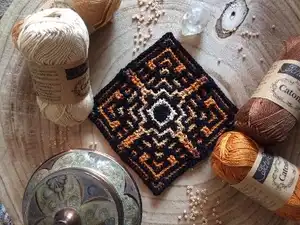
Make a vibrant mosaic tile blanket with this detailed crochet pattern. You will create 36 beautiful tiles worked in rounds using Scheepjes Catona, then join them for a 36 x 36 inch throw. The pattern includes full tile rounds (R1-R15), exact color grams per tile for five colorways, joining instructions and a finished border with picots and tassels. Clear stitch notes and a chart are included to guide you through the mosaic technique.
Progress Tracker
0% Complete
— General Info :
Info :
CROCHET HOOK NEEDED: I recommend a 3.0mm for the entire pattern.
Info :
SIZE: The finished size one tile will be approx. 5 x 5 inches. The finished measurements of the blanket will be 36 x 36 inches.
Infos :
Yarn Requirements: I used Scheepjes Catona in 22 different colors. Scheepjes Catona comes in balls of 10/25 and 50 grams with a length of 125 meters. As you will use some colors just a few grams, it might be convenient you can buy this yarn in smaller amounts. The main color in the pattern is 110 Jet Black. You will need 10 balls of 50 grams for the entire pattern including the border. This color is marked as Color A in the pattern. You use color A for tile Rounds 1, 3, 5, 7, 9, 11, 13 and 15. The other rounds are divided in 4 other colors which results in : - ROUND 2 AND 4, COLOR B IS USED. - ROUND 6 AND 8, COLOR C IS USED. - ROUND 10 AND 12, COLOR D IS USED. - ROUND14, COLOR E IS USED. Under here I have written down in which tile, which color shades are used for B, C, D, E.
Tile 1 (P1) :
TILE 1 : THE MEDINA TILE COLOR A : 110 JET BLACK ( 12 GRAMS NEEDED FOR A TILE ) COLOR B : 101 CANDLE LIGHT ( 1 GRAM NEEDED FOR A TILE ) COLOR C : 522 PRIMROSE ( 2 GRAMS NEEDED FOR A TILE ) COLOR D : 208 YELLOW GOLD ( 3 GRAMS NEEDED FOR A TILE ) COLOR E : 249 SAFFRON ( 1 GRAM NEEDED FOR A TILE )
Tile 2 (P1) :
TILE 2 : THE CASBAH TILE COLOR A : 110 JET BLACK ( 12 GRAMS NEEDED FOR A TILE ) COLOR B : 404 ENGLISH TEA ( 1 GRAM NEEDED FOR A TILE ) COLOR C : 179 TOPAZ ( 2 GRAMS NEEDED FOR A TILE ) COLOR D : 383 GINGER GOLD ( 3 GRAMS NEEDED FOR A TILE ) COLOR E : 157 ROOT BEER ( 1 GRAM NEEDED FOR A TILE )
Tile 3 (P1) :
TILE 3 : THE TUNIS TILE COLOR A : 110 JET BLACK ( 12 GRAMS NEEDED FOR A TILE ) COLOR B : 253 TROPIC ( 1 GRAM NEEDED FOR A TILE ) COLOR C : 514 JADE ( 2 GRAMS NEEDED FOR A TILE ) COLOR D : 391 DEEP OCEAN GREEN ( 3 GRAMS NEEDED FOR A TILE ) COLOR E : 525 FIR ( 1 GRAM NEEDED FOR A TILE )
Tile 4 (P1) :
TILE 4 : THE SOUK TILE COLOR A : 110 JET BLACK ( 12 GRAMS NEEDED FOR A TILE ) COLOR B : 403 LEMONADE ( 1 GRAM NEEDED FOR A TILE ) COLOR C : 411 SWEET ORANGE ( 2 GRAMS NEEDED FOR A TILE ) COLOR D : 281 TANGERINE ( 3 GRAMS NEEDED FOR A TILE ) COLOR E : 388 RUST ( 1 GRAM NEEDED FOR A TILE )
Tile 5 (P1) :
TILE 5 : THE MAJORELLE TILE COLOR A : 110 JET BLACK ( 12 GRAMS NEEDED FOR A TILE ) COLOR B : 146 VIVID BLUE ( 1 GRAM NEEDED FOR A TILE ) COLOR C : 400 PETROL BLUE ( 2 GRAMS NEEDED FOR A TILE ) COLOR D : 201 ELECTRIC BLUE ( 3 GRAMS NEEDED FOR A TILE ) COLOR E : 124 ULTRAMARINE ( 1 GRAM NEEDED FOR A TILE )
Info :
BORDER COLORS : Color A : 110 Jet Black Color B : 105 Bridal White ( 20 grams needed )
Info :
Note: I didn't put up the totals of all colors besides the color A, black. That's because you can choose to variate a different color combination of tiles if you like or make more or less of them. If you would decide to rearrange tiles, this would also mean your amount of yarn colors would change. So instead, I added per color range the amount needed for a square. Just count how many squares you want to make, and you can calculate how much you would need for each color. Of course, you can also make tiles with other kinds of yarn or fewer or more colors. It is totally up to you, and there are many ways to make the tile. Using two colors can be amazing, but remember that you always choose a light and dark color to work with. If you do not, you will not see the mosaic pattern in it.
Info :
STITCH ABBREVIATIONS (US TERMS): CH – CHAIN SS – SLIP STITCH SC- SINGLE CROCHET SC3TOG – MAKE 3 SINGLE CROCHETS TOGETHER HDC- HALF DOUBLE CROCHET DC – DOUBLE CROCHET PICOT – CH3, MAKE A SS IN THE FIRST CH OF THE CH3 ST/STS – STITCH(ES) SP - SPACE BLO – BACK LOOP OF THE STITCH FLO – FRONT LOOP OF THE STITCHES * - MARKS THE START OF A REPEAT IN THE ROUND REP – REPEAT RS – RIGHT SIDE OF THE WORK CRN - CORNER { } – GIVES THE TOTAL AMOUNT OF STS AFTER A ROUND ( ) – NOTES BETWEEN THESE MARKS A SHORT REPEAT IN A ROUND
Infos :
SPECIAL NOTES: * The pattern is written conveniently. When the pattern tells you to make 2sc in blo, you crochet 1 sc in blo of the next two sts. The same goes for dc's. The pattern tells you to make a dc in flo. In this case, you will crochet 1 dc in the flo of the st under it two Rounds down. * In the pattern, you make dc's in the front loop of the stitch two Rounds down. If you make a dc in R4, you will use the FLO of the st under it in R2. You always skip an st on the current Round when making a dc. I have not written this in the directions, so keep in mind to do this. * The CH's you make in the corners of the squares will be used to work new stitches in. Make sure to not work in the space but in the actual chains when making these stitches. Stitches made in corners don't need to be made in the BLO. * The pattern is worked in Rounds. This means you will work at the Right Side of the work at all times. * It is easy to put aside colors between Rounds. It saves a lot of ends to weave in. If you're not familiar with this technique, please watch my video tutorial on Youtube.
— The Pattern :
Round 1 :
R1 (RS): Take Color A and make a magic loop. Ch2 (doesn't count as st), make 12hdc in the magic loop. Ss in top of first st to connect. Put Color A aside. [12hdc]
Round 2 :
R2: Take Color B and attach it in any hdc made. Ch1 (doesn't count as st here and throughout entire pattern) *2sc in blo, 1sc-ch2-1sc in next st. Rep from * 3 more times. Ss in top of first st to connect. Put Color B aside. [4 sides of 4sc and 4 times a ch2-crn]
Round 3 :
R3: Pick up Color A and attach in the nearest third st of a side. Ch1, *2sc in blo, 1sc in first ch of ch2-crn, ch2, 1sc in second ch of ch2-crn, 2sc in blo. Rep from * 3 more times. Ss in top of first st to connect. Put Color A aside. [4 sides of 6sc and 4 times a ch2-crn]
Round 4 :
R4: Pick up Color B in the nearest fourth st on a side. Ch1, * 3sc in blo, 1sc in first ch of ch2-crn, ch2, 1sc in second ch of ch2-crn, 3sc in blo. Rep from * 3 more times. Ss in top of first st to connect. Fasten off Color B. [4 sides of 8sc and 4 times a ch2-crn]
Round 5 :
R5: Pick up Color A in the nearest fourth st on a side. Ch1,*2dc in flo, 3sc in blo, 1sc in first ch of ch2-crn, ch2, 1sc in second ch of ch2-crn, 3sc in blo. Rep from * 3 more times. Ss in top of first st to connect. Put Color A aside. [4 sides of 8sc/ 2dc and 4 times a ch2-crn]
Round 6 :
R6: Take Color C and attach it in the first dc out of two on a side. Ch1,*2sc in blo, 1dc in flo, 3sc in blo, 1sc in first ch of ch2-crn, ch2, 1sc in second ch of ch2-crn, 3sc in blo, 1dc in flo. Rep from * 3 more times. Ss in top of first st to connect. Put Color C aside. [4 sides of 10sc/2dc and 4 times a ch2-crn]
Round 7 :
R7: Pick up Color A in the nearest first dc before 2 sc's on a side. Ch1,*4sc in blo, 1dc in flo, 3sc in blo, 1sc in first ch of ch2-crn, ch2, 1sc in second ch of ch2-crn, 3sc in blo, 1dc in flo. Rep from * 3 more times. Ss in top of first st to connect. Put Color A aside. [4 sides of 12sc/2dc and 4 times a ch2-crn]
Round 8 :
R8: Pick up Color C in the nearest first dc before the 4 sc's on a side. Ch1,*2sc in blo, 2dc in flo, 6sc in blo, 1sc in first ch of ch2-crn, ch2, 1sc in second ch of ch2-crn, 4sc in blo. Rep from * 3 more times. Ss in top of first st to connect. Fasten off Color C. [4 sides of 14sc/ 2dc and 4 times a ch2-crn]
Round 9 :
R9: Pick up Color A in the nearest first dc out of two made on a side. Ch1,*2sc in blo, 1dc in flo, 3sc in blo, 2dc in flo, 1sc in blo, 1sc in first ch of ch2-crn, ch2, 1sc in second ch of ch2-crn, 1sc in blo, 2dc in flo, 3sc in blo, 1dc in flo. Rep from * 3 more times. Ss in top of first st to connect. Put Color A aside. [4 sides of 12sc/ 6dc and 4 times a ch2-crn]
Round 10 :
R10: Take Color D and attach it into the first of 2 sc's between the dc's on a side. This will be the middle st of a side. Ch1,*2dc in flo, 8sc in blo, 1sc in first ch of ch2-crn, ch2, 1sc in second ch of ch2-crn, 8sc in blo. Rep from * 3 more times. Ss in top of first st to connect. Put Color D aside. [4 sides of 18sc/ 2dc and 4 times a ch2-crn]
Round 11 :
R11: Pick up Color A into the nearest first dc out of the two you made on a side. Ch1,*2sc in blo, 1dc in flo, 2sc in blo, 1dc in flo, 2sc in blo, 1dc in flo, 2sc in blo, 1sc in first ch of ch2-crn, ch2, 1sc in second ch of ch2-crn, 2sc in blo, 1dc in flo, 2sc in blo, 1dc in flo, 2sc in blo, 1dc in flo, 2sc in blo, 1dc in flo, 2sc in blo, 1dc in flo. Rep from * 3 more times. Ss in top of first st to connect. Put Color A aside. [4 sides of 16sc/ 6dc and 4 times a ch2-crn]
Round 12 :
R12: Pick up Color D into the nearest first sc of the third 2sc-group made on a side. This will be the middle 2 sc-group on a side. Ch1,*2dc in flo, 4sc in blo, 2dc in flo, 4sc in blo, 1sc in first ch of ch2-crn, ch2, 1sc in second ch of ch2-crn, 4sc in blo, 2dc in flo, 4sc in blo. Rep from * 3 more times. Ss in top of first st to connect. Fasten off Color D. [4 sides of 18sc/ 6dc and 4 times a ch2-crn]
Round 13 :
R13: Pick up Color A into the nearest first dc of the second 2dc-group on a side. This will be the middle 2dc-group on a side. Ch1,*2sc in blo, 1dc in flo, 2sc in blo, 1dc in flo, 7sc in blo, 1sc in first ch of ch2-crn, ch2, 1sc in second ch of ch2-crn, 7sc in blo, 1dc in flo, 2sc in blo, 1dc in flo, 2sc in blo, 1dc in flo. Rep from * 3 more times. Ss in top of first st to connect. Put Color A aside. [4 sides of 22sc/ 4dc and 4 times a ch2-crn]
Round 14 :
R14: Take Color E and attach it into the first sc of the second 2sc-group which will be the middle one on a side. Ch1,*2dc in flo, 12sc in blo, 1sc in first ch of ch2-crn, ch2, 1sc in second ch of ch2-crn, 12sc in blo. Rep from * 3 more times. Ss in top of first st to connect. Fasten off Color E. [4 sides of 26sc/ 2dc and 4 times a ch2-crn]
Round 15 :
R15: Pick up Color A into the nearest first dc of 2dc-group made on a side. Ch1,*2sc in blo, 2dc in flo, 8sc in blo, 1dc in flo, 2sc in blo, 1sc in first ch of ch2-crn, ch2, 1sc in second ch of ch2-crn, 2sc in blo, 1dc in flo, 8sc in blo, 2dc in flo, 2sc in blo. Rep from * 3 more times. Ss in top of first st to connect. Fasten off Color A. [4 sides of 24sc/ 6dc and 4 times a ch2-crn]
Info :
A tile is completed now! Weave in all ends and block if needed.
— Joining the Squares :
Info :
Join the squares together with a simple ss. Attach two squares with stitch markers. Turn to the backside of the tiles and make an ss through the inner loops of both sides. In this way, you will leave the outer loops unworked, and it will close like a zipper. Work an ss through both ch2-crns to join when working in a ch2 corner at the beginning or the end. Do this on every side. Of course, you can also use the mattress stitch to sew the squares together.
Info :
The best way to do this is to work in rows of 6 tiles. As the pattern contains 36 tiles, making six long rows of 6 tiles that you individually connect is better. And then, attach the large six-tile pieces the same way you joined the tiles. When you work your way over a connecting point of 2 tiles, make sc's in the ch2 corners and the middle of an ss section between two tiles.
— Border :
Foundation Round :
Foundation Round (RS): In this Round, only make regular sts without making them into blo or flo. Attach Color A in any of the ch2-corners on one of the four sides of your tiles. It doesn't matter which one you take. Ch1, *make a sc-ch2-cs in the ch2-crn, (make a sc in the next 30 st, sc3tog over the next ch2-sp-the ss joining section and the next ch2-sp of the next tile) 5 times , make a sc in next 30 st. Rep from * 3 more times. Ss in top of first st to connect. Ss to next ch2-crn. [4 sides of 187sc and 4 times a ch2-crn]
Round 1 :
R1: Ch1, *1sc-ch2-1sc in ch2-crn, 1sc in blo of each st on side till next ch2-crn. Rep from * 3 more times. Ss in top of first st to connect. Put Color A aside. [4 sides of 189sc and 4 times a ch2-crn]
Round 2 :
R2: Take Color B and attach it in any ch2-crn. Ch2 (doesn't count as st), *1hdc-ch2-1hdc in ch2-crn, 1hdc in blo of each st on side till next ch2-crn. Rep from * 3 more times. Ss in top of first st to connect. Fasten off Color B. [4 sides of 191hdc and 4 times a ch2-crn]
Round 3 :
R3: Pick up Color A in the nearest ch2-crn. Ch1, *1sc-ch2-1sc in ch2-crn, 3sc in blo, 1dc in flo, (5sc in blo, 1dc in flo) 31 times, 2sc in blo. Rep from * 3 more times. Ss in top of first st to connect. Ss to next ch2-crn. [4 sides of 193 sts and 4 times a ch2-crn]
Round 4 :
R4: Ch2 (doesn't count as st), *1hdc-picot-1hdc in ch2-crn, 1hdc in each st on side till next ch2-crn. Rep from * 3 more times. Ss in top of first st to connect. Fasten off Color A. [4 sides of 195 sts and 4 times a picot-crn]
Info :
Weave in the remaining ends and block the project when needed. To finish my piece I bought some amazing silk tassels which I added into the picot corners.
This mosaic tiles blanket pattern is a lovingly crafted project that turns small rounds into a stunning 36 x 36 inch throw. The combination of Scheepjes Catona colors and the zipper-style join creates a clean geometric finish you'll be proud to display. Treat yourself or make a special handmade gift—this blanket brings warmth and color to any room. 🧶✨