🧢 Beautiful ✨ Detailed πŸ’ Adorable

Spiderman Plush Amigurumi Pattern

Spiderman Plush Amigurumi Pattern
4.3β˜… Rating
5-7 Hours Time Needed
3.6K Made This
βœ‚οΈ

Intermediate Level

Ideal for those with basic crochet experience, featuring slightly more advanced stitches and techniques to expand your skills.

⏱️

Weekend Treat

Takes 5-7 hours, making it an enjoyable project to finish over a couple of days.

🧸

Cute Companion

An adorable friend to cherish, handcrafted with love to bring comfort and joy for years to come.

About This Spiderman Plush Amigurumi Pattern

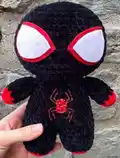
This pattern creates a 10 inch tall Spiderman plush worked in chunky yarn, designed for a soft, squishy finish. You can make the classic Peter Parker red & blue version or the Miles Morales black & red variant. The pattern includes full rounds, color change notes, and finishing tips for eyes and the spider emblem.

Spiderman Plush Amigurumi Pattern crochet pattern - detailed view of completed project

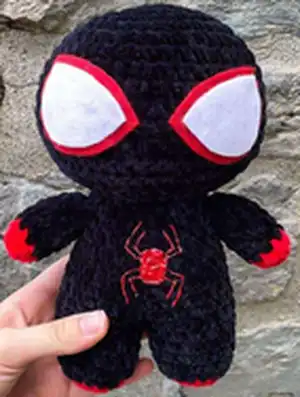
Worked in continuous rounds with basic increases and decreases, it is ideal for crocheters comfortable with amigurumi techniques. Felt eyes and puffy paint details give a polished, characterful finish.

Why You'll Love This Spiderman Plush Amigurumi Pattern

I absolutely love this pattern because it takes a beloved character and makes it approachable for home crocheters; the chunky yarn turns each stitch into a plush, huggable surface that children and collectors will adore. I enjoy the clear section-by-section format which makes following the shaping simple and satisfying. The option to make either Peter Parker or Miles Morales means you can personalize the final look, and adding felt eyes and a painted spider creates a charming handmade finish. Sharing this pattern always brings me joy when I see others make their own mini heroes to gift or display.

Spiderman Plush Amigurumi Pattern step 1 - construction progress Spiderman Plush Amigurumi Pattern step 2 - assembly progress Spiderman Plush Amigurumi Pattern step 3 - details and accessories Spiderman Plush Amigurumi Pattern step 4 - final assembly and finishing

Switch Things Up

I love customizing this pattern by switching yarn colors to create unique versions; try pastel reds and blues for a soft, nursery-friendly Spiderman or bold neons for a playful twist.

You can change the size by altering yarn weight and hook size; use worsted weight yarn with a smaller hook for a medium version or bulky with a larger hook for a jumbo, cuddly plush.

I sometimes embroider a different emblem on the chestβ€”try a heart, star, or initials instead of the spider for a personalized gift.

Swap felt eyes for safety eyes if making a toy for an older child, or embroider the eye outlines for extra durability and a handcrafted look.

For different textures, use boucle or textured novelty yarn for the body while keeping smooth yarn for the eyes and emblem to add contrast.

Add wire to the arms if you want posable limbs; insert the wire before finishing stuffing and wrap it with yarn to avoid poking through the fabric.

Create an entire set by making different costume colorwaysβ€”pair Peter Parker with Miles Morales for a collectible duo.

Try sewing tiny accessories like a crochet mask, hood, or removable cape to give the plush more play options and personality.

Use a small amount of stuffing variation: firmer in the legs and softer in the head to balance stability and cuddliness depending on how the plush will be used.

I often experiment with finishing techniques for the spider emblemβ€”felt cutouts, embroidered outlines, or layered puffy paint all give different visual effects.

If you prefer a minimalist look, skip the spider detail and simply embroider web lines lightly across the torso for a subtle, modern effect.

For gifts, add a small loop of yarn at the top to hang the plush as an ornament or attach a keyring to make a chunky keychain-sized version.

Common Mistakes & How to Fix Them

βœ— Skipping stitch markers during rounds can make it hard to identify the start of each round; place a marker at the beginning of every round to keep your stitch count accurate. βœ— Not stuffing as you go can lead to lumps or gaps in shaping; begin stuffing early and add fiber gradually to maintain an even, smooth shape throughout the head and body. βœ— Changing colors without securing ends will leave loose tails; weave in or carry yarn neatly and secure color changes with a small knot or a few sewing stitches to prevent unraveling. βœ— Forgetting to stuff the legs and body firmly makes the doll flop; stuff legs and the lower body firmly and the neck/top slightly less to keep the head-proportion balanced. βœ— Sewing parts without pinning can cause misaligned limbs; pin or baste arms and eyes in place, check symmetry, then sew securely for a professional finish.

Spiderman Plush Amigurumi Pattern

Make your own cuddly Spiderman plush with this clear, photo-inspired crochet pattern. You will work in the round with simple increases, decreases, and color changes to recreate either the classic Peter Parker or Miles Morales version. The pattern uses chunky yarn for a soft, squishy finish and includes steps for felt eyes and a puffy paint spider detail.

Intermediate 5-7 Hours

Materials Needed for Spiderman Plush Amigurumi Pattern

β€” Main Fabric

  • 01
    Premier Parfait Chunky yarn (bulky/chunky) - Peter Parker version: Red (Poppy) and Blue (Classic Blue)
  • 02
    Premier Parfait Chunky yarn (bulky/chunky) - Miles Morales version: Black and Red (Poppy)
  • 03
    Felt for eyes - Peter Parker: black & white felt; Miles Morales: red & white felt
  • 04
    Puffy paint for spider detail - Peter Parker: black puffy paint; Miles Morales: red puffy paint

β€” Tools Required

  • 01
    Crochet hook size 4.5 mm
  • 02
    Polyester stuffing
  • 03
    Yarn needle for sewing and embroidery
  • 04
    Scissors
  • 05
    Stitch marker
  • 06
    Felt for eyes (black, red, white as noted)
  • 07
    Puffy paint for spider emblem
  • 08
    Optional: Cricut or cutting tool for precise felt shapes

Progress Tracker

0% Complete

β€” Head :

Info :

Using red.

Round 1 :

Rnd 1. 8 sc in MR (8)

Round 2 :

Rnd 2. inc x 8 (16)

Round 3 :

Rnd 3. *sc,inc* x8 (24)

Round 4 :

Rnd 4. *3sc, inc* x6 (30)

Round 5 :

Rnd 5. *2sc, inc, 2sc* x6 (36)

Round 6 :

Rnd 6. *5sc, inc* x6 (42)

Round 7 :

Rnd 7. *3sc, inc, 3sc* x6 (48)

Round 8-14 :

Rnd 8-14. sc around (48), 7 total rounds.

Round 15 :

Rnd 15. *3sc, dec, 3sc* x6 (42)

Round 16 :

Rnd 16. *5sc, dec* x6 (36)

Round 17 :

Rnd 17. *2sc, dec, 2sc* x6 (30)

Info :

Begin stuffing, and continue to stuff well as you work.

Round 18 :

Rnd 18. *3sc, dec* x6 (24)

Round 19 :

Rnd 19. *sc, dec* x8 (16)

Round 20 :

Rnd 20. dec x6 (6)

Info :

Fasten off and sew closed.

Info :

Use black to make the head if making miles morales.

β€” Arms :

Info :

Starting with red.

Round 1 :

Rnd 1. 8 sc in a MR (8)

Round 2-4 :

Rnd 2-4. sc around (8), 3 total rounds.

Info :

Change to blue.

Round 5-8 :

Rnd 5-8. sc around (8), 4 total rounds.

Info :

Change to red.

Round 9 :

Rnd 9. sc around (8)

Info :

Fasten off and leave a long tail for sewing. Stuff very lightly.

Info :

For miles morales: Rnd 1-2. with red, Rnd 3-9. with black.

β€” Legs :

Info :

Starting with red.

Round 1 :

Rnd 1. 8 sc in a MR (8)

Round 2 :

Rnd 2. inc x8 (16)

Round 3-5 :

Rnd 3-5. sc around (16), 3 total rounds.

Info :

Change to blue.

Round 6-7 :

Rnd 6-7. sc around (16), 2 total rounds.

Info :

Fasten off here on the first leg only. On the second leg, continue to rnd 8.

Info :

For miles morales: Rnd 1. with red, Rnd 2-7. with black.

β€” Body :

Info :

Continuing from the second leg.

Round 8 :

Rnd 8. Ch 1. Make 16 sc around the first leg, 1 sc in the ch, 16 sc around second leg, and 1 sc into the other side of the ch (34)

Round 9 :

Rnd 9. *sc 7, dec, 6 sc, dec* x2 (30)

Info :

Change to red.

Round 10 :

Rnd 10. sc around (30)

Info :

Stuff the legs well.

Round 11 :

Rnd 11. *dec, 13 sc* x2 (28)

Info :

Rounds 12-14 involve multiple color changes. Change colors between red and blue as indicated by the red and blue text.

Round 12 :

Rnd 12. 5 sc, 6 sc, 7 sc, 6 sc, 4 sc (28)

Round 13 :

Rnd 13. 3 sc, dec, 6 sc, *sc,dec* x2, sc, 6sc, 2sc, dec (24)

Round 14 :

Rnd 14. 5 sc, 5 sc, 6 sc, 5 sc, 3 sc (24)

Info :

The rest of the body is made with red.

Round 15-17 :

Rnd 15-17. sc around (24), 3 total rounds.

Info :

Fasten off and leave a long tail for sewing.

Info :

Stuff the body well, especially the top of the body/neck.

Info :

For miles morales: All of the body is made with black.

β€” Assembly :

Info :

Using the long tail from the body, sew it to the head.

Info :

Sew the arms between rnd 16-17, on either side of the body.

β€” Eyes :

Infos :

I do not have a cricut, so i cut out my eyes by hand. Here is how i do it. 1. Using a picture of my spiderman plush, or any other you like, enlarge the image on a tablet/laptop so that it is the same size as your plush. 2. Trace the inner white part of the eye and cut it out in felt. 3. Glue this to the outer eye felt color (black or red felt depending on the version). 4. Leaving a small border, cut around the white part. Glue the eyes around rnd 6-10.

β€” Spider :

Info :

I use puffy paint and a yarn needle to be as precise as possible when making the spider. Alternatively, you could use a cricut for this.

Assembly Instructions

  • Using the long tail from the body, sew the body to the head securely so seams are hidden and the head sits centered.
  • Sew the arms between rounds 16-17 on either side of the body, pinning first to check symmetry and angle before stitching.
  • Glue or sew the felt eyes in place around rounds 6-10, checking spacing and size against a printed reference image before final attachment.
  • Use puffy paint or embroidered stitching to create the spider emblem on the chest, working slowly with a yarn needle or paint applicator for precision.
  • Fasten off and weave in all ends, tucking tails inside the plush and trimming excess for a clean finish.

Important Notes

  • πŸ’‘Use stitch markers to mark the start of each round to maintain accurate stitch counts and prevent accidental increases.
  • πŸ’‘Stuff gradually and evenly as you work to ensure a smooth shape; overstuffing can distort your piece, while understuffing makes it floppy.
  • πŸ’‘Pin parts in place before sewing to ensure correct alignment of limbs and facial features for a balanced finished plush.
  • πŸ’‘When changing colors frequently, carry yarn neatly or secure and weave in ends to avoid loose tails showing through the surface.

This adorable Spiderman plush is designed to be soft, squishy, and full of character, perfect as a gift or a keepsake. Customize between classic Peter Parker or Miles Morales styles using the included color notes. The chunky yarn and felt details make finishing fast and satisfying. πŸ§ΆπŸ•·οΈ

You ask,

we answer.

FAQs

What size will the finished piece be?

The finished Spiderman plush is about 10 inches tall when made with the recommended chunky yarn and a 4.5 mm hook.

Can I use different yarn weights for this pattern?

Yes, you can change yarn weight, but the final size and texture will change; use an appropriate hook size and expect differences in stitch count or finished dimensions.

Do I need prior crochet experience for this pattern?

This pattern is rated intermediate, so basic knowledge of single crochet, increases, decreases, and working in the round is recommended.

How long does this project typically take to complete?

Most crocheters complete this project in 5-7 hours, depending on experience, speed, and how much time you spend on finishing details like eyes and the spider.

How do I adapt the pattern to make Miles Morales instead of Peter Parker?

Make the head and body mostly black instead of red, follow the notes at the end of each section indicating which rounds should be black, and use red felt or puffy paint for the spider emblem.