🧢 Beautiful ✨ Detailed πŸ’ Adorable

Spike Stitch Tote Bag Pattern

Spike Stitch Tote Bag Pattern
4.4β˜… Rating
5-7 Hours Time Needed
3.9K Made This
βœ‚οΈ

Intermediate Level

Ideal for those with basic crochet experience, featuring slightly more advanced stitches and techniques to expand your skills.

⏱️

Weekend Treat

Takes 5-7 hours, making it an enjoyable project to finish over a couple of days.

✨

Stylish Touch

An elegant detail to elevate any look, combining traditional techniques with contemporary design sensibilities.

About This Spike Stitch Tote Bag Pattern

This pattern creates a roomy Spike Stitch Tote Bag with a textured body and a contrasting top band. It uses the spike stitch for an engaging woven look and works in continuous rounds to avoid seams. The pattern includes two strap options: pre-made leather straps or crocheted straps for a fully handmade finish. Clear notes and a visual tutorial are provided to help you master the spike stitch and achieve clean results.

Spike Stitch Tote Bag Pattern crochet pattern - detailed view of completed project

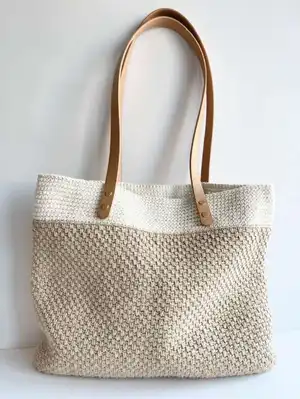
The finished bag measures approximately 15 inches wide by 12 inches high using the recommended yarn and hook. Detailed round-by-round instructions make it easy to follow along and customize colors or straps to your taste.

Why You'll Love This Spike Stitch Tote Bag Pattern

I absolutely love this pattern because the spike stitch creates an effortlessly chic texture that looks far more complex than it is. I enjoy how the design can be made with either pre-made straps for a polished finish or crocheted straps for a fully handmade touch. I also appreciate that the construction is worked in rounds, which gives a smooth, seamless look and makes assembly simple. Every time I make this tote I like to experiment with color placement and yarn combinations to create a different vibe.

Spike Stitch Tote Bag Pattern step 1 - construction progress Spike Stitch Tote Bag Pattern step 2 - assembly progress Spike Stitch Tote Bag Pattern step 3 - details and accessories Spike Stitch Tote Bag Pattern step 4 - final assembly and finishing

Switch Things Up

I love changing up the color placement to give the bag a different personality; try a bold body with a neutral top band or a soft pastel band for a feminine look.

To make a smaller or larger bag, change your yarn weight and hook size; bulky yarn and a larger hook will make a chunky, cozy tote while lighter yarn creates a delicate, smaller bag.

I often experiment with Ombre or variegated yarn for the body so the spike stitch pops with subtle color shifts across the bag.

Try lining the bag with fabric for added durability and a professional finish; choose a lightweight cotton for structure without weighing the bag down.

Swap the faux leather straps for wooden or metal handles for a completely different style and dress the bag up for evening use.

Embellish with a small crocheted pocket on the inside or outside for keys and phone; I usually add a simple slip pocket sewn to the lining for convenience.

If you want extra sturdiness, insert a thin interfacing panel into the base before lining to prevent sagging when the bag is filled.

I sometimes add a decorative stitch row between the body and the top band, like a row of reverse single crochet, to create a defined edge.

For long-lasting straps, reinforce the attachment with both rivets and a few hand stitches through the strap tabs; this adds strength and peace of mind when carrying heavy items.

Want to personalize it? Embroider a small initial or motif on the top band before attaching straps to make each bag uniquely yours.

Common Mistakes & How to Fix Them

βœ— Skipping the recommendation to crochet around a second strand of yarn; start round 2 around a second strand if you want a firmer structure to avoid a floppy bag. βœ— Not placing stitch markers for strap placement which leads to uneven handles; place stitch markers at the specified stitches before beginning round 54 to ensure symmetry. βœ— Twisting the long chains when making handles which causes a twisted strap; check that each CH 100 is not twisted before joining or slip stitching into it. βœ— Forgetting to count stitches after increases results in an incorrect stitch count; always confirm the stitch totals shown in parentheses at the end of each round. βœ— Pulling the carried yarn too tight when using a second strand can cause puckering; check the work at the end of each round and gently stretch the carried yarn to remove bunching.

Spike Stitch Tote Bag Pattern

Make a stylish, textured tote bag using the spike stitch and simple round construction. This pattern guides you through a sturdy base, a beautiful spike stitch body, and two strap options so you can choose the finish you love. Clear step-by-step rounds and a visual spike stitch tutorial help you achieve a professional result. Perfect for gifting or everyday use, this project elevates basic stitches into a modern accessory.

Intermediate 5-7 Hours

Materials Needed for Spike Stitch Tote Bag Pattern

β€” Main Fabric

  • 01
    Worsted weight yarn (#4) - approximately 100m in cream (for top band and straps)
  • 02
    Worsted weight yarn (#4) - approximately 300m in beige (for main body)
  • 03
    Suggested yarn used in sample: Lily Sugar 'n Cream Solids in Jute, Ecru and White

β€” Tools Required

  • 01
    Crochet hook size 3.5mm
  • 02
    Tapestry needle
  • 03
    Scissors
  • 04
    Faux leather bag strap 80cm x 18mm (optional)
  • 05
    8mm length bag rivets (optional)
  • 06
    Stitch markers

Progress Tracker

0% Complete

β€” Spike Stitch Tutorial :

Info :

Place your hook in the next stitch one round below (the same position where that stitch was worked in the last round).

Info :

Yarn over and draw up a loop to the height of the round.

Info :

Yarn over and draw through both loops to complete the spike stitch.

β€” Base :

Info :

In cream CH 55

Round 1 :

Start in the 2nd CH from the hook, SC Inc, SC 52, SC 4 in the last stitch. Continue on the other side of the CH, SC 52, SC Inc in the last stitch. (112)

Info :

(Note: to create a firmer structure, begin crocheting around another strand of yarn in round 2)

Round 2 :

[SC Inc] x 2, SC 52, [SC Inc] x 4, SC 52, [SC Inc] x 2 (120)

Round 3 :

[SC 1, SC Inc] x 2, SC 52, [SC 1, SC Inc] x 4, SC 52, [SC 1, SC Inc] x 2 (128)

Round 4 :

[SC 2, SC Inc] x 2, SC 52, [SC 2, SC Inc] x 4, SC 52, [SC 2, SC Inc] x 2 (136)

Round 5 :

[SC 3, SC Inc] x 2, SC 52, [SC 3, SC Inc] x 4, SC 55, SC Inc, SC 4 (143)

β€” Body :

Round 6 :

BLO SC 143

Round 7 :

*BLO SC, SPSC (143)

Round 8 :

*SPSC, BLO SC (143)

Round 9 - 47 :

Repeat rounds 7 and 8.

Info :

Change to white or cream:

Round 48 :

BLO SC 143 (143)

Rounds 49–53 :

SC 143 (143)

Info :

Continue to either pre-made bag strap or crocheted bag strap instructions.

β€” Pre-made bag strap :

Rounds 54 – 57 :

SC 143

Round 58 :

SS 143

Info :

FO and weave in ends.

Info :

Attach pre-made bag strap approximately 4.5 inches from either side of the bag using the rivets.

β€” Crochet bag strap :

Info :

Continue crocheting until you reach the edge of the bag, place a stitch marker, this is the new end of round 53.

Info :

The straps will be approximately 4.5 inches from the side of the bag. Before the next round I recommend placing stitch markers to indicate where your straps will be placed. This will ensure they are lined up before you start.

Info :

Place 1 stitch marker in the following stitches of the next round: 21st stitch, 49th stitch, 94th stitch, 121st stitch.

Info :

You can now adjust your stitch markers if straps are not positioned equally. Proceed to the next round when you are happy with the placement of your straps.

Round 54 :

SC 20 (or until the stitch before the first stitch marker), CH 100, make sure the CH is not twisted and skip the next 29 stitches (or until the stitch after the next stitch marker), SC 43 (or until the stitch before the next stitch marker), CH 100, make sure the CH is not twisted and skip the next 29 stitches (or until the stitch after the next stitch marker), SC 22 (285 incl CH's)

Round 55 :

SC 20, place 1 SC in the next 100 CH sts, SC 43, place 1 SC in the next 100 CH sts, SC 22 (285)

Rounds 56-57 :

SC 285 (285)

Round 58 :

SS 285 (285)

Info :

FO and weave in ends.

β€” Finishing the crochet straps :

Info :

Re-attach the yarn to the first unworked stitch of round 53.

Info :

SS 29, continue slip stitching up the chain side of the handle.

Info :

SS to the first SS and FO.

Info :

Repeat on the other side.

Assembly Instructions

  • Attach pre-made bag strap approximately 4.5 inches from either side of the bag using rivets to secure the strap to the top band.
  • For crocheted straps, place stitch markers at the 21st, 49th, 94th, and 121st stitches to mark strap placement, then follow rounds 54–58 to create and join the chain handles.
  • Weave in all ends securely after finishing round 58 for either strap option, then check strap attachment for stability before using the bag.
  • If using the crocheted strap, slip stitch 29 times up the chain side of the handle, then sew or secure the end to the top band and fasten off; repeat on the opposite side.

Important Notes

  • πŸ’‘Finished dimensions: Approx 15 inches (width) x 12 inches (height).
  • πŸ’‘Gauge: 19 stitches and 18 rows = 4 inches or 10 cm in single crochet and spike stitch.
  • πŸ’‘The pattern uses American crochet terminology; numbers in brackets confirm stitch counts each round.
  • πŸ’‘For a firmer structure consider crocheting around a second strand of yarn starting in round 2 and check for bunching at the end of each round.

This Spike Stitch Tote Bag pattern combines texture and modern simplicity to create a timeless accessory you will reach for every day. Handmade details and two strap options let you customize the final look for a polished, durable carryall. Make one in neutral tones for everyday chic or swap colors for a bold statement. 🧢✨

You ask,

we answer.

FAQs

What size will the finished bag be?

The finished bag measures approximately 15 inches wide by 12 inches high when worked with the recommended worsted weight yarn and a 3.5mm hook.

Can I use a different yarn weight for this pattern?

Yes, you can use a different yarn weight but the finished size and gauge will change; adjust your hook size accordingly and check gauge to achieve the desired dimensions.

Do I need to know the spike stitch before starting?

No, a visual spike stitch tutorial is included that explains how to insert the hook one round below and complete the spike stitch with clear step instructions.

How long does this project take to complete?

Most crafters finish this project in about 5-7 hours, though the time may vary depending on experience and whether you choose pre-made or crocheted straps.