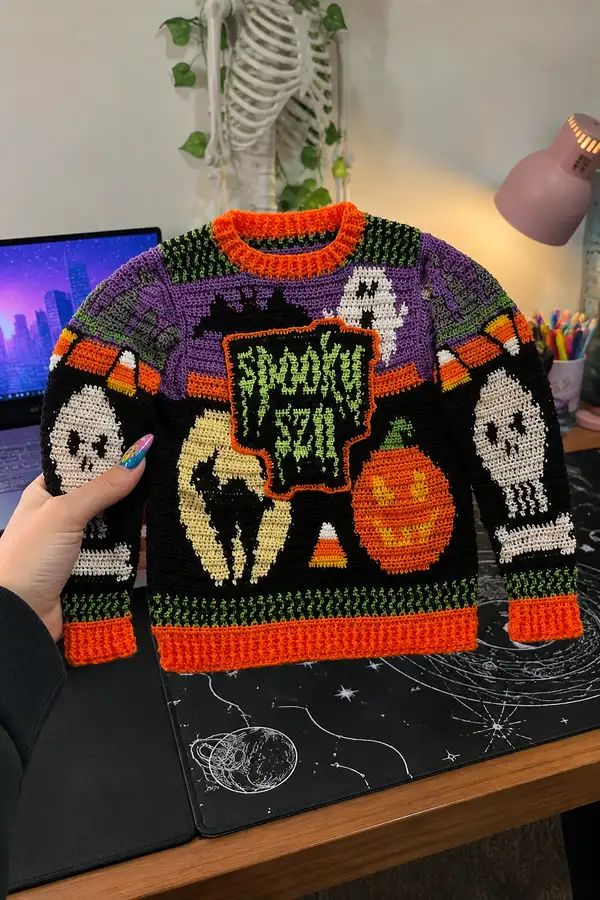
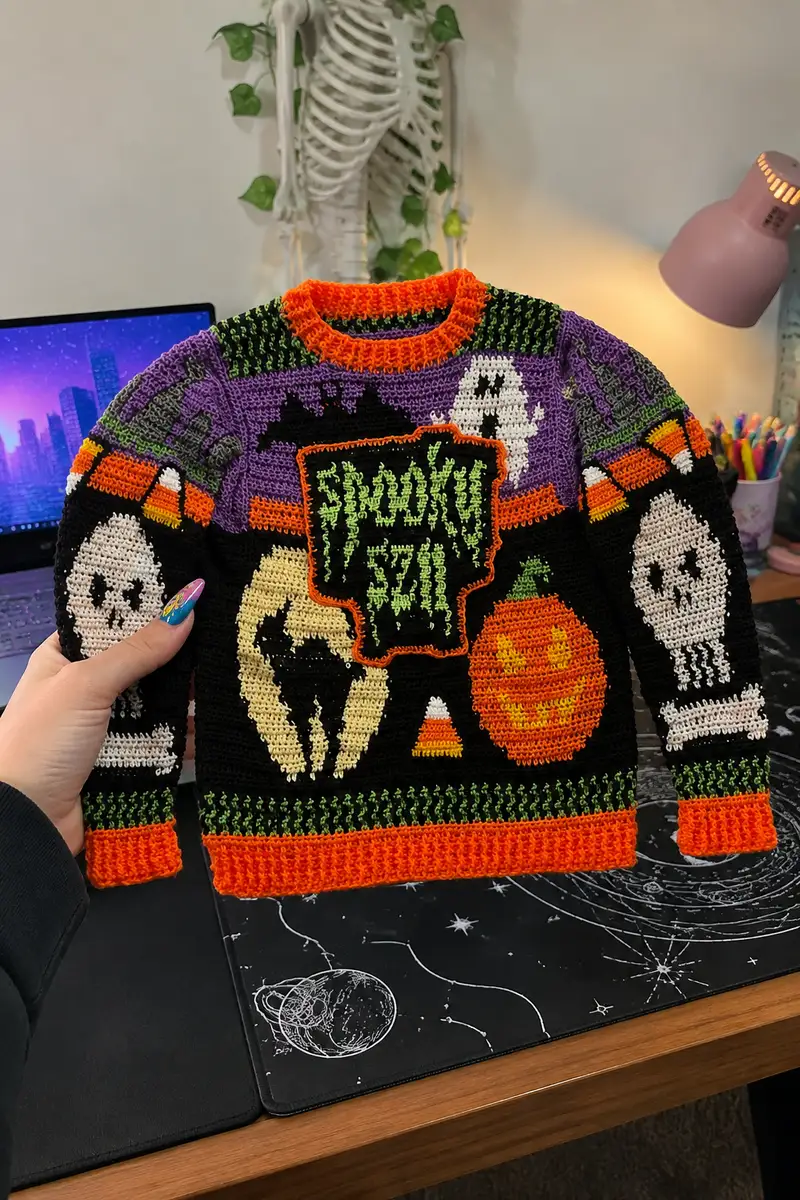
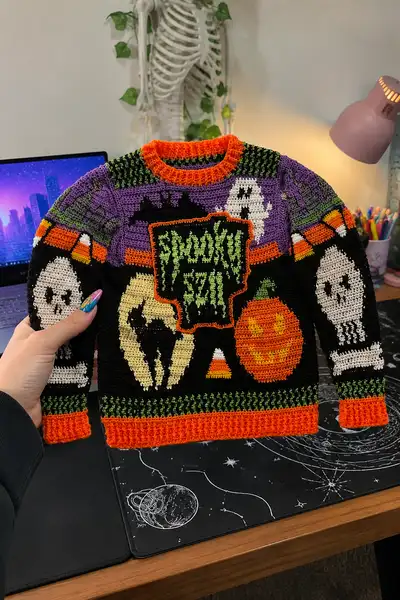
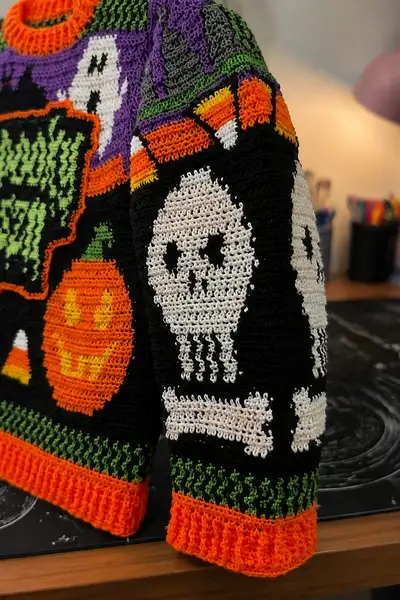
A playful, color-packed crochet sweater inspired by classic Halloween motifs — ghosts, pumpkins, candy corn, skulls and a central spooky neon sign. Worked in single crochet tapestry-style colorwork with contrasting ribbed cuffs, hem and neckline, this sweater is a bold statement piece for seasonal fun. The pattern includes clear instructions for back, front, sleeves, collar and finishing, plus techniques for carrying yarn and surface embroidery to make the motifs pop.
Progress Tracker
0% Complete
— Notes and Gauge :
Info :
This sweater is written for a toddler size (approximate chest 20 inches, approx. 13-14 inches length from shoulder to hem). Gauge: 5 sc x 6 rows = 1 inch in single crochet tapestry tension with 4.0mm hook. Adjust hook and stitch count to modify size. The sweater is worked in panels (back, front, 2 sleeves) in single crochet tapestry style (color changes worked each row) and seamed. Use stranded/carry methods but avoid twisting floats over 6-8 stitches; catch or anchor floats as needed.
Info :
All rows counted below are worked flat unless otherwise noted. For tapestry colorwork, carry unused colors along the WS and catch them every 6-8 stitches. When changing colors, finish the last yarn-over of the previous color with the new color to secure the join and avoid holes.
— Back Panel :
Round 1 :
Ch 41, sc in 2nd ch from hook and across — 40 sc (40)
Round 2 :
Ch 1, turn, 1 sc in each st across (40)
Round 3 :
Repeat Round 2 (40)
Round 4 :
Change to black if not already. Ch 1, turn, 1 sc across (40)
Round 5-10 :
Work 6 rows even in black, 1 sc in each st (40)
Info :
These initial even rows create the lower back rib boundary. If you prefer a longer body, add 2-4 additional even rows now before starting motif bands.
Round 11 :
Change to green accent. Ch 1, turn. *1 sc black, 1 sc green* rep across (40) — forest green alternating band; carry unused color loosely (40)
Round 12 :
Ch 1, turn. *1 sc green, 1 sc black* rep across (40)
Round 13-14 :
Change to black. Work 2 rows even in black (40)
Info :
These alternating rows mimic the green flame band visible above the ribbing. Maintain color floats on WS and anchor occasionally.
Round 15-22 :
Change to purple for haunted-rock section. Work 8 rows of single crochet in purple (40)
Round 23 :
Begin gray rock shaping: Ch 1, turn. Work across changing to gray for the rock shapes: sc in first 4 sts purple, [sc in next 3 sts gray, sc in next 5 sts purple] rep twice, sc last 4 sts purple — placement creates three gray rock piles (40)
Round 24 :
Ch 1, turn. Mirror previous row, shifting gray blocks by 1 st to create organic edges (40)
Round 25-28 :
Work 4 rows even in purple across full row (40)
Info :
Tip: Carry gray behind purple when only 2-3 sts intervene. Catch floats every 6 stitches. These rows establish the yoke background and motif placement height.
Round 29-40 :
Change to black. Work 12 rows even in black for main body height (40)
Round 41 :
Ready for armhole shaping: Ch 1, turn. Work 16 sc, place next 8 sts on stitch holder (for sleeve opening), sc remaining 16 sts across (40)
Info :
Set aside the 8-st sleeve opening on a holder; these stitches will be joined later when seaming the sleeve to the body. Keep RS facing out. Continue to work upper back short rows if you want a slightly curved shoulder.
Round 42-48 :
Work 7 rows straight across the 32 working sts (shoulder shaping rows) — 32 sc across (32)
Info :
At the end of these rows you'll shape the shoulders slightly by decreasing 1 sc at each end over 2 rows if a tapered shoulder is desired. This pattern keeps shoulders simple for a toddler fit.
Round 49 :
Dec row: ch 1, turn, sc2tog at beg, sc across until last 2 sts, sc2tog at end — (30)
Round 50 :
Ch 1, turn, sc across (30)
Round 51 :
Fasten off leaving long tail for seaming shoulders. Block panel gently to square if desired
Info :
Back panel complete. Set aside and prepare to work front panel to mirror height and to include central motifs. Keep all panels unseamed until final assembly.
— Front Panel :
Round 1 :
Ch 41, sc in 2nd ch from hook and across — 40 sc (40)
Round 2-10 :
Work 9 rows even in black for lower front hem (40)
Info :
These rows align with the back hem rows so when seamed the hem matches. Keep tension consistent to maintain motif alignment with the back.
Round 11-12 :
Work 2 rows alternating black/green as on back (40)
Round 13-20 :
Change to purple and work 8 rows to create the yoke background (40)
Info :
Front yoke will host top-edge of the central sign and ghost motifs. Plan motif heights: the neon sign will occupy rows approx. 24-34 of the front so keep additional purple rows if you want more spacing.
Round 21 :
Change to black. Ch 1, turn. Work 5 sc, change to cream and begin ghost motif: [sc cream x6, change to black x4] rep for motif spacing, complete row with black to end — place ghost motif approx 6 sts from arm openings (40)
Round 22-24 :
Continue working ghost motif rows: follow color chart to increase cream area for ghost head and black to create eye sockets. Work full row colorwork as charted (40)
Info :
It helps to sketch a small 40-st wide by 20-row chart marking where each color change occurs. Use small bobbins or cut short lengths to minimize carrying too many colors.
Round 25-34 :
Begin central spooky sign panel: switch to black background and work charted intarsia to form the sign box center (roughly 18 sts wide centered). For 10 rows, work the sign's black background with neon green letters carried as floats in those sign columns. Maintain full row count 40 sts (40)
Round 35 :
Info : Change to orange for sign frame. Using surface crochet after finishing can create a raised orange border; alternatively, carry orange and work border rows now by changing the 2 outer stitches of the sign area to orange for 1 row and then back to black (40)
Round 36-40 :
Continue black body rows below sign and pumpkin motifs, begin pumpkin: at columns 6-14 start orange pumpkin shaping using full colorwork chart for face eyes and teeth in yellow (40)
Round 41-46 :
Pumpkin rounds continued; solid orange body with 2 rows of yellow eyes and small green stem worked at column 10-11 near top of pumpkin (40)
Info :
When working multiple motif colors across a single row, carry the background color as a long float beneath motif colors or use intarsia bobbins per motif to avoid large floats. Keep floats loose to avoid puckering.
Round 47-52 :
Work 6 rows even black to finish torso before armhole shaping (40)
Round 53 :
Armhole shaping: Ch 1, turn, sc 16, place next 8 sts on holder for sleeve opening, sc remaining 16 (40)
Round 54-60 :
Work 7 rows across 32 sts for shoulder shaping to align with back (32)
Round 61 :
Shoulder taper: ch 1, turn, sc2tog at beginning, work across, sc2tog at end (30)
Round 62 :
Work 1 row even (30)
Round 63 :
Fasten off leaving long tail for seaming shoulders (30)
Info :
Front panel complete. Use surface crochet in bright orange to outline the neon sign: with RS facing, use slip stitch or surface single crochet around the frame of the sign for raised border contrast. Embroider neon letters if green motifs need extra definition.
— Sleeve (Make 2) :
Round 1 :
Ch 21, sc in 2nd ch from hook and across — 20 sc (20)
Round 2 :
Ch 1, turn, 1 sc in each st (20)
Round 3-6 :
Work 4 rows even in black (20)
Round 7 :
Change to orange for cuff: BLO ribbing set up row: ch 1, turn, 1 sc BLO in each st (20)
Round 8-11 :
Work 4 rows in BLO 1 sc (20) — creates stretchy ribbing for cuff
Info :
If you want a folded cuff, work the ribbing longer by 4-6 rows and fold up later when seaming; for this sample we used 4 rib rows for a single-layer cuff.
Round 12 :
Change to black. Work 1 row even in black (20)
Round 13-20 :
Begin candy corn and skull motif band. Work rows following chart: for row blocks across the sleeve top: place candy corn cluster at sts 6-10 and skull motif occupying columns 12-18 using cream for skull and black for eyes (20)
Round 21 :
Work 1 row even black (20)
Round 22-30 :
Work 9 rows even in black to lengthen sleeve to underarm (20)
Info :
Sleeve length should reach approx 9-10 inches as measured from cuff to underarm for toddler size; add/subtract rows if adjusting length. Keep motif bands centered on sleeve midsection.
Round 31 :
Cap shaping start: Ch 1, turn, dec 1 sc at beg and end every 4th row over next 6 rows to shape top cap (after decreases final round should reduce to 14-16 sts depending on shaping) — see shaping table below
Round 32-36 :
Work shaping rows: Row 32 dec at beg and end (18), Row 33 even (18), Row 34 dec at beg and end (16), Row 35 even, Row 36 dec to 14 (14)
Round 37 :
Fasten off leaving long tail for seaming into armhole opening (14)
Info :
When seaming sleeve into the 8-st opening placed on holder, you will stretch the sleeve top slightly to fit. Pin carefully and sew with mattress stitch for least visible seam.
— Neckline and Collar :
Round 1 :
With RS of front attached to back at shoulders, pick up 30-34 sts evenly around neck opening (including rejoined front and back center neck gap). Ch 1, join with sl st to form round (this forms circular shallow collar) (30-34)
Info :
Measure neck opening circumference before picking up stitches; for toddler size aim for 11-12 inches circumference. Adjust picked up stitches to maintain rib stitch multiples if you plan to use BLO ribbing for collar.
Round 2 :
Use orange for collar: ch 1, 1 sc BLO in each picked up st around (30-34)
Round 3-8 :
Work 6 rounds BLO 1 sc to create pronounced ribbing (30-34)
Round 9 :
Fold collar in half to inside and slip stitch through both loops to create folded collar (optional) — fasten off and weave ends
Info :
Alternatively, work 10-12 rows of BLO for a taller collar if preferred. For a non-folded look, finish with 2-3 rows of even sc in orange instead of folding.
— Hem and Cuff Finishing :
Round 1 :
With RS facing, join orange at lower hem edge and pick up 40 sts evenly across hem edge (if panels were seamed) — 40
Round 2 :
Ch 1, 1 sc BLO across picked up sts (40)
Round 3-6 :
Work 4 rows BLO sc for stretchy orange hem (40)
Info :
For a folded hem, work 6-8 rows and then fold up and slip stitch through both layers; for single-layer hem simply finish after desired rib height and weave in ends.
— Surface Crochet and Embellishments :
Round 1 :
Info : To make the neon sign frame pop, use bright orange and surface single crochet with RS facing. Insert hook into the fabric from WS to RS at starting corner, pull up a loop and work sc along the outer outline of the sign area. This will create a raised cord-like border.
Round 2 :
Info : For neon lettering, use duplicate stitch with lime green yarn over the neon sign letters to increase brightness and texture. Embroider small highlights on pumpkin eyes and candy corn with yellow and white for extra depth.
Round 3 :
Info : To get the looped textured look on some orange details visible in the photo (slightly loopy picot texture), you can insert short looped fringe by pulling up long loops with the hook then securing them on the next row; practice on a swatch first.
— Seaming and Assembly :
Round 1 :
Info : Block all pieces lightly to measurements. Lay front and back RS together, align shoulder edges and seam using mattress stitch; use the long tails left from shoulder fast-offs. Make seams invisible by taking small stitches from corresponding bars of each piece.
Round 2 :
Info : With shoulders joined, set sleeve top into arm opening: place sleeve RS to body RS, match center of sleeve cap to shoulder seam and pin. Sew around using whip stitch or mattress stitch, easing sleeve cap into 8-st opening evenly.
Round 3 :
Info : Once sleeves are attached, seam side seams from hem to cuff in one continuous seam on each side. Turn sweater RS out and check motif alignment and tension across seams.
Round 4 :
Info : Add surface crochet outlines, duplicate stitch lettering and small embroidered facial features now. Weave in all ends neatly on WS, trimming close after weaving for secure finish.
— Optional Size Adjustments and Advanced Shaping :
Info :
To make a larger size, increase starting chain by multiples of 4 to preserve pattern repeats and work additional body rows proportionally. For adult sizes, consider working in pieces of 60-80 sts half-panel widths and increase sleeve length by 10-20 rows depending on arm length.
Info :
If you prefer a seamless yoke instead of set-in sleeves, convert pattern to top-down raglan: cast on circumference for neck and increase at raglan points each round while working colorwork charts in the yoke. This requires re-charting motifs into radial layout.
This Spooky Halloween Sweater is a joyous mashup of colorwork and costume-ready charm — every stitch adds character and personality! The neon sign, grinning pumpkin and playful skulls make it perfect for seasonal wear or photogenic costume layering. Work methodically, enjoy the vibrant contrasts, and celebrate each completed motif. 🎃🧶 Make one for a loved one (or yourself!) and watch it become an instant favorite for Halloween festivities. Happy crocheting and share your spooky creations! 👻