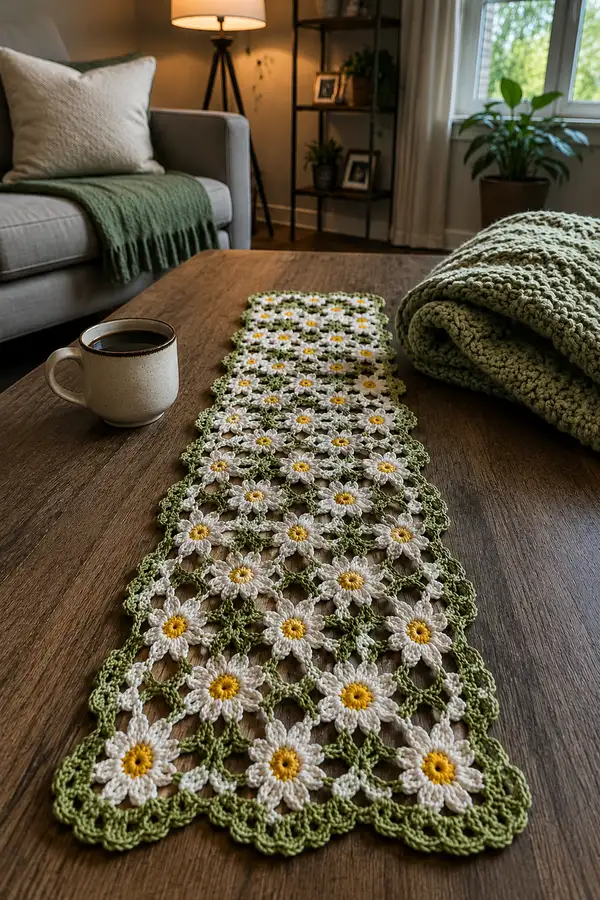
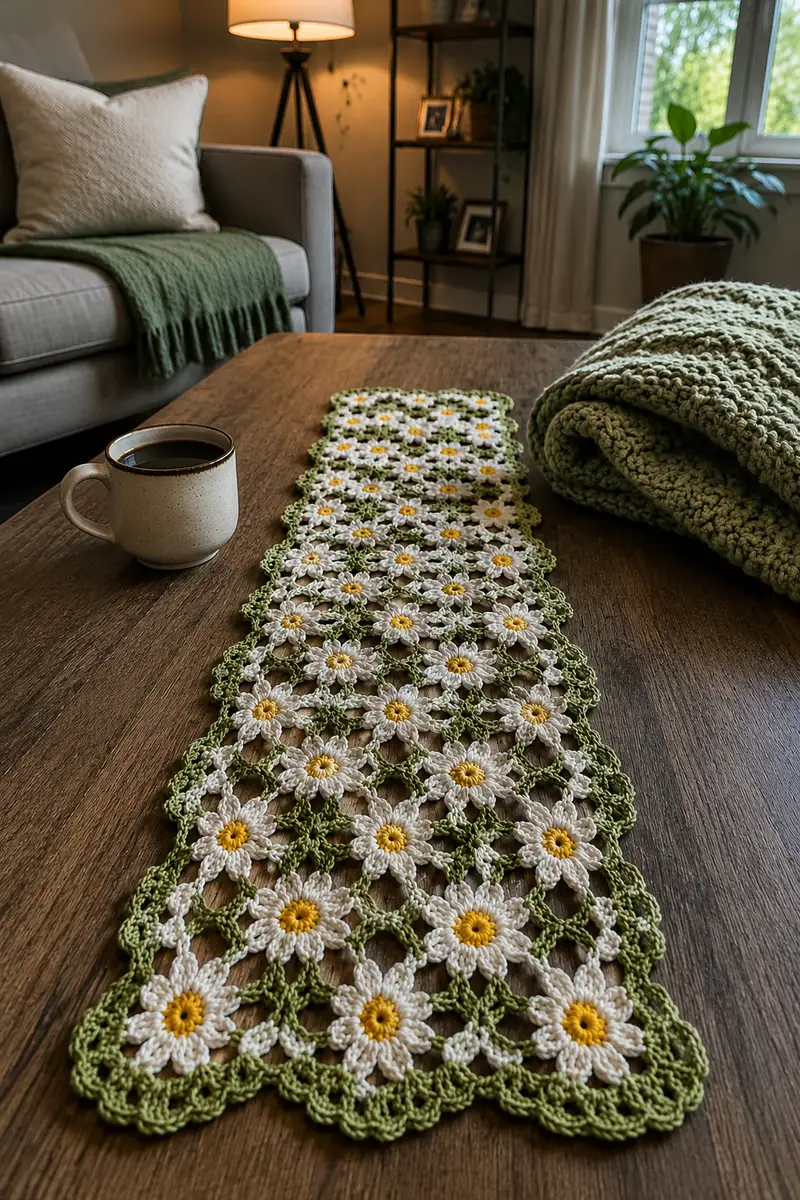
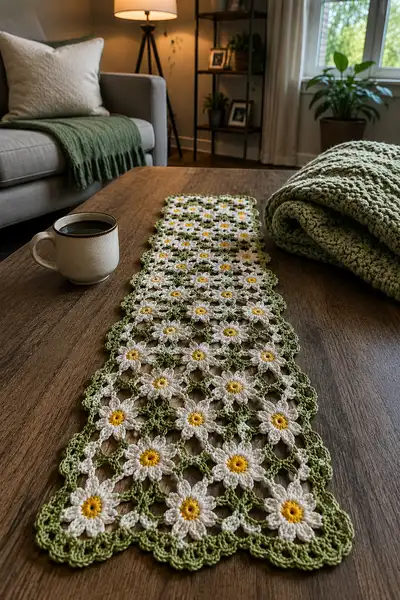
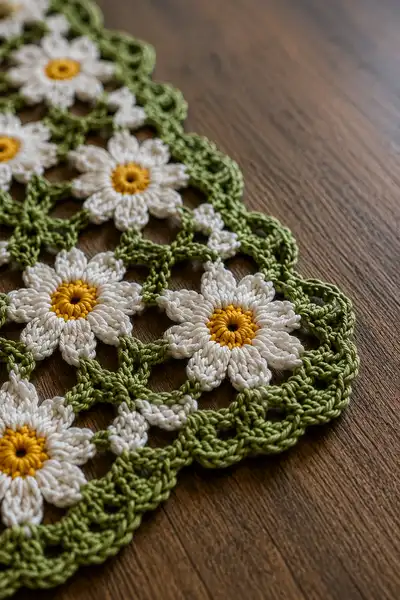
Bright, airy and wonderfully vintage-inspired, this Spring Daisy Chain Openwork Table Runner stitches together delicate daisy motifs in a repeating lattice for a long, scalloped runner. Features sunny yellow centers, soft white petals and a fresh green connecting lace and scalloped border. The finished runner lies flat with pretty openwork that shows the table surface beneath, perfect for spring and summer décor or a cheerful centerpiece.
Progress Tracker
0% Complete
— Overview and Gauge :
Info :
This runner is built from a repeating daisy motif; each completed motif measures approximately 3 1/4" (8.5 cm) across before blocking, and approximately 3 1/2" (9 cm) after gentle blocking when worked with worsted weight cotton and a 3.5mm hook. Make a gauge swatch of a single motif to ensure consistency across your pieces. Gauge is not critical for pattern function but consistent motif size ensures a flat runner and even scalloped edge.
Info :
For the sample runner pictured, the layout is 6 motifs across by 12 motifs long (72 motifs total) yielding a runner approximately 12" (30 cm) wide and 36" (92 cm) long after blocking. Adjust the number of motifs to lengthen or shorten the runner; motifs join in a honeycomb configuration so the runner width must be a multiple of the repeat used here for a clean scalloped border.
— Daisy Motif (Make X motifs) :
Round 1 :
With yellow yarn, make a magic ring. Ch1 (does not count as stitch), work 10 sc into ring. Pull ring tight. Join with sl st to first sc. (10)
Round 2 :
Ch2 (counts as first hdc), hdc in same st, 2 hdc in each st around. Join with sl st to top of first ch2. (20)
Info :
Round 2 creates a small, slightly raised center disk that will sit tight and neat as the daisy eye. Keep tension slightly firmer here so the center looks compact.
Round 3 :
Switch to white yarn. Fasten onto any stitch behind the last round with sl st, ch1. *Ch5, sl st in next stitch (this forms a petal base chain space)*. Repeat from * around into each st across; you will have 10 ch-5 loops. Join with sl st to first sl st. (10 ch-5 sp)
Info :
When changing color, either fasten off yellow and join white or carry yellow behind if you plan to work very few ends; carrying across many stitches can cause bulk. I recommend fastening off yellow and weaving in ends later for a neat center.
Round 4 :
For each ch-5 loop: (into loop) work [sc, hdc, 5 dc, hdc, sc] — a raised petal cluster worked around each ch-5 loop. After finishing the last petal, join with sl st to first sc. (10 petals)
Info :
Work the 5 dc cluster gently so petals puff slightly—this creates the dimension of the daisy. Keep the same hook and tension so petals match across motifs.
Round 5 :
Ch1, sl st into space between first and second petals, *ch3, sl st into space between next two petals*; repeat from * around inserting a small ch-3 connecting picot between each petal pair to form small bridges for the later green connectors. Join with sl st to first sl st. (10 ch-3 bridges)
Info :
These small chain bridges are optional but recommended: they provide predictable entry points for the green joining round and stabilize the petal spacing.
Round 6 :
Fasten off white leaving a tail for weaving if desired. Using green yarn, join with a sl st in the ch-3 bridge (any one). Ch3 (counts as dc), dc in same ch-3 bridge, *ch2, dc in next ch-3 bridge, dc in same bridge (2 dc worked across each bridge separated by ch-2)*. Repeat around creating a ring of dc pairs separated by ch-2 spaces. Join with sl st to top of first ch3. (10 pairs of dc, 10 ch-2 sps)
Info :
This round begins the connecting lattice in green. The ch-2 spaces are the points that will be used to join adjacent motifs later. Be sure to count your pairs — if you have 10 petals you should have 10 dc pairs and 10 ch-2 spaces.
Round 7 :
Ch1, sc in same stitch, *ch3, sk next dc, sc in next ch-2 space (through the center of the space made previously)*. Repeat from * around so that small ch-3 arches are formed between each pair of dc; join with sl st to first sc. (10 sc, 10 ch-3 sps)
Info :
These ch-3 arches will create the triangular openwork that visually separates motifs and makes the daisy chain airy. Keep your arches even by counting stitches and spacing consistently.
Round 8 :
Ch1, sc in same sc, *ch4, sc into top of next arch (into top of ch-3 made in previous round)*; repeat around placing sc into each arch top. Join with sl st. (10 sc, 10 ch-4 sps)
Info :
Ch-4 spaces here will become the large connector spaces used for joining three motifs at a time when assembling the runner, forming a honeycomb lattice. Make sure your sc placements are centered on the previous arch tops for an even grid.
Round 9 :
Ch2 (counts as dc), 2 dc in same sc, *ch1, 3 dc in next sc* — work 3-dc clusters into each sc from Round 8 separated by ch-1. Join with sl st to top of ch2. (10 clusters of 3 dc, 10 ch-1 sps)
Info :
These 3-dc clusters build a small hexagon around each motif and are easier to join to neighboring motifs when connecting; keep cluster height consistent for flat joining.
Round 10 :
Ch1, sc in each dc across the clusters, placing 3 sc per cluster (one in each dc), and sc in each ch-1. Join with sl st. Total stitch count: 30 sc (approx — 3 sc per cluster x10 = 30). (30)
Info :
At this point the motif has a defined daisy center with petals and a small surrounding ring that will allow tidy joins. Fasten off leaving a long tail (approx 12-18") if you plan to join motifs with whipstitch; if joining as-you-go carry the green yarn into the next motif to join seamlessly.
Round 11 :
Optional decorative puff finishing: If you prefer slightly fuller petals, rejoin white at the base of any petal and work 1 puff stitch (yarn over, insert, pull up loops 5 times, yarn over and pull through all loops) into each petal base, then sl st between petals. Repeat around. This is optional and adds texture. Fasten off and weave ends. (10 puff sts if worked)
Info :
Optionally block each motif flat by pinning gently and spritzing. Blocking now helps motifs sit smooth and consistent before joining.
— Joining and Lattice Construction (Join As You Go Method Recommended) :
Info :
There are two common ways to join motifs: sew them together after making all motifs, or join-as-you-go (JAYG) while working the final green round on a motif to join to previously made motifs. The sample runner used a join-as-you-go approach that produces fewer ends to weave and a cleaner back. Instructions below describe the JAYG method and also provide sewn join alternatives.
Joining Step A (Establish First Row) :
Make your first motif completely (Rounds 1-10). This will be Motif A. Make a second motif (Motif B) through Round 9 but do not fasten off the green in Round 10. Instead, when you come to each place that will abut Motif A (the large ch-4 spaces), slip stitch to the corresponding ch-4 space of Motif A through the top loop of the ch-4, then continue the cluster as written. Work this linking at the three contact points per side as you encounter them. After linking all contact points on the motif edge, finish Round 10 on Motif B and fasten off.
Info :
When joining, match orientation so petals of neighboring motifs face the same direction for a consistent pattern. Keep joins loose enough to preserve openness but tight enough to make a sturdy bond.
Joining Step B (Second Row and Staggering) :
When beginning a motif that will sit between and slightly offset from two motifs below, use the ch-4 spaces created in those motifs as join points: when your Round 8 or Round 9 creates a ch or cluster across, insert sl st through the ch-4 space of the two neighbor motifs to anchor. Typically each motif will share up to six join points with surrounding motifs (two on each adjacent side and two on diagonals depending on layout). Use the green ch-4 tops and ch-2 spaces as guides. Continue creating motifs row by row, joining into the already placed motifs using the same Round 10 join technique.
Info :
Work slowly through the first few joins to understand where your stitches must connect. It helps to lay motifs on a flat surface in the desired layout and pin them with sewing pins or blocking pins before joining.
Joining Step C (Sewn Join Alternative) :
If you prefer to sew instead of JAYG, make all motifs complete and block them. Place two motifs right sides up, overlapping slightly so the contact ch-4 spaces register. With matching green yarn and a yarn needle, use a whip stitch or invisible ladder stitch through the ch-4 loops keeping stitches small and even. Sew each pair and then sew rows together to create the runner layout.
Info :
Sewn joins allow you to reopen and reposition motif layout before finalizing; JAYG is faster with fewer ends but requires careful planning of the motif sequence.
— Constructing a Runner Layout (Sample 6x12 Layout) :
Round 1 :
Create a straight template using scrap yarn or pins marking the positions of the first row of 6 motifs. Work the first row of 6 motifs across, joining the adjacent motifs on the fly with the Round 10 link method so that all six are connected horizontally.
Round 2 :
Start the second row by placing the first motif so it nestles between the first two motifs of the row above. Join it at the three intended ch-4 contact points using JAYG method during Round 10. Continue across, working motifs and joining into the two motifs above as you go. Repeat until the second row of 6 is complete.
Info :
Stagger rows so motifs sit in a honeycomb layout: the seam between two motifs in one row will meet the center of the motif below, creating triangular connection points. This is what creates the chain-lattice effect.
Round 3-12 :
Repeat Round 1-2 sequence until you have 12 rows total (or desired length). When adding the final row, check for evenness and adjust the number of motifs to maintain a symmetrical scalloped edge. The sample runner pictured used 12 rows to reach the photographed length.
Info :
If you choose a different width, ensure the number of motifs across yields a clean scalloped edge pattern: an even number across simplifies the border. Count carefully and add or remove motifs from the center row if necessary to correct symmetry.
— Main Scalloped Border (worked after all motifs are joined) :
Border Round 1 :
With green yarn joined anywhere on the outermost ch-4/top-of-arch edge, work 1 sc in each stitch and 1 sc in each ch space around the entire runner to create a tidy perimeter base. Join with sl st. Maintain an even number of stitches along each straight edge to facilitate scallops. (Stitch count will depend on runner size — record your count for consistency.)
Info :
This round creates a firm edge that prevents the runner from stretching and gives a stable base for the scalloped rounds to come. Keep tension even. If the runner pulls in on corners, add an extra sc in the corner chain space to compensate.
Border Round 2 :
Ch3 (counts as dc), *skip 2 sc, 5 dc in next sc (shell), sk 2 sc, sl st in next sc* — work a shell-scallop pattern around the perimeter with shells placed roughly every 3 to 6 stitches depending on your base stitch count. Join with sl st. (Number of shells will vary)
Info :
Arrange shells so scallops fall naturally around the runner and align with motif points beneath. If shells look crowded or sparse, modify the number of skipped sc between shells by 1 to balance spacing.
Border Round 3 :
Fasten off green and optionally add a decorative picot row in a lighter green or white: join contrast color, *ch3, sl st into top of shell center, ch1, sl st into same point* to create small picot points between scallops. Repeat around and fasten off. Weave in ends. (Optional)
Info :
A contrasting picot row is optional and adds an eye-catching finish. The sample runner used only the green scalloped shells with a single-row raised shell for a clean, vintage look.
— Alternative Decorative Edge (Layered Scallops) :
Round 1 :
After Border Round 1, join green and work 1 sc in each st around for a build-up round to even out edges, then join with sl st.
Round 2 :
Ch4, 3 tr in same st, ch2, 4 tr in next designated edge space; repeat to form 4-tr clusters separated by ch-2 spaces around the runner. Join with sl st.
Info :
This layered scaffold creates taller, rounded scallops. Use it if you want a more pronounced scalloped ripple on the edge.
Round 3 :
Into each ch-2 space of Round 2: work [sc, ch3, sc] to create a small loop atop each scallop. Join and fasten off. Weave in ends.
Info :
Blocking after this round ensures scallops sit evenly and the loops are open and rounded.
— Finishing Details & Blocking :
Info :
Carefully weave in all tails on the back of the runner with a yarn needle. Keep joins neat and press joins flat with fingers. Trim any bulky ends that create lumps.
Blocking Step :
Lay the runner flat on a blocking mat or clean towel. Gently spray with water or use lightly damp cloths. Pin the scalloped edge evenly with blocking pins, spacing pins so scallops have consistent curve and motifs lie flat. Allow to dry fully — overnight or 12-24 hours depending on humidity. For a crisper finish, lightly mist with spray starch before drying.
Info :
Blocking improves motif alignment, opens the lace, and flattens join seams. Do not over-stretch; aim to achieve natural evenness rather than forcing the runner larger than intended.
— Detailed Troubleshooting and Tips (frequent Info sections) :
Info :
If one motif measures differently, rip back to the last consistent round and rework with looser/tighter tension to match the majority. Small variations add up dramatically across a runner.
Info :
To change runner width: add or remove motifs in the central width. When changing width, re-evaluate border shell spacing early to keep scallops even.
Info :
To make longer runners or tablecloth panels, continue adding rows following the established honeycomb join pattern. For placemats, use a small cluster of 4-9 motifs and finish with the same scalloped border.
Info :
For a denser texture, substitute a lighter weight hook for the same yarn (e.g., 3.0mm) to tighten fabric; conversely, for a looser, airier look, increase hook size slightly (e.g., 4.0mm) but gauge will change and motif size will alter.
Info :
Keep a notepad to mark each motif's placement as you make them row-by-row. Number them lightly on a paper template to avoid joining in the wrong order and creating twisted seams.
— Optional Variation: Center Embellishment (Tiny Buds) :
Round 1 :
Replace Round 2 yellow hdc round with: ch1, (sc, ch1) around into the magic ring to create a beaded center. Then proceed with petal rounds. This creates a smaller, textured yellow center.
Info :
Try this variation for a different vintage feel — looks particularly charming if alternating a few motifs along the runner with beaded centers to break visual monotony.
Final Wrap-up :
Once all motifs are joined and border is complete, go over the runner and weave in all loose ends using a yarn needle. Trim ends carefully and re-block any areas if needed. Lay flat to dry and admire your daisy chain runner.
Info :
Store runner flat or rolled, never tightly folded, to keep scallops and lace intact. If gifting, wrap loosely with tissue paper and include care instructions for gentle hand washing and flat drying.
Completing this daisy chain table runner feels like stitching a little garden you can place down the center of your table. Each motif is a small moment of progress that grows into a beautiful, floral-laced fabric that brightens a room. The scalloped green border frames the daisies like lace and gives the runner a timeless, cottage charm. 🧶🌼 Sharing this handmade piece with a friend or keeping it as a cozy accent will bring joy each time you see it on your table. Happy crocheting and enjoy the slow, satisfying rhythm of the petals and joins! 🌿