🧢 Beautiful ✨ Detailed πŸ’ Adorable

Squid Coraline Amigurumi Pattern

Squid Coraline Amigurumi Pattern
4.7β˜… Rating
5-7 Hours Time Needed
3.6K Made This
βœ‚οΈ

Intermediate Level

Ideal for those with basic crochet experience, featuring slightly more advanced stitches and techniques to expand your skills.

⏱️

Weekend Treat

Takes 5-7 hours, making it an enjoyable project to finish over a couple of days.

🧸

Cute Companion

An adorable friend to cherish, handcrafted with love to bring comfort and joy for years to come.

About This Squid Coraline Amigurumi Pattern

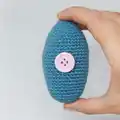
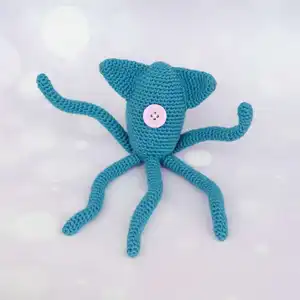
This pattern creates a Coraline-inspired squid amigurumi crocheted with 2.5 mm cotton yarn, finished about 21 cm high. The design includes a button eye, two triangular ears, and six bendable tentacles reinforced with pipe cleaners. Instructions are given round-by-round for the body, ears and arms so you can follow along easily.

Squid Coraline Amigurumi Pattern crochet pattern - detailed view of completed project

The pattern uses basic amigurumi stitches (sc, inc, dec) and simple shaping to build the squid's body and features. Photos are provided for reference and tips on stuffing and assembly.

Why You'll Love This Squid Coraline Amigurumi Pattern

I absolutely love this pattern because it captures the whimsical spirit of Coraline with a simple amigurumi design that still feels unique. I enjoy how the pipe-cleaner tentacles let you pose the squid for playful display or gifting. I find the combination of a smooth cotton finish and a cute button eye gives it character without complicated details. Making this pattern always feels satisfying β€” it works up quickly yet delivers a polished finished toy I enjoy sharing.

Squid Coraline Amigurumi Pattern step 1 - construction progress Squid Coraline Amigurumi Pattern step 2 - assembly progress Squid Coraline Amigurumi Pattern step 3 - details and accessories Squid Coraline Amigurumi Pattern step 4 - final assembly and finishing

Switch Things Up

I love changing yarn colors to give this squid a whole new personality; try pastel tones or bright neons for a fun twist.

You can make the squid larger or smaller by switching yarn weight and using a correspondingly larger or smaller hook for scale adjustments.

I sometimes replace the button eye with an embroidered eye or a safety eye for a different look and texture.

To make the tentacles firmer or more poseable, try using floral wire instead of pipe cleaners, bending them before inserting into the arms.

I add tiny crocheted accessories like a scarf or a little hat to personalize each squid as a gift.

For a softer, cuddlier feel, use acrylic or a softer yarn rather than cotton and slightly overstuff the body.

Try changing the number of arms to make a whimsical variant β€” fewer arms give a minimalist look, while more arms make it wilder.

I like to experiment with embroidered details around the button eye to create different expressions and personalities.

Try sewing on felt shapes or adding sewn-on appliques for extra character and detail on the body.

If making for children, securely sew or embroider the button in place, or replace it with a safe, child-friendly eye option for safety.

Common Mistakes & How to Fix Them

βœ— Skipping stitch counts during rounds causes uneven shaping and unexpected stitch totals; count your stitches at the end of each round to ensure accuracy and correct mistakes immediately.
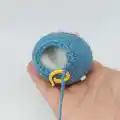
 βœ— Forgetting to place or note where to attach the button will make placement inaccurate later; sew the button between R.14 and R.19 before closing the body and while stuffing to secure proper alignment. βœ— Not inserting the pipe cleaner fully or evenly into the arms will result in weak or lopsided tentacles; fold the pipe cleaner in half, insert it to the arm center, then trim excess and adjust before closing. βœ— Overstuffing the body distorts the squid shape and makes sewing parts together difficult; stuff gradually to the desired firmness and adjust while closing the opening for a smooth finish. βœ— Leaving very short yarn tails when fastening off makes sewing difficult and sloppy; leave a long enough tail for sewing and weaving in ends neatly after assembly.

Squid Coraline Amigurumi Pattern

Make a charming Coraline-inspired squid amigurumi using 2.5 mm cotton yarn and simple amigurumi techniques. This pattern gives you clear, round-by-round instructions so you can crochet, stuff and assemble a 21 cm tall squid with bendable pipe-cleaner arms. Perfect as a unique handmade gift or a fun weekend project you will cherish.

Intermediate 5-7 Hours

Materials Needed for Squid Coraline Amigurumi Pattern

β€” Main Fabric

  • 01
    2.5mm cotton yarn: Medium Blue (as specified for main body and details)
  • 02
    Synthetic cotton filling (polyester stuffing) for body shaping
  • 03
    2 cm light pink button for eye detail

β€” Tools Required

  • 01
    Crochet hook size 2.5mm
  • 02
    6 pipe cleaners (for tentacle structure)
  • 03
    Needle and thread to sew the button
  • 04
    Wool needle for sewing pieces
  • 05
    Scissors
  • 06
    Stitch markers (recommended)

Progress Tracker

0% Complete

β€” Body :

Info :

With 2.5 mm blue cotton yarn.

Round 1 :

6 sc in a magic ring (6)

Round 2 :

6 inc (12)

Round 3 :

1 sc (12)

Round 4 :

1 sc, 1 inc (18)

Round 5 :

2 sc, 1 inc (24)

Round 6 :

1 sc (24)

Round 7 :

3 sc, 1 inc (30)

Round 8 :

4 sc, 1 inc (36)

Round 9 - R.23 :

1 sc (36) (15 turns)

Round 24 :

4 sc, 1 dec (30)

Round 25 - R.26 :

1 sc (30)

Round 27 :

3 sc, 1 dec (24)

Round 28 :

1 sc (24)

Info :

Sew the button between R.14 and R.19 and stuffing.

Round 29 :

2 sc, 1 dec (18)

Round 30 :

1 sc, 1 dec (12)

Round 31 :

6 dec (6)

Info :

Fasten off with slst, cut and hide the thread.

β€” Ears :

Info :

With 2.5 mm blue cotton yarn.

Round 1 :

6 sc in a magic ring (6)

Round 2 :

1 sc, 1 inc (9)

Round 3 :

1 sc (9)

Round 4 :

2 sc, 1 inc (12)

Round 5 :

1 sc (12)

Round 6 :

3 sc, 1 inc (15)

Round 7 :

1 sc (15)

Round 8 :

4 sc, 1 inc (18)

Round 9 :

1 sc (18)

Round 10 :

5 sc, 1 inc (21)

Round 11 :

1 sc (21)

Infos :

Fasten off with slst and leave a thread to sew to body between R.4 and R.15. This piece is not stuffed.

β€” Arms :

Info :

With 2.5 mm blue cotton yarn. Make six equal pieces.

Round 1 :

4 sc in a magic ring (4)

Round 2 :

4 inc (8)

Round 3 - R.31 :

1 sc (8) (24 turns)

Info :

Insert the pipe cleaner folded in half and cut off the excess piece.

Info :

Fasten off with slst, leave a thread and sew to body between R.27 and R.28.

β€” Assembly :

Info :

Sew the light pink 2 cm button to the body between rounds R.14 and R.19 before closing completely and after stuffing to secure placement.

Info :

Sew the two ears to the top sides of the body between R.4 and R.15 using the remaining thread from the ear pieces.

Info :

Insert pipe cleaners into each arm (folded in half) and trim the excess, then position and sew arms to the body between R.27 and R.28 for even spacing.

Info :

Stuff the body as you close it so the shape stays smooth and even; weave in all ends to finish.

Assembly Instructions

  • Sew the 2 cm light pink button to the front of the body between rounds R.14 and R.19 while stuffing, securing it with needle and thread so it lies flat.
  • Sew the two ears to the top sides of the body using the left thread from each ear, positioning them between R.4 and R.15 for symmetry.
  • Insert a pipe cleaner folded in half into each arm tube, trim the excess, then position and sew each arm to the body between R.27 and R.28, spacing the six arms evenly.
  • Stuff the body gradually before closing; adjust stuffing while shaping to keep the squid form smooth and even.
  • Weave in and hide all yarn tails after assembly and check all joins for secure stitching before gifting or displaying.

Important Notes

  • πŸ’‘Work with 2.5 mm hook and cotton yarn as recommended to achieve the correct finished size and fabric drape.
  • πŸ’‘Do not stuff the ears; they are left flat to sew neatly to the body for the intended silhouette.
  • πŸ’‘Fold pipe cleaners in half before inserting into arms for added strength, and trim excess so no sharp edges remain.
  • πŸ’‘Leave enough yarn tail when fastening off to sew pieces neatly into position without adding extra joins.
  • πŸ’‘Use stitch markers when needed to maintain round starts and counts for accurate shaping.

This Coraline squid amigurumi is a tiny, whimsical companion perfect for gifting or display. It combines simple amigurumi shaping with bendable tentacles for playful posing. Make one for yourself or give as a special handmade present β€” each one is unique and full of charm. πŸ§ΆπŸ’™

You ask,

we answer.

FAQs

What size will the finished piece be?

The finished amigurumi measures approximately 21 cm high when using the recommended 2.5 mm cotton yarn and hook size.

Can I use different yarn weights for this pattern?

Yes, you can use different yarn weights, but this will affect the final size; adjust your hook accordingly and expect a different finished height.

Do I need prior crochet experience for this pattern?

This pattern is rated intermediate, so basic crochet experience with magic ring, single crochet, increases and decreases is recommended.

How long does this project typically take to complete?

Most crocheters complete this project in 5-7 hours, depending on experience and speed, including assembly and finishing.