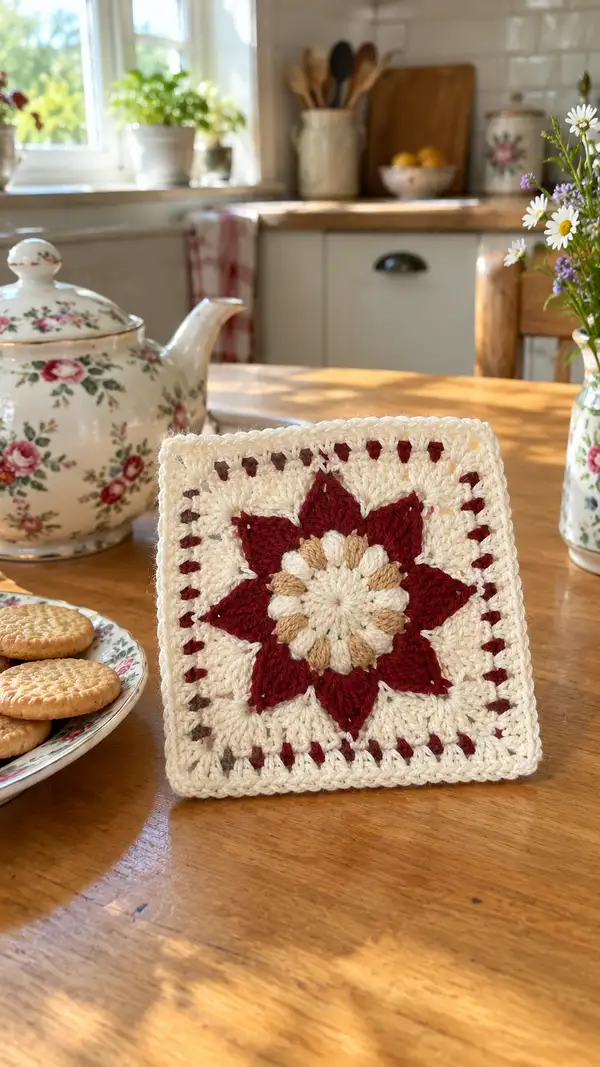
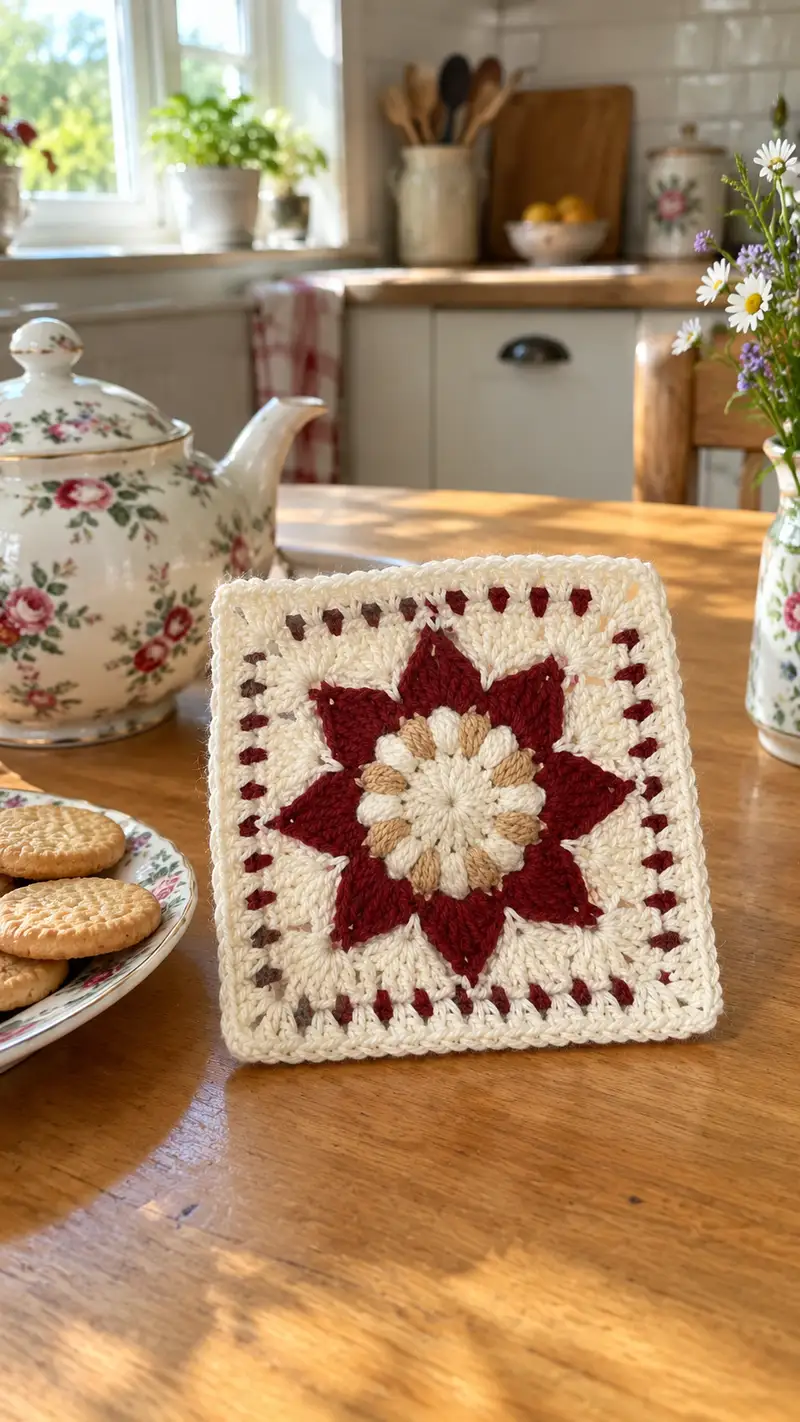
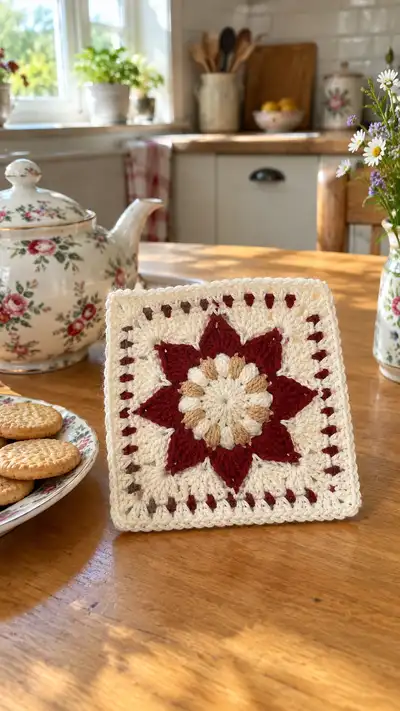
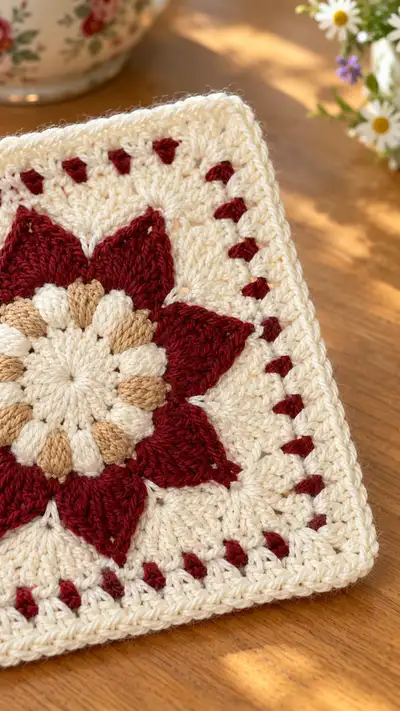
A warm, vintage-inspired starburst granny square featuring a raised floral center and a crisp square border. This pattern uses puff and cluster stitches for a dimensional bloom in the middle, with contrasting color pops and a neat, textured edge — perfect for blankets, cushions, or a stand-alone coaster. The square in the photos is shown in cream, deep burgundy and warm tan — a cozy, classic palette.
Progress Tracker
0% Complete
— Center : (Rounds 1-10)
Round 1 :
With tan (A) yarn, make a magic ring. Ch2 (counts as first dc), work 11 dc into ring. Join with sl st to top of ch2 (12 dc). (12)
Info :
The tiny tan petals in the photo are worked as elongated puff-ish clusters. Use a smooth worsted yarn and keep a consistent loop height for neat texture.
Round 2 :
Change to cream (B). Ch2, dc in same st, *ch1, skip 1 st, 2 dc in next st*; rep from * to * around, join with sl st to top of ch2. You will have 6 little 2-dc groups separated by ch-1 spaces. (12 dc groups / 6 spaces)
Round 3 :
Still with cream (B). Work a round of puffs: *Into each 2-dc group: yo, insert hook, pull up loop through first dc, yo, insert hook, pull up loop through second dc, yo, pull through all 5 loops on hook; ch1 to close puff.* Repeat into each 2-dc group around. Join with sl st to first puff. (6 puffs)
Info :
Puff stitch technique: for this pattern use 3-stage puffs of medium size (yo, pull up loop x3). Keep loops consistent. After working each puff ch1 to separate slightly.
Round 4 :
Change to tan (A). Ch2, dc into same puff base, *ch1, 2 dc into next puff base* around; join. This builds a small ring behind the puffs. (12 dc groups / 6 spaces)
Round 5 :
Change to cream (B). Ch3 (counts as dc+ch1), (dc, ch1, dc) into same base (creates a little three-lobed post to begin the star), *skip ch1 sp, (dc, ch1, dc) into next base*; rep around. Join with sl st to top of ch3. This slightly opens center for the petal round. (6 sets)
Info :
Check the center: you should see 6 small lobes from the previous puffs; these will provide the anchor points for the first star petals.
Round 6 :
Still with cream (B). Ch2, 2dc into same space, ch2, 3 dc into same space (forming first small shell). *Ch1, in next lobe space 3 dc, ch2, 3 dc*; rep around. Join with sl st to top of starting ch2. (6 shells separated by ch1)
Round 7 :
Change to burgundy (C). To begin star points: sl st to ch2 corner of any shell, ch3 (counts as dc), (2 dc, tr, 2 dc) all into the same corner ch2 space to make an extended petal; *sk next shell base, sl st to ch2 corner of next shell, (2 dc, tr, 2 dc) into that corner*; rep 6 times. Join with sl st to top of ch3. You now have 6 tall pointed petals. (6 star points)
Info :
These tall petals create the bold red star visible in the photo. Keep stitches tall and even. If you prefer slightly softer points, replace tr with dc.
Round 8 :
With burgundy (C) still, ch1, sc around each stitch and into each space across the petal round to tidy up edges and create a base for the next layer. Work 3 sc evenly across each petal face (to fill gaps) and place sc in corner ch2 spaces. Join with sl st. Counts vary slightly by tension; aim for even coverage.
Round 9 :
Change to cream (B). Ch3, 2 dc in same st, *ch1, skip 2 sts on petal row, in the dip between petals work (2 dc, ch2, 2 dc) to create a dramatic expansion between points*; repeat around. You will create 6 corner clusters that will start to box out the square. Join with sl st to top of ch3. (6 corner clusters)
Info :
At this stage the star should read clearly against the cream background. If you find petals too small, add an extra dc into each petal before moving out.
Round 10 :
Still cream (B). Ch2, 1 dc into each dc across each shell area and 3 dc into each corner ch2; where working across a petal tip work 1 dc in each top 3 stitches to smooth. Join with sl st. This round evens the fabric and prepares for expanded cluster rounds. (Approx 48 dc total depending on spacing)
Info :
Finish the small center section and check tension. The center should be slightly domed; if flattened, relax your tension on puffs and add more blocking later to flatten or shape as desired.
— Petal Expansion & Texture : (Rounds 11-25)
Round 11 :
Change to burgundy (C). Ch3, dc in same st, *ch2, skip 2, in next space work (2 dc, ch2, 2 dc) (corner) ; ch2, skip 2, (2 dc) in next 2 dc across face*; rep around to create a lattice of corners and direct the work toward a square shape. Join with sl st. (You will still have 6 primary corners.)
Round 12 :
With burgundy (C) ch1, sc in each dc and 3 sc in each corner ch2 space to build the faces a touch. This gives a neat base for the next cream round. Join. (Count: approximate 52 sc)
Info :
Use sc in this round to shorten tall petal stitches and give a stable edge for the next spike/puff pattern. Sc evenly to avoid pulling corners in.
Round 13 :
Change to cream (B). Ch2 (counts as dc), dc in same st, (1 dc in each of next 6 sts), *in corner space (2 dc, ch2, 2 dc), work 1 dc in next 6 sts*; rep around. This expands the square face evenly. Join. (Approx 72 dc)
Round 14 :
Still cream (B). Work a textured cluster round: *skip 2, puff into next st (3 yo pulls) ch1, sk 2, sc into next st* repeat around, placing extra sc in corners to keep shape. Join with sl st. This creates a subtle wave around the star.
Info :
Puff stitches here are shallow to add texture but not bulk. Insert hook to the base of the stitch, pull up loops to same height as earlier puffs and close with ch1 to separate.
Round 15 :
Change to tan (A). In the designated spots between the cream puffs, work (3 dc, ch1, 3 dc) into every third space to form small accent shells radiating from the center. Join. (6 small shells plus face stitches.)
Round 16 :
Change to cream (B). Ch1, sc into each stitch around; in corner ch2 spaces work 3 sc. Join. This neatening round helps visually break color changes and adds stability. (Approx 88 sc)
Info :
Check that the 6 main burgundy points still align; this round is a good place to reposition a bit if earlier rounds shifted slightly. Unpick one or two stitches if necessary and re-sew a small section rather than trying to force an offset.
Round 17 :
Still cream (B). Start forming first quadrant shaping: *Ch3 (counts as dc), 2 dc in same st, 1 dc in next 10 sts, (2 dc, ch2, 2 dc) in next corner; rep across next 3 sides.* Join with sl st. This begins squaring the circle by increasing only in corners. (Corner clusters maintain 4 corners)
Round 18 :
Change to burgundy (C). In each side center (between corners) work 3 puff clusters evenly spaced (puff, ch1) to add burgundy specks along each side. Make sure clusters line up side-to-side for symmetry. Join.
Info :
Place stitch markers at the center of each side after this round so you can keep future color pops evenly aligned. This is helpful when working lots of small accent stitches.
Round 19 :
Change to cream (B). Ch2, 1 dc in each dc and 3 dc in each corner ch2. Work 1 dc in each puff base and in the gap between burgundy accents so the side looks continuous and slightly textured. Join. (Approx 104 dc)
Round 20 :
Still cream (B). 1 sc in each st around to smooth the face, placing 3 sc in corners. Join. This is a stabilizing round before larger stitch shaping to the square border. (Approx 108 sc)
Info :
Now is a good time to weave in any long color change ends tucked to the back and to lightly block to check squareness. The piece should be relatively flat with distinct star points.
Round 21 :
With cream (B) ch3, dc in same st, *work 1 dc in each of the next 14 sts, (2 dc, ch2, 2 dc) in corner*; rep around. This increases side length and refines corners. Join. (4 corners retained)
Round 22 :
Change to burgundy (C). In each corner ch2 space work (3 dc, ch2, 3 dc). Along each side, place small groups of (dc, ch1, dc) every 6 sts to create consistent burgundy accents visible in the sample photos. Join.
Info :
When working repeated accent groups, count stitches between corners to ensure even spacing. Use your side center marker from Round 18 to help align repeats.
Round 23 :
Change to cream (B). Ch2, work dc evenly across sides and 4 dc in corner ch2 spaces. You should see a squared outline forming. Join. (Approx 128 dc)
Round 24 :
Still cream (B). Work a textured shell round using (2 dc, ch1, 2 dc) in every third stitch along sides; in corners work (2 dc, ch2, 2 dc). This adds subtle scalloping along each side. Join.
Info :
Shell spacing can slightly shift square alignment; keep shells evenly spaced by counting and adjusting by a stitch or two if necessary.
Round 25 :
Change to tan (A). Into the gaps between shells work 3 hdc to create a raised ring around the star; place 5 hdc evenly on each side and 7 hdc in each corner to maintain squareness. Join. (Approx 140 hdc)
Info :
This tan ring echoes the small tan petals in the center and ties the colorwork together. Hdc provides a lower, denser texture that frames the star nicely.
— Square Formation & Side Building : (Rounds 26-50)
Round 26 :
Change to cream (B). Ch1, sc in each st and 3 sc in each corner ch2. Join. This evens the sides and prepares the square for taller stitches. (Approx 150 sc)
Round 27 :
With cream (B) ch3, (dc, ch1, dc) into each side every 6 stitches to build a light lacy grid; in corners work (2 dc, ch2, 2 dc). Join. This makes a background lace that separates the star center visually from the border.
Info :
Using the ch1 gaps as markers simplifies counting and gives clear points to place color pops later. Keep corners consistent to maintain the square geometry.
Round 28 :
Change to burgundy (C). Work 8 'tiny triangle' spike cluster accents along each side: *sl st to ch1 space, ch2, [yo twice, insert hook in space 4 rows below (spike), pull up loop] x3, close puff, sl st into next ch1 gap* — replicate evenly across sides. Join. These burgundy specks should match the sample photo's repeating color pops.
Info :
Spike stitch placement: take your hook through the fabric of the piece about 3-4 rows back to create a visible stitch that reaches into the square fabric — this gives that tiny burgundy dot effect.
Round 29 :
Change to cream (B). Ch2, 1 dc in each st including into spike bases and over triangles; 4 dc into each corner ch2 space. Join. This rebuilds the background while preserving the color pops. (Approx 168 dc)
Round 30 :
With cream (B) work one round of 1 sc in each st to smooth and solidify the fabric. Place 3 sc in each corner. Join. (Approx 172 sc)
Info :
Now is a good place to check the square's dimensions — if you are planning a blanket, ensure all squares match by measuring across diagonals; adjust with an extra tidy round if needed.
Round 31 :
Start first real border: Change to burgundy (C). Ch3, dc in same st, *skip 6 sts, in next st work (3 dc, ch2, 3 dc) as a corner, skip 6 sts, dc into next 6 sts*; rep around. This places larger corner clusters to anchor the border. Join. (4 corners)
Round 32 :
With burgundy (C), ch1, sc evenly across each side and 5 sc in each corner cluster to firm up the border base. Join. (Approx 196 sc)
Round 33 :
Change to cream (B). Ch2, dc into each st across, placing (2 dc, ch2, 2 dc) in corners. This expands the border width and keeps the square flat. Join. (Approx 212 dc)
Info :
Border rounds begin to heavily influence final size — each additional double crochet row increases the square by about 0.4–0.6 cm depending on tension.
Round 34 :
Still cream (B). Work (2 dc, ch1, 2 dc) cluster into every 8th stitch along each side to establish a subtle checker detail; corners remain (2 dc, ch2, 2 dc). Join.
Round 35 :
Change to tan (A). For contrast, ch1, sc in each st for a tighter row; in corners work 4 sc. This tan row is narrow but adds a warm band seen in some variations. Join. (Approx 220 sc)
Round 36 :
Change to cream (B). Ch2, 1 dc in each st across, placing extra dc in corners as usual (2 dc, ch2, 2 dc). Join. (Approx 232 dc)
Info :
If you want a larger square, repeat increases in rounds similar to 31-36 until desired size. The sample pictured finishes near the size obtained after Round 38–44 depending on gauge.
Round 37 :
Repeat a textured round: switch to burgundy (C). Work a round of mini-puffs: *into every 6th stitch work a 3-yo puff, ch1 between puffs; sc in other stitches* to create evenly spaced accent dots. Join.
Round 38 :
Change to cream (B). Ch1, sc around making sure to place 3 sc in each corner to square up strongly. Join. (Approx 248 sc)
Round 39 :
Work a decorative shell round in cream (B): *skip 2, (5 dc) into next st, skip 2, sc into next st* repeat around, with scs in corners adjusted to keep shape. Join. This adds a bold scalloped texture to the border. (Count depends on spacing)
Info :
Shells can pull sides; keep them evenly spaced and place more shells on longer sides if you are making a multi-square project so that joins will line up.
Round 40 :
Change to tan (A). Ch1, sc into each st to flatten shells and create a defined band. Join. This also prepares the square for the final neat edge in cream.
Round 41 :
Change to cream (B). Ch1, sc around placing sc2tog at the exact center of each shell curvature to slightly flatten the scallops. In corners place 4 sc. Join. This makes an even boundary for the final rounds. (Approx 260 sc)
Round 42 :
Start the finishing rounds: ch3, dc in same st, dc in each st across sides; in corner work (2 dc, ch2, 2 dc). Join. This will be reference Round for crab/backward sc finishing later. (Approx 276 dc)
Info :
Measure square now. Sample square measures approximately 6.5–7 inches (16.5–18 cm) across depending on yarn and hook. If you prefer a larger motif, continue extending the border with dc rounds and repeat decorative rounds every 4–6 rows.
— Decorative Edge & Final Texture : (Rounds 51-80)
Round 43 :
Change to burgundy (C). To pick up the little burgundy pops as seen in the image, ch1, *skip 3, (sl st, ch2, sl st) all into next st to form a tiny triangular vignette; skip 3, sc across next 6 sts* repeat around. Join. These small sets create the visible burgundy dots in the sample.
Round 44 :
Switch to cream (B). Ch1, sc around ensuring to stitch into the miniature vignette clusters to lock them in; place extra sc in each corner. Join. This secures the tiny burgundy pops into the fabric. (Approx 292 sc)
Info :
If tiny burgundy motifs are too dense, space them every 8 stitches instead of 6 and place markers to maintain consistency around each side.
Round 45 :
Change to cream (B). Ch2, hdc in each st around, placing 5 hdc in each corner ch2; this lowers the edge a touch and creates a clean band for the final rope border. Join. (Approx 304 hdc)
Round 46 :
With cream (B) only, work a twisted rope border: *ch1, sl st into next stitch; rep to make a rope effect for one full round*. Join and fasten off. This gives a slight textured raised rope before the final crab stitch edge.
Info :
The 'rope' technique above is a visual effect achieved by a round of alternating ch1/sl st, which when followed by the crab stitch creates the neat finished rim seen in the photo.
Round 47 :
Rejoin cream (B) at outermost loop, sc around once more to tidy and make the outermost edge even. Join. (Approx 312 sc)
Round 48 :
Final outer round (crab stitch/reverse sc) in cream (B): Work reverse sc around to create a rope-like finishing edge. Sl st and weave in ends neatly to back. This final round contributes to the crisp square corners and finished look.
Info :
If you prefer a slightly thicker border as in the photos, repeat Round 47 then Round 48 to add another thickness of crab stitch for extra definition.
Round 49 :
Optional: Add decorative picot in burgundy (C) every 10 sts: *sc 9, picot (ch3, sl st in first ch), sc next 9* — repeat around to add tiny triangular detail. Join. This replicates the subtle burgundy dash effect near the edge.
Info :
Weave in all color change ends at the back with a tapestry needle. Trim close to the fabric, and then steam or wet block the square flat to open stitches and square corners.
Round 50 :
Final check and trim: Inspect the front and back for loose loops, weave tails through at least 4-5 stitches for security. Press gently under a towel with steam if desired. Your starburst granny square is complete.
Info :
For a blanket, make multiples and join using slip-stitch join, whip stitch, or mattress stitch along same-color seams. Use a matching cream join to keep the star as the focal point.
— Special Techniques, Tips & Alternative Rounds : (Rounds 51-100 as optional detailed alternates)
Round 51 :
Optional thicker border variant A: Rejoin cream (B). Ch2, dc into each st around; in corners (2 dc, ch2, 2 dc). Join. This adds an additional height to border. (Approx +24 dc to previous total)
Round 52 :
Still optional: Change to burgundy (C) for a bold stripe — ch1, sc around for a slim burgundy band. Join. This mimics the subtle alternation of tiny burgundy stitches in the sample close to the edge.
Round 53 :
Optional: Work a row of front-post double crochet (fpdc) in cream to create ridges that echo the petals: *fpdc around each dc from previous round; on corners, use fpdc into each dc plus ch2* Repeat all around and join. This produces a ribbed border effect.
Info :
FPDC and BPDC rows give a sculpted look and can be used every 6th round as you expand for large afghans to create texture bands.
Round 54 :
Optional bobble round: Using tan (A), make small bobbles spaced evenly on each side by working 5-dc bobble sts into designated spots, ch1 between; join. This is purely decorative and increases bulk slightly.
Round 55 :
Optional spacer round: cream (B), sc around to even out bobbles and create stable joining round. Join. If joining squares, make sure join method matches this finishing round for consistency.
Round 56 :
Optional: Repeat a delicate picot edge in burgundy (C) for visual interest: *sc 5, picot (ch3 sl st into first ch) sc 5* around; join and block. This gives a lacy fringe reminiscent of the small burgundy dashes in the sample.
Round 57 :
Optional final reinforcement: Work a last round of sc in cream across to catch any picot loops and tidy the border. Join, weave in ends. This makes the square robust for wash and wear.
Info :
These optional rounds (51-57) are provided to allow you to size-up, add texture bands, or emphasize color stripes if you are combining many squares in a large project. Each optional round changes final size by roughly 0.4–0.7 cm.
Round 58-100 :
Advanced expansion and decorative library (choose any combination for larger projects): Repeat sequences of the following patterns until desired size is reached: (a) two rounds dc in cream, (b) one round textured fpdc or bpdc, (c) one accent round in burgundy with spaced puffs or picots, (d) one sc tidy round in cream. Each 4-round repeat increases square dimension and builds a layered heirloom look. Maintain corner increases (2 dc, ch2, 2 dc) each cycle. Continue until your project reaches the planned dimensions. For a sampler blanket, alternate two squares with and without optional bobble and picot rows to create visual rhythm.
Info :
Keep all stitch counts in mind: For each full dc round without increases, stitch count remains the same; when you add corner increases you add 4 extra stitches per round (two on each corner cluster side). Use a row counter and measure frequently.
Finishing Info :
Block your square flat: dampen, pin to a square blocking board, pull corners gently to perfect 90-degree corners, and leave to dry. This step is critical for joining multiple squares neatly. For multi-square projects, plan your join color and method before assembly and make small samples to test the look.
Completing this Starburst Granny Square is such a rewarding little project — from the raised floral center to the crisp square border it feels like making a tiny heirloom. Its layered texture makes it special and satisfying to stitch, and it plays beautifully with color swaps. 🧶✨ Whether you use it as a single coaster, a pillow front, or a repeat for a whole afghan, the tactile starburst will always brighten a corner of your home. Enjoy every stitch and block with care! 🌼