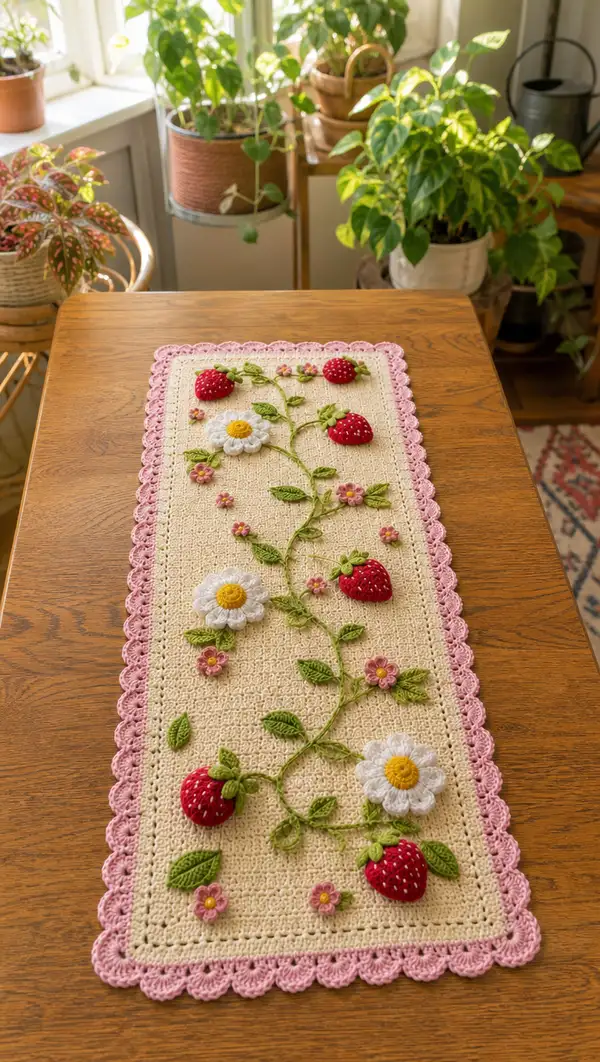
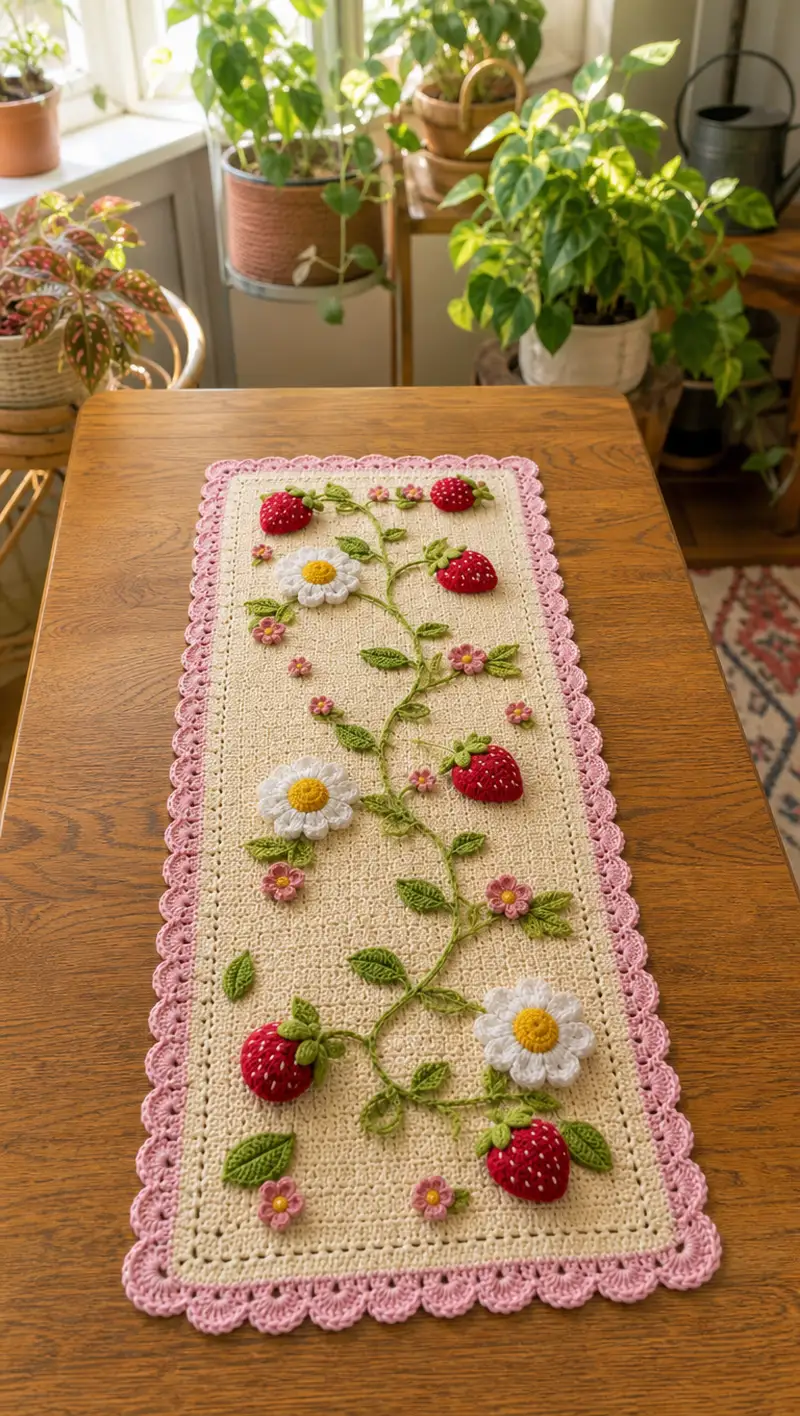
This charming rectangular table runner features a neutral cream crochet ground framed by a delicate pink scalloped border. Lush embroidered green vines connect 3D strawberries, layered white daisies with yellow centers, and tiny pink blossoms for a vintage cottage feel. The design uses cotton yarn for a crisp stitch definition and sits beautifully on dining or side tables as a cheerful seasonal accent.
Progress Tracker
0% Complete
— Base Panel :
Round 1 :
Foundation chain 121. Turn, ch 1 (does not count as a stitch), sc in 2nd ch from hook and in each ch across — 121 sc. (121)
Info :
This runner is worked flat in rows; I call each row a 'Round' for consistency with sectional instructions. Mark the first stitch of every row with a removable marker to maintain even edges.
Round 2 :
Ch 1, turn. Sc in each st across — 121 sc. (121)
Round 3 :
Ch 1, turn. Sc in each st across — 121 sc. (121)
Round 4 :
Ch 1, turn. Sc in each st across — 121 sc. (121)
Info :
Keep tension moderately firm: cotton yarn tends to relax. If your rows are becoming wider than you like, switch to a slightly smaller hook for the fabric rows.
Rounds 5-12 :
Ch 1, turn. Sc in each st across — 121 sc each row. (121)
Info :
At the end of Round 12 we'll create an eyelet guide row to give the center panel a subtle texture and to create a place to anchor vine embroidery later. Keep counting carefully so the eyelets line up each side.
Round 13 :
Ch 1, turn. *Sc in next 5 sts, ch 1, sk 1 st*; rep from * to * across, finish with sc in last st. This creates evenly spaced tiny eyelets. Count: because our chain was 121, the pattern fits repeating blocks; adjust the last rep to ensure edge scs remain. (121)
Round 14 :
Ch 1, turn. Sc in each st and ch-1 space across — 121 sc. (121)
Rounds 15-28 :
Ch 1, turn. Sc in each st across — 121 sc each row. (121)
Info :
If you prefer a denser runner for high-traffic tables, work these rows in hdc instead of sc for a slightly more solid fabric but reduce overall rows as desired to retain size.
Rounds 29-40 :
Ch 1, turn. Sc in each st across — 121 sc each row. (121)
Info :
At this midpoint evaluate the length of your runner compared with your tabletop. The pattern as written yields a finished runner approximately 78-85 cm long and 24-26 cm wide depending on yarn/hook tension. Adjust number of center rows to change length.
Rounds 41-50 :
Ch 1, turn. Sc in each st across — 121 sc each row. (121)
Info :
When you reach the total desired length (the sample is 52 rows of fabric before edging), finish with an even edge row before beginning the border to ensure the scallops have a uniform base to work into.
Round 51 :
Ch 1, turn. Sc in each st across — 121 sc. Fasten off cream yarn and weave in ends later or leave a long tail if you prefer to close with mattress stitch for neater edge. (121)
— Decorative Pink Scalloped Border :
Info :
Use pink yarn and 3.5mm hook (or one size smaller if you want a neater scallop). Join with sl st to a corner (picture: join to the corner stitch on the long edge). We will work a round of sc evenly around, placing (sc,ch2,sc) in each corner to give room for scallops.
Round 52 :
Join pink, ch 1. Work 2 sc in the same corner stitch, sc evenly along the side placing approx 1 sc in each row-end (count approx 52 sc along each long side — this matches the number of short rows; adjust slightly to avoid puckering), (sc, ch2, sc) in corner, then sc evenly along short side (approx 12 sc), (sc, ch2, sc) in corner; continue around; join with sl st to first sc. Total stitches will equal perimeter count; keep even tension. (perimeter count)
Info :
Place marker at midpoint of each long side and each short side so you can distribute scallops evenly. If your total perimeter stitch count isn't divisible by the scallop repeat, add or reduce a few sc along the long side to balance.
Round 53 (Scallop Foundations) :
Ch 1. *Skip 2 sc, 5 dc in next sc, skip 2 sc, sl st in next sc*; rep around. Work (sl st) into corner sc or ch-2 corner space to curve. Join with sl st. This creates the scallop shell arches. (shell count around)
Round 54 (Scallop Finish) :
Sl st into center dc of first shell, ch 1. In each shell: *(3 sc, ch 3, 3 sc)* into shell center (creates a pretty picot-like bump) or alternatively work 7 sc across shell for a fuller scallop; rep around. Join and fasten off. Weave in ends neatly on the wrong side. (scallop count)
Info :
Block the runner flat, pinning the scallops to shape, before attaching motifs. Blocking evens stitches and helps appliques sit smoothly.
— Strawberry Motif (Make 6 small and 4 medium or as desired) :
Info :
Strawberries are worked in red with a small green calyx added. Work each berry in joined rounds; stuff very lightly. The sample shows six small strawberries and four medium; you may adjust quantity. Make each berry slightly different in size by altering rounds before decreases.
Round 1 :
MR, 6 sc in magic ring. Pull tight. (6)
Round 2 :
Inc in each st around — 6 inc (12). (12)
Round 3 :
(1 sc, inc) x 6 — 18 sc. (18)
Round 4 :
(2 sc, inc) x 6 — 24 sc. (24)
Round 5 :
(3 sc, inc) x 6 — 30 sc. (30)
Info :
For medium strawberries work one extra increase round: Round 6 (4 sc, inc) x 6 to reach 36 sts. For smaller berries stop increases earlier. The example has both sizes for visual variety.
Round 6 :
Ch 1, sc in each st around — 30 sc. (30)
Round 7 :
Sc in each st around — 30 sc. (30)
Round 8 :
(3 sc, dec) x 6 — 24 sc. (24)
Round 9 :
(2 sc, dec) x 6 — 18 sc. (18)
Info :
Begin light stuffing now. Use very small amounts of fiberfill so the berries remain slightly flattened when attached; too much stuffing makes sewing difficult and bulky under the fabric.
Round 10 :
(1 sc, dec) x 6 — 12 sc. (12)
Round 11 :
Dec x 6 — 6 sc. (6)
Round 12 :
Fasten off leaving a long tail for sewing to the runner. Close remaining gap by threading tail through remaining stitches and pulling tight; weave end inside berry. (6)
Info :
Embroider tiny seeds over the berry using white embroidery thread and a simple French knot or short straight stitches spaced evenly. Make small, regular dots — the sample shows white seeds embroidered vertically in rows for a charming hand-stitched look.
— Strawberry Calyx (Green Top) :
Round 1 :
With green yarn, MR, ch 1, 6 sc in ring. Pull tight. (6)
Round 2 :
Ch 1, in each st: (ch 3, sl st into same st) x 6 — creates 6 small pointed leaves. Fasten off leaving long tail to sew; flatten and sew at berry top. (12 small loops)
Info :
Sew the calyx to the top of the berry by passing your yarn needle through the center underside of the calyx and into the top of the berry; secure with several stitches so the calyx lies flat against the runner once attached.
— Daisy Motif (Make 3 large daisies) :
Info :
Each daisy is worked in two parts: a yellow center disk and white layered petals worked in rounds then sewn together and slightly cupped to sit raised on the runner.
Round 1 (Center) :
With yellow yarn, MR, 6 sc in ring. Pull tight. (6)
Round 2 :
Inc in each st — 12 sc. (12)
Round 3 :
(1 sc, inc) x 6 — 18 sc. (18)
Round 4 :
Sc in each st around — 18 sc. Fasten off yellow, leaving tail for sewing to petal layer. (18)
Petal Round 1 :
Join white yarn in any stitch on the outer edge of the yellow disk. *Ch 6, sl st in next stitch* — rep around to form 18 loops (or adjust to petal count you prefer). Slip stitch to first loop and fasten off leaving long tail. (18 loops)
Petal Round 2 :
Work back into each loop: *(sc, hdc, 2 dc, hdc, sc) into loop*; rep around to form petal ruffles. Fasten off and weave in ends. This gives a full petaled daisy. (18 petals)
Info :
For a more dimensional daisy, make two petal rounds (one slightly smaller) and sew the smaller on top, offsetting petals so the flower looks full and layered. Sew the yellow center firmly to the center of the petal assembly.
— Small Five-Petal Flowers (Make 8-10) :
Round 1 :
With pale pink, MR, 5 sc in ring. (5)
Round 2 :
*Ch 4, sl st in next st* rep 5 times to create 5 loops. (5 loops)
Round 3 :
Into each loop: (sc, hdc, 2 dc, hdc, sc) — rep 5 times. Fasten off leaving long tail for sewing. (5 petals)
Info :
Sew a small yellow French knot or a tiny bead to the center of each small flower if desired for a finished look. Pin before stitching down to check spacing among leaves and larger flowers.
— Leaf (Make 12-14 leaves of varying sizes) :
Leaf - Small (Flat) Round 1 :
Ch 9. Sc in 2nd ch from hook, hdc next, dc next 2, tr 1 (or dc3 for smaller), dc next 2, hdc next, sc in last ch — now work on opposite side of foundation chain: sc next, hdc next, dc next 2, tr 1, dc next 2, hdc next, sc next; join where you began. This makes a small pointed leaf. (approx 16 sts per side)
Leaf - Textured Version (Optional) :
Work in BLO for one side to create a raised center vein: first row in BLO sc across foundation chain, then return in FLO to create a ridge. Fasten off leaving long tail for sewing.
Info :
Make leaves in 2-3 sizes: small (ch9 base), medium (ch11 base), large (ch15 base). Use the long tail to stitch leaves flat to the runner, catching a couple of background stitches so leaves sit securely.
— Embroidered Vine and Stem :
Info :
Vines are easiest to add after all motifs are made and the runner is blocked. Use a long chain stitched foundation placed with pins as a guideline, then surface slip stitch the chain in place or use stem stitch with embroidery thread for a raised look. The sample shows a single sinuous vine from one short end to the other with branches for leaves and flowers.
Vine Guide :
Cut a length of green yarn approximately 3x the length of the runner to have enough to work and tack. Create the vine by making a long chain on the wrong side following your pinned path, or work a surface slip stitch along the right side: insert hook from front to back, yo and pull up a loop, sl st into same spot, working forward to mimic a stem. Secure ends by sewing into the back of the runner.
Info :
For a raised vine: work a chain and then overlay with stem embroidery using long straight stitches or chain stitch for consistent thickness. Attach leaves and flower stems by sewing through the chain and a few base fabric stitches for strength.
— Assembly & Placement of Motifs :
Info :
Arrange motifs on the blocked runner: place 3 large daisies roughly evenly spaced along the vine path, intersperse medium and small strawberries along both sides of the vine, and tuck small pink flowers and leaves around clusters for a natural look. Pin all pieces securely before sewing.
Assembly Step 1 :
Pin vine along desired path and sew in place with small whip stitches under the vine into the runner using green yarn. Keep stitches small and hidden under the vine body. Secure both vine ends to the runner base with extra stitches. (no count)
Assembly Step 2 :
Sew daisies to runner: position the yellow center first, then place white petal layer on top if you made layered petals. Use matching yarn tails to sew through center and around the base of petals with neat whip stitches; make the flower slightly cupped by sewing a few gathering stitches under the petals. (no count)
Assembly Step 3 :
Sew strawberries using the long tail: position the berry with the wider base down so it hangs naturally from vine. Anchor the top calyx first, then secure the base with a few stitches. Reinforce underside by stitching through the runner fabric behind the berry to prevent sagging. (no count)
Assembly Step 4 :
Place leaves around flower clusters and sewn vines; use long tail to couch leaves down with small invisible stitches through a few background rows. Add tiny 5-petal blossoms in small gaps to balance composition. (no count)
Info :
Step back frequently when arranging so you keep the composition airy and not overcrowded. The sample balances 3 daisies, 7-8 strawberries of varied sizes and many leaves and tiny flowers to achieve a cottage-garden feel.
— Finishing Touches :
Info :
Weave all tails on the wrong side using a yarn needle. Secure embroidery and couching stitches by passing the needle through several stitches within the runner. Trim excess yarn, and give the whole runner a light steam block if needed to flatten scallops and relax embroidery tension.
Round 55 :
Final inspection: reinforce any motifs that feel loose with a few extra stitches under the seam, and hide ends thoroughly. Press gently from the wrong side if necessary. (no count)
Info :
To protect a table surface, consider adding a thin felt backing sewn to the bottom of the runner. Use matching thread to stitch around edges so it is not visible from the top.
This cheerful strawberry and daisy runner brings cottage-garden charm to your table with intricate 3D motifs and a soft scalloped edge. Each blossom and berry is made with love, then carefully arranged and sewn to create a warm, inviting feature for your home. I hope this project brings you as much joy in making it as it will in displaying it — happy stitching! 🧶🌸🍓