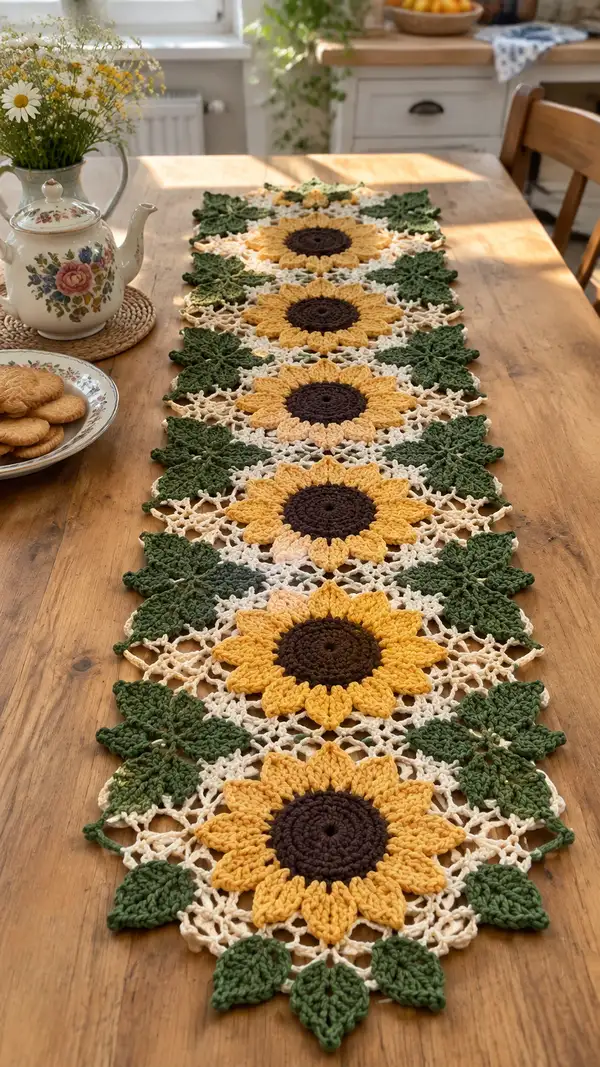
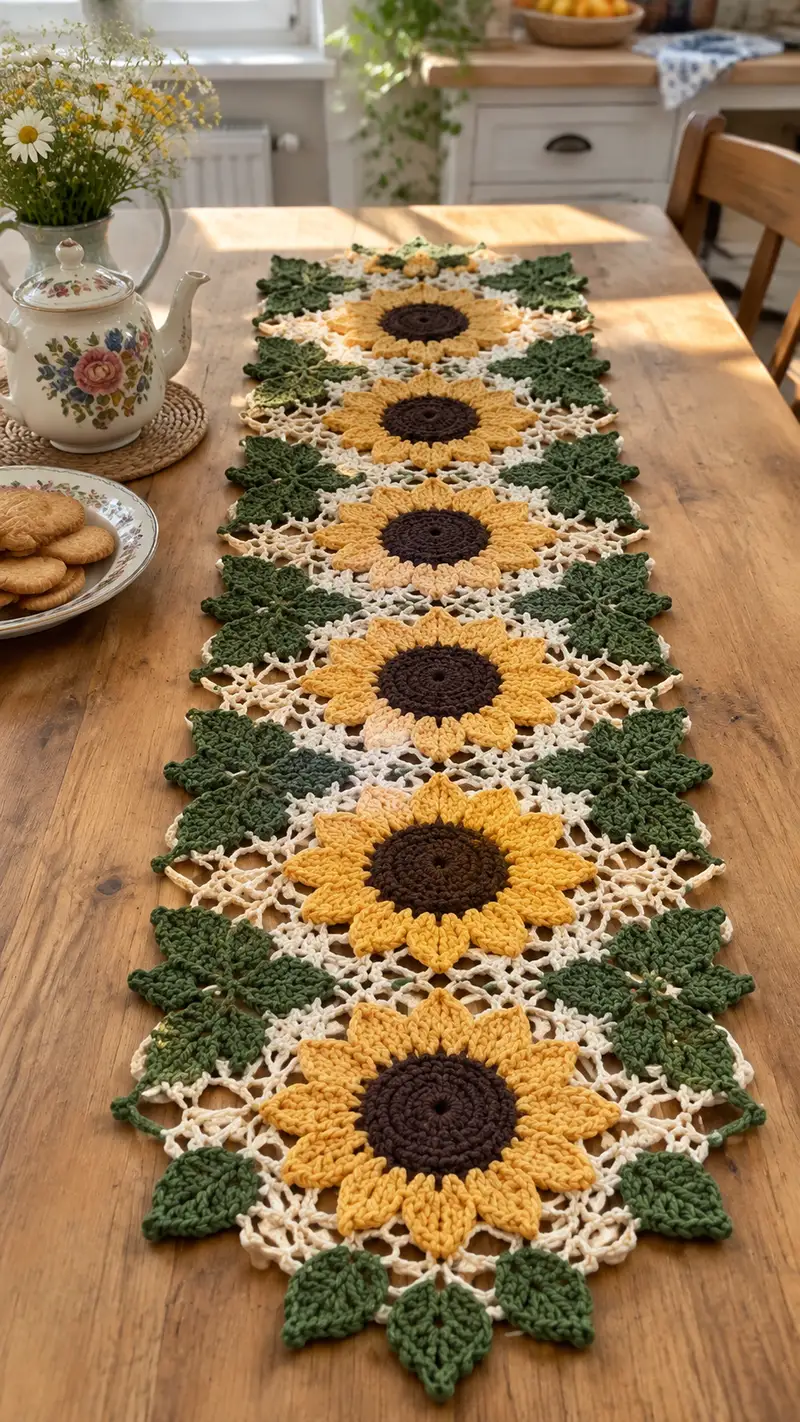
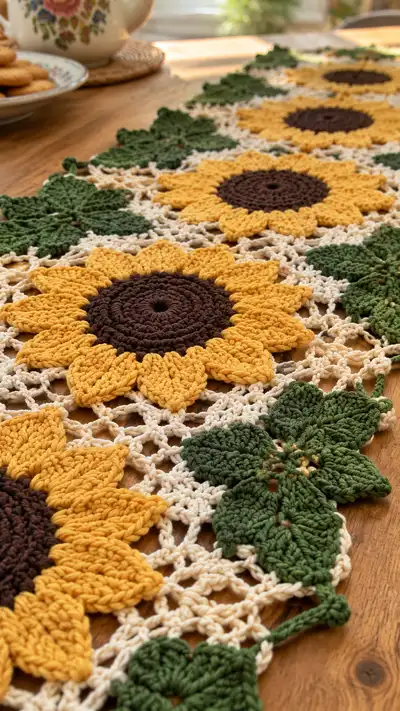
Create a warm, cottage-style sunflower table runner with layered sunflower motifs, lacey neutral mesh and leafy green accents. This runner uses cotton yarn in rich golden yellow, deep brown, cream and forest green for a sturdy, washable centerpiece. The pattern is modular—make as many flower units as your table needs and join them with a delicate mesh join-as-you-go technique. Detailed instructions, stitch counts and assembly tips are included for an elegant finished runner.
Progress Tracker
0% Complete
— Sunflower Motif : Center (Brown) :
Round 1 :
6 sc in magic ring (6)
Round 3 :
(1 sc, inc) x 6 (18)
Round 4 :
(2 sc, inc) x 6 (24)
Info :
Use deep brown yarn. Keep rounds tight for a dense center; do not join with sl st unless specified, we work in continuous rounds to avoid a seam when possible
Round 5 :
(3 sc, inc) x 6 (30)
Round 6 :
(4 sc, inc) x 6 (36)
Round 7 :
(5 sc, inc) x 6 (42)
Round 8 :
(6 sc, inc) x 6 (48)
Info :
At the end of Round 8 you should have a flat disc approx the size of a small coaster; if your tension makes it ruffle, use a slightly larger hook the next time or add a short even round to flatten
— Sunflower Motif : Petal Foundation (Transition to Yellow) :
Info :
Change to golden yellow yarn. Fasten off brown leaving a short tail to weave under the first yellow rounds for neatness
Round 9 :
Join yellow with a sl st into any st, ch1, 1 sc in same st, *1 sc in next 3 sts, ch3* repeat around to create 12 ch-3 spaces (48)
Round 10 :
Work petals into each ch-3 space: *sl st into ch-3 sp, ch1, (hdc, 3 dc, hdc) all in same ch-3 sp, sl st into base st* Repeat 12 times (48 base points)
Info :
Each petal sits on 4 base stitches (3 sc + 1 ch-3). The round keeps the base stitch count at 48; petals are worked into spaces, not increasing the base stitch total
Round 11 :
Rotate and work an outer petal ridge: *ch2, (3 tr topped with sl st at base) in front of previous petal to add height, ch2, sl st into next base st* Repeat 12 times (48)
Round 12 :
*Working behind petals, 1 sc in each of the 48 base stitches to stabilize the petal join (48)
Info :
Stuffing is not required for flat sunflower motifs. Keep petals consistent in tension so they lie flat; check petals and adjust height with tr counts if needed
— Sunflower Motif : Second Petal Layer (Textured Petals) :
Round 13 :
Join a fresh strand of golden yellow at the back loop of every 4th stitch to begin second-layer petals: *(3 sc, skip 1 st), [work into back loop only]* repeat around (36)
Round 14 :
In each placement from Round 13, work the textured petal: sl st to position, ch1, (5 dc cluster, ch1, sl st) anchored into the same placement – this creates 12 larger petals but uses the 36 marked placements as anchors (36)
Round 15 :
*1 sc around the base row to secure petal anchors, working 1 sc in each visible base stitch and 1 sc between anchors as needed to keep stitch count consistent (48)
Info :
Second-layer petals sit on top of the first layer for a fuller sunflower; the exact stitch numbers here are flexible—your aim is symmetry. Keep a count of petal anchors and ensure they are evenly spaced around the center.
Round 16 :
*Edge finish for flower: ch3, sl st into the valley between petals to create a subtle scallop; repeat around (48)
Round 17 :
Fasten off yellow leaving long tail for joining to mesh and weaving in ends. Weave the brown center tail inside to hide and secure the center.
Info :
At this point you have a completed sunflower motif roughly 12-14cm across depending on tension and yarn; measure and adjust hook if you need bigger/smaller flowers for your runner
— Leaf Motif (Make 10-12 leaves for runner) :
Info :
Leaves are made in forest green yarn. Each leaf uses a short elongated teardrop shape with serrated edges. They are worked flat and joined to the mesh later.
Round 1 :
Ch10, sc in 2nd ch from hook, hdc in next, dc in next 3 ch, tr in next 2 ch, dc in next, hdc in next, sc in last (this creates the backbone of the leaf; counts vary by stitches rather than a numbered round)
Round 2 :
Turn work and work back along the opposite side: sc in first st, hdc, dc, tr, dc, hdc, sc to join at base; do not join into a round - leaf remains flat (approx 18 sts total including both sides)
Round 3 :
Edge serration: *skip 1 st, (sc, picot, sc) into next st* repeat along edge to create small points; work both sides (approx 10 picots)
Info :
Keep the leaf slightly cupped by working picots loosely; steam-blocking the leaves will help them sit flat or slightly cupped depending on preference
Round 4 :
Optional center vein: with contrasting green, embroider or surface crochet a chain down the center of the leaf and secure ends (no stitch count change)
Round 5 :
Fasten off leaving long tails for joining to the mesh and hiding ends under leaves
Info :
Each leaf dimension should be approx 6-8 cm long depending on yarn. Make leaves in two sizes: larger for full edge leaves and smaller for filler leaves as pictured
— Small Filler Motif (Star Cluster) :
Round 1 :
6 sc in magic ring (6)
Round 3 :
*sc in next 2 sts, ch3* repeat 4 times to create 4 ch-3 spaces and small gaps for connecting (12)
Round 4 :
Work small petals in each ch-3: sl st, ch1, (hdc, 3 dc, hdc) in each ch-3; repeat (12)
Round 5 :
1 sc in each base stitch to secure cluster (12)
Info :
These small filler motifs sit between sunflowers and leaves in the mesh. Make as many as needed to reproduce the runner layout; they are quick and help create the airy lace effect
— Lace Connector Mesh (Cream) :
Info :
The mesh is worked round-by-round to connect flowers and leaves. Plan a layout where each sunflower sits in a large open motif joined by the mesh; count how many flower columns you will make and leave spaces accordingly.
Round 1 :
With cream yarn, ch6, sl st to form a ring, ch3 (counts as dc), 11 dc into ring, join with sl st to top ch-3 (12)
Round 2 :
Ch4 (counts as tr), *ch3, tr into next st* repeat around to build a lacy wheel (12 tr points and 12 ch-3 loops)
Round 3 :
*In each ch-3 loop: ch5, sl st into base to form extended loop; between loops work sc into tr to stabilize.* Repeat around (12 loops, base count 12)
Round 4 :
Turn and work 1 sc in each tr base and 3 sc across each extended loop to create a lattice foundation (approx 48 sc)
Info :
We are establishing a lattice that will later be expanded into the open mesh. Keep chain loops even in length to ensure a consistent grid to join sunflower motifs and leaves
Round 5 :
*Ch5, skip 2 sc, sl st into next sc to create open chains across the foundation; repeat creating diamond-shaped spaces across the motif (approx 16 chain-loops)*
Round 6 :
Work a round of 1 sc in each sc base and 3 sc into each ch-5 loop to stabilize (stitch count varies by motif but maintain symmetry)
Round 7 :
Repeat a chain-lace round: *ch6, sl st into center of next diamond space* around to enlarge mesh (creates decorative open net; base stays even)
Info :
The goal of rounds 5-8 is to turn the small wheel into an open, airy net that can be used to connect sunflower motifs. Work loosely to maintain drape, but not so loose that structural integrity is lost.
Round 8 :
Secure everything with 1 sc in each base stitch, 2 sc into larger chain junctions to prevent distortion (stitch count varies)
Round 9 :
Lay out one sunflower motif on the mesh and identify 12 anchor points along its scalloped round; using cream yarn, join-as-you-go with sl st into the mesh at each anchor point to lock the flower to the mesh
Info :
Join-as-you-go: instead of finishing motifs and sewing, you will sometimes work the final round(s) of a motif and at certain stitches sl st into the corresponding chain space on the mesh to join. This keeps joins invisible and flat.
Round 10 :
Build the mesh between adjacent flower anchors: *ch8, sl st into opposite anchor to create a long connector, ch3, sl st into next anchor* Repeat to create an open diamond lattice; secure with sc rounds (approx 48 connector loops)
Round 11 :
Finish connectors with 1 sc in base junctions and 3 sc in ch-8 loops for reinforcement (stitch count varies)
Info :
When joining adjacent sunflower motifs, ensure consistent spacing. Use a ruler to keep approx distance of 18-20 cm between flower centers, or customize for your table size.
— Runner Layout & Repeat Instructions :
Info :
Decide the number of sunflower motifs you want in the runner. The photographed runner shows five sunflowers in a single column with leaf clusters alternating on both long sides. This pattern describes one column repeat you can repeat to lengthen the runner as desired.
Repeat Unit :
One repeat unit consists of: 1 complete sunflower motif + surrounding cream mesh to its left and right + 4 leaf motifs (two larger top/bottom and two smaller fill leaves) + 2 small filler star clusters. Assemble units with the mesh so each flower shares mesh joins with its neighbors.
Info :
To reproduce the pictured runner length, make 5 sunflower units and join them edge-to-edge along the mesh. For a shorter runner use 3 units, for a table length use 7-9 units as needed.
— Joining Sequence (Detailed Join-As-You-Go) :
Round 1 :
With cream yarn, position first sunflower on a blocking mat. Pin it gently. Working from behind the scalloped petal edge, join cream yarn and work 1 sc in each scallop base and when reaching a pre-determined petal valley, ch6 and sl st into the corresponding mesh loop to form a connector; continue around until 12 connectors are placed (48 base points)
Round 2 :
After placing connectors, work a stabilization round of 1 sc in each base sc and 3 sc in each ch6 loop to secure (stitch count varies).
Info :
When joining the next sunflower, align it so its petal anchors correspond with the mesh loops and repeat the join-as-you-go. Keep tension moderate to prevent pulling motifs inwards.
Round 3 :
Work small filler motifs by joining them into mesh diamonds: when you encounter a diamond space of the mesh, sl st to anchor then work into the space the small filler motif (see earlier small motif rounds) and secure with a final sc round (12)
Round 4 :
Sew leaf motifs by bringing leaf base under the mesh and using yarn tail to whip stitch into place at 3-4 anchor points. For a neat finish, secure leaf bases into the center of mesh diamonds to hide tails (no numeric stitch count)
Info :
Pin leaves and filler motifs in place before final stitching. Use blocking pins to achieve symmetry and spacing—this will determine how flat and even your runner appears once finished.
— Outer Leaf Border & Scalloped Edge :
Round 1 :
With green yarn, pick up from one outermost mesh junction and ch3 to begin an edge round; work 1 sc into mesh junctions around the runner perimeter to create a narrow border (stitch count varies with runner length)
Round 2 :
*In every 6th sc along the perimeter work a leaf cluster: ch6, anchor with 1 sc in the 3rd sc ahead and form leaf following Leaf Motif instructions but worked directly into the edge; repeat along long edges to create the leafy scallop* (edge clusters count varies)
Info :
Create leaf clusters symmetrically along both sides. The pictured runner alternates large five-lobed leaf clusters and smaller single leaves for a rich, natural border.
Round 3 :
Finish edge with a final round of sl st and small picot accents: *sc, picot, sc* repeat as desired to mimic photographed texture (stitch count varies)
Round 4 :
Fasten off and weave all tails to the back of the work, use a tapestry needle to bury ends through several stitches and trim flush.
Info :
Edge rounds should be worked with even tension to prevent curling. If edges cup, wet-block with pins to flatten and hold shape while drying.
— Blocking & Finishing :
Info :
Wet-block each motif individually before final joining if possible. Pin to desired dimensions on a blocking board, spray with water (or steam), and allow to dry fully. Blocking opens the lace mesh and flattens petals and leaves to sit beautifully on the table.
Round 1 :
After final assembly, pin the entire runner on a flat surface and adjust spacing between flower centers to equal distances. Spray lightly and let dry overnight to set the shape
Round 2 :
Check all joins and weave any visible tails to the back. Trim stray fibers and give a gentle final press with a warm iron through a damp cloth if necessary to flatten bulky stitches
Info :
For a more durable runner, consider attaching a fabric backing with a slip stitch or simple whip stitch; this will make it sturdier under heavy table wear.
— Sizing & Repeat Notes :
Info :
One sunflower unit measures approximately 18-20cm across centre-to-centre when blocked. Multiply by the number of motifs plus mesh spacing to estimate total length. Add or remove repeats to fit your table length. The width is determined by motif plus leaf edge—measure and adjust accordingly.
Round :
Pattern complete. Enjoy your handmade sunflower runner and feel free to adapt colors and spacing to your own decor.
This sunflower table runner brings instant warmth to your dining space with rich golden petals, a lacy neutral mesh and leafy green edges. Each modular motif slides together like a puzzle to form a graceful, hand-blocked centerpiece you can be proud of. Make it in a single afternoon or over several relaxing evenings—either way the finished runner will feel like a sunny, homemade treasure. 🌻🧶✨