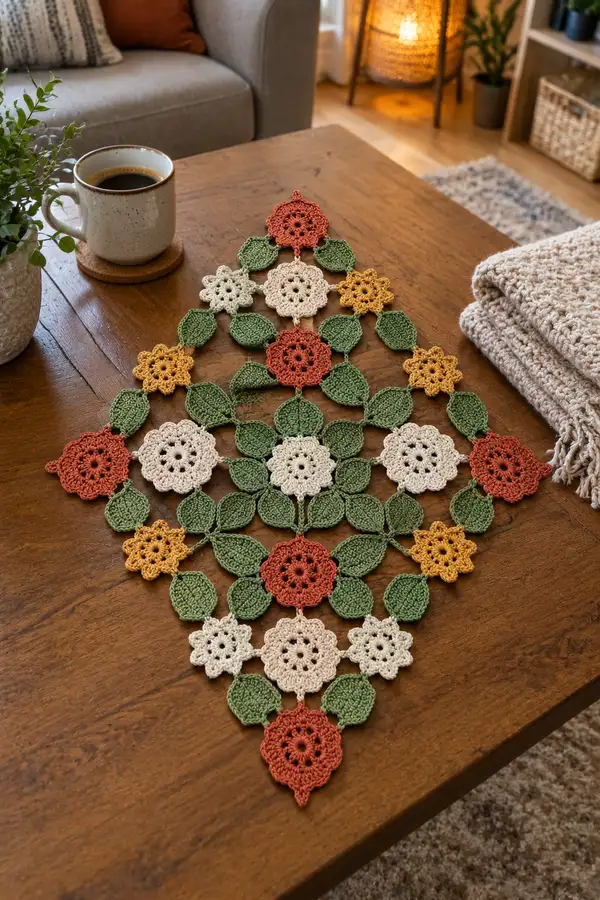
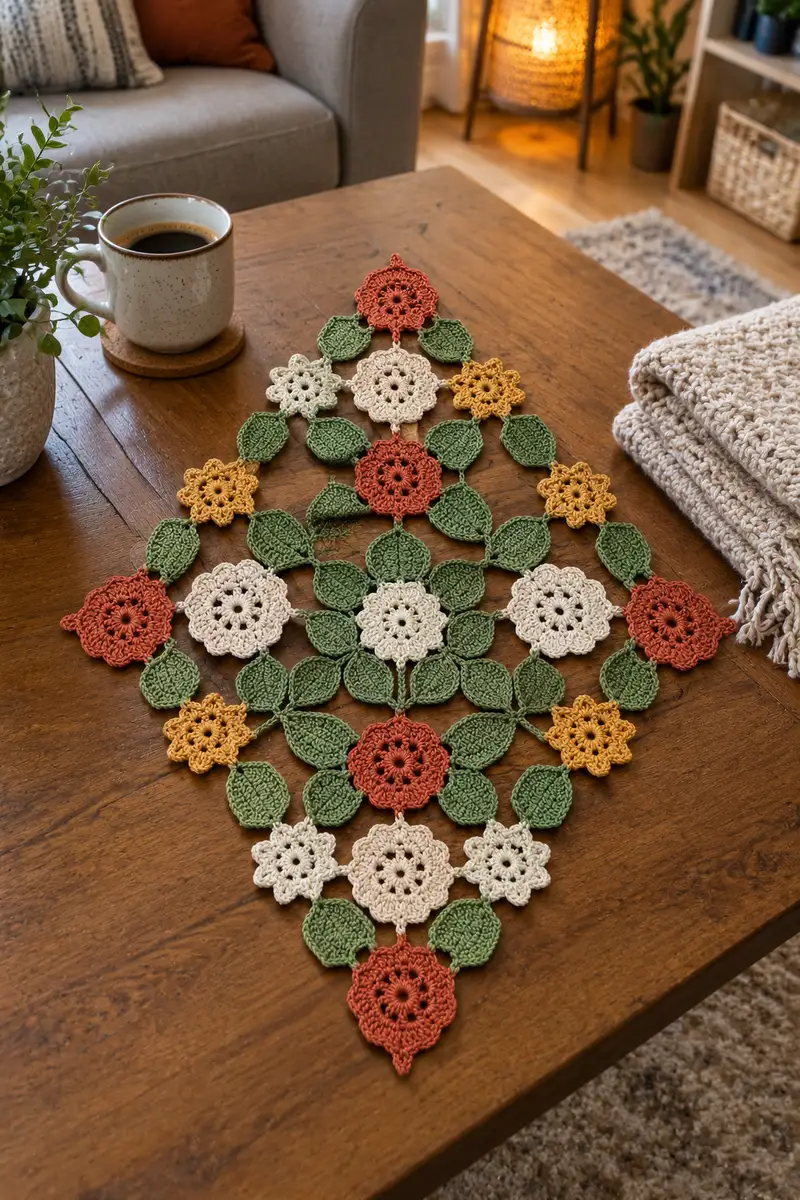
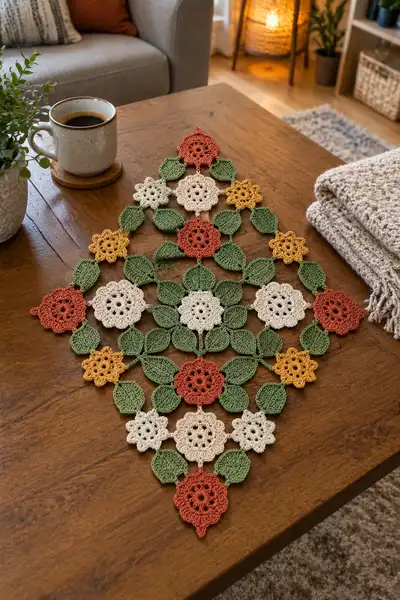
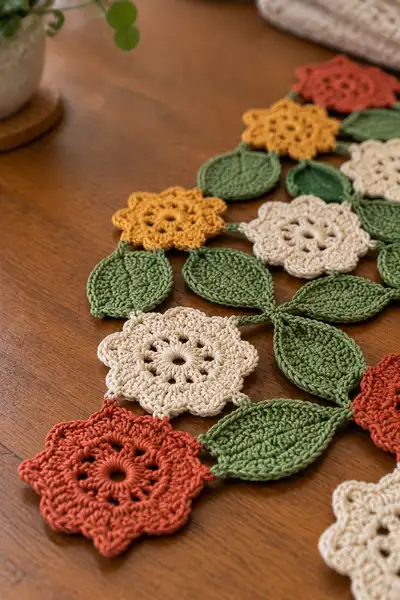
Create a beautiful diamond-shaped lace table runner made from linked floral and leaf motifs in warm autumn tones. This pattern uses separate flower and leaf motifs joined by short chains to form a geometric diamond. The finished runner has a vintage-lace look with openwork leaves and scalloped floral motifs — perfect for coffee tables, sideboards, or seasonal decor.
Progress Tracker
0% Complete
— Pattern Overview :
Info :
This pattern builds a diamond-shaped runner by making and joining three motif types: Large Scalloped Flower (A), Small Star Flower (B), and Pointed Leaf (C). The sample runner is arranged in five motif rows forming a diamond: starting at the narrow point with 1 large flower, widening to 3, then 5, then 3, and finally 1 large flower. Leaves and small flowers are used as connectors and filler between larger flowers. Make motifs in the colors shown or choose your own palette. Work motifs flat and block lightly before joining for neat edges.
Info :
Gauge note: one large scalloped flower (worked with 3.5mm hook and cotton worsted) measures approximately 3 1/4 inches (8.5 cm) across at the widest point; each leaf measures about 2 1/4 inches (5.5 cm) long. Final runner shown measures roughly 12" x 30" (30 cm x 76 cm) — your runner size will vary based on yarn, hook, and block.
— Large Scalloped Flower (Make 7) :
Round 1 :
Make magic ring, ch 1, 8 sc into mr (8)
Round 2 :
Inc in each st around (16)
Round 3 :
(1 sc, 1 inc) x 8 (24)
Round 4 :
1 sc in each st around (24)
Round 5 :
*(Ch2, sk 1 st, 1 dc in next st) rep from * around to create 8 small lacy chain spaces. End with sl st to first sc to close (8 ch2-sps)
Info :
These chain-2 spaces will act as petals anchors. Maintain even tension so petals sit flat and not raised. Place a stitch marker at the beginning of this round if preferred.
Round 6 :
*In each ch2-sp: (ch1, 1 sc, ch2, 3 dc, ch2, 1 sc) sl st into next dc space to finish petal* Repeat in each ch2-sp (8 petals). After the final petal, sl st to base to finish (petals complete)
Round 7 :
Sl st to center of first petal, ch3 (counts as dc), 2 dc in same base, *(sk 2 sts to center of next petal, 3 dc in petal center) rep from * around to create a ring of 3-dc groups (24 dc total when counting ch3 as dc)
Info :
Round 7 increases decoration and gives the motif a raised center. Keep edges flat by working dc groups into the central petal area rather than at the outer petal tips.
Round 8 :
Ch1, 1 sc in each dc across using 24 sc total around (24)
Round 9 :
(2 sc, 1 inc) x 8 (32)
Round 10 :
1 sc in each st around (32)
Info :
This is the body round that will set the scalloped edging base. If you want a slightly larger flower, work one extra even round here before forming the scallop edge.
Round 11 :
*Ch4, sl st in next st to form a picot-loop edging (repeat) — ch4, sl st into every 4th st around to create 8 loops. Finish with sl st to base of first loop*
Round 12 :
Form scalloped finishing: Work *(5 dc, sl st into base of same loop, sl st into next loop) x 8* to create 8 scallops; fasten off leaving long tail for joining (8 scallops)
Info :
Fasten off and weave in tail later, or leave long tail to sew directly onto adjacent leaves during join-as-you-go. Block lightly to open scallops so the motif lies flat.
— Small Star Flower (Make 6) :
Round 1 :
Make magic ring, ch1, 6 sc into mr (6)
Round 2 :
Inc in each st around (12)
Round 3 :
(2 sc, 1 inc) x 4 (16)
Round 4 :
Ch3, *in next st: (1 tr, ch2, 1 tr), sl st in next st to anchor* -- repeat around to make 8 small pointed petals; sl st to join (8 points)
Info :
This small star flower is decorative filler between leaves. It uses a small tr/ch2 cluster to create a spiky, open look. Use mustard yellow or cream for variation.
Round 5 :
Ch1, 1 sc around the base of each petal (16 sc total), sl st to join
Round 6 :
Finish edge: *(ch3, sl st into base between petals) x 8* to create tiny looped edges. Fasten off and weave in ends
Info :
Leave a 12-15 cm tail if you plan to join the small star to adjacent leaves using sewing. Alternatively use join-as-you-go when making the final connecting leaf to avoid extra sewing.
— Pointed Leaf Motif (Make 24) :
Round 1 :
Ch 8, sl st to form a loop (or make magic ring and ch7), ch1, work 12 sc evenly into the loop (12)
Round 2 :
Ch2 (counts as hdc), 2 hdc in next st, 1 hdc in next 3 sts, 2 hdc in next 2 sts, 1 hdc in next 3 sts, 2 hdc in last st, ch2, turn to work down opposite side of foundation: 1 hdc in next 3, 2 hdc in next 2, 1 hdc in next 3, 2 hdc in next; sl st to first hdc to close (approx 24 hdc, check count)
Info :
Round 2 creates the leaf body. Work evenly on both sides of the foundation chain so the leaf is symmetrical. Keep tension even; if the leaf cups, block it with pins after finishing.
Round 3 :
Ch1, 1 sc in next 6 sts along one side, *ch3, sl st into tip of leaf (this creates small pointed tip), ch3, continue with 1 sc across opposite side back to start*; sl st to join
Round 4 :
Leaf surface ridges: Working BLO only, 1 sc in each st around (approx 28 sc) to emphasize center ridge
Info :
Working BLO gives a subtle raised center column that mimics a vein. If you'd like a stronger central vein, after Round 4 embroider a line using surface slip stitches down the center of the leaf.
Round 5 :
Form join points: Decide three join points — base, left mid, right mid. At these three positions make small chain-loop connectors: *ch5, sl st back into the leaf base to anchor* repeat for other two points. Fasten off leaving long tail for sewing (if not doing join-as-you-go)
Info :
Each leaf will be joined to two adjacent motifs (flowers or other leaves) via these chain connectors. Position chains so that when joining the motifs they lie flat within the runner geometry.
— Optional Leaf Variation (Make 6) :
Round 1 :
Ch 10, sl st to form loop, ch1, 14 sc into loop (14)
Round 2 :
Ch2, 1 hdc in same st, (2 hdc in next st, 1 hdc in next) x 4, 2 hdc in last st; work down opposite side mirroring increases, sl st to join (approx 28 hdc)
Round 3 :
Ch1, 1 sc around entire leaf edge to create a slightly larger leaf shape; sl st to join; fasten off leaving long tail for joining
Info :
Use the optional leaf for border shaping to soften points of the diamond or for pairs of leaves that appear wider in the sample runner.
— Connector Chains and Join-as-you-go Technique :
Info :
We recommend join-as-you-go (JAYG) for a neat seamless runner. When you reach a join point on a motif, instead of fastening off, chain a small number (usually ch4 or ch5) and then sl st into the corresponding stitch on the previously blocked motif. Adjust chain length so connected pieces rest flat. For seams that cross at angles use ch4 then sl st into a picot or into the join loop on the adjacent motif.
Round 1 :
When joining round: Attach new motif by inserting hook into final loop of previous motif, ch1, sl st to join, then continue with next st sequence
Info :
When connecting petals to leaf chain connectors allow approximately 6-10 mm spacing between motif centers to mimic lace openness. Pin pieces together on a blocking board and adjust chain tension before finishing seams.
— Assembly Layout (Diamond Grid) :
Info :
Layout the motifs before joining. Use the following schematic rows from top point to bottom: Row A (top): 1 Large Flower. Row B: 1 leaf pair + 1 Large Flower + 1 leaf pair (3 large flower centers across). Row C: 2 leaf rows + 3 Large Flowers + leaves filling between (5 large flowers). Row D: mirror Row B. Row E (bottom): 1 Large Flower. Small star flowers fill gaps at outer edges and between leaf intersections as accents. Exact motif counts in sample: Large Flowers = 7, Small Flowers = 6, Leaves (Pointed) = 24, Optional larger leaves = 6. Adjust counts for runner size preference.
Row 1 :
Start at top with 1 large flower. Pin in center of workspace.
Row 2 :
Make two leaves. Position one leaf below left petal of top flower and one below right petal. Join leaves to top flower using join-as-you-go at the leaf base loop and a picot on the scalloped petal (use ch3 sl st into petal base). Work gently to avoid pulling the top flower out of shape.
Info :
When joining, keep chain connectors taught but not overly tight. The runner needs a little drape; over-tightening will curve the diamond and cause buckling at joins.
Row 3 :
Place a large flower under the two leaves; attach by joining leaf left mid-loop to the leftmost petal picot of the center large flower and right leaf mid-loop to the right petal picot of that same center large flower. This forms a triangular cluster of flower+leaves.
Row 4 :
Continue by adding two leaf motifs to each side of the center row, joining them to the adjacent petal picots of neighboring flowers. Repeat mirror-wise to build a row of three large flowers with leaves connecting them in a continuous chain.
Info :
At each join, use the long tail left at the round-12 of the large flower to make a neat whip-stitch for extra security beneath sl sts if you prefer. This is optional but helps motifs hold flat on high-traffic surfaces.
Row 5 :
Expand to the widest section (5 large flowers): Add leaves and small flowers as filler so each large flower connects to neighbors on left and right with a leaf pair. The pattern of connection follows a lattice: (Leaf between A and B) — Small star in the small triangular gap where three leaves meet. Attach small star via sewing through its center with a yarn tail to the three leaf chain anchors.
Row 6 :
Work the opposite half of the diamond by mirroring rows 1-5 in reverse order, connecting leaves and large flowers with the same sequence until bottom point completes a single large flower matching the top.
Info :
Block each motif individually before final joining if you prefer super-flat edges. Pin motifs to the blocking board in the exact layout to ensure symmetry. If join-as-you-go is intimidating, you may sew motifs together after blocking using mattress or whip stitch.
— Detailed Joining Steps (Round-like Sequence for Assembly) :
Join Step 1 :
With leaf in position and long tail left, use yarn needle to whip-stitch through the base of the leaf and the picot loop on the large flower's scallop. Take 6-8 small stitches across the base to distribute tension evenly; tie a secure knot on the back and weave in tail for 4-5 cm.
Info :
When sewing joins, keep stitches small and hidden under the leaf or petal. Avoid pulling yarn through to the right side where it would show as lumps.
Join Step 2 :
For three-way intersections where two leaves and a small star meet, use the small star's center tail to sew it to each leaf's chain anchor: pierce through the leaf chain anchor and the star center, finishing with a secure knot. Trim tail and bury end with tapestry needle.
Join Step 3 :
Where leaves connect directly to leaves (forming continuous leaf-chain lines), use join-as-you-go: on the final round of the second leaf, instead of sl st to finish, ch3 and sl st into the corresponding join-loop of the first leaf then sl st back into the base to secure. Fasten off and weave tail.
Info :
Keep an eye on runner symmetry as you join. Measure diagonals and lengths periodically; if a section looks shorter, loosen nearby joins to restore balance before all seams are secured.
— Decorative Edge and Final Finishing :
Round 1 :
With matching color (you may pick green or cream for subtle edge), join yarn to any outermost motif where you want the border to start. Ch1, work 1 sc into place, *ch4, sk a small space, sl st into next outer picot or designated stitch on adjacent motif* — continue around entire perimeter forming airy looped edging. Adjust ch4 length to mirror sample loop size.
Round 2 :
In each ch4 loop from Round 1, work (1 sc, ch3, 1 sc) to form tiny arched ridges. Sl st into the motif edge between loops to anchor. Repeat around perimeter; fasten off and weave tails. This creates a delicate framed look similar to the sample runner.
Round 3 :
Optional picot finishing: In each sc of Round 2, *ch3, sl st into same sc (picot)* for a picot-dotted edge. This is decorative and optional based on your taste.
Info :
When the entire runner is joined and edges finished, press lightly by misting with water and shaping on a blocking board until dry. Mercerized cotton will hold shape well after blocking. If you prefer a softer drape, block minimally.
— Alternate Join Patterns and Adjustments :
Info :
If you want a narrower runner, reduce the center row by one large flower and the leaves connecting to it. For a longer runner, add mirrored diamonds end-to-end by repeating the entire diamond sequence and joining at the extreme flowers with leaf connectors. To scale motifs, use a 3.0mm hook for a tighter, smaller motif or 4.0mm for a slightly larger one; adjust yarn amounts accordingly.
Round :
Edge reinforcement: If the runner will see frequent handling, after final weaving, work a reinforcing sc round inside the decorative loops, using thin matching yarn to stitch through both front and back of edge loops to help hold shape without changing the look.
Info :
Weave in all ends neatly on the wrong side, trimming tails close. If any joins look loose after blocking, add invisible whip-stitches underneath using a matching thread for extra strength.
— Care Instructions :
Info :
Wash hand-warm or gentle machine cycle in a mesh bag, reshape while damp and lay flat to dry. Avoid tumble drying to preserve the crispness of the cotton lace. Iron lightly on the reverse if needed using low heat with a pressing cloth.
Info :
Optional: To stiffen runner for display, spray a diluted fabric stiffener or light starch while blocking and allow to dry on a flat surface. Test on a scrap motif first to avoid discoloration.
Completing this diamond lace runner is such a satisfying finish — watching independent floral and leaf motifs transform into a single elegant piece feels magical. The sampler palette gives it a warm, handmade quality that looks sophisticated on any wooden table. Take pride in each join and enjoy blocking the runner into its perfect diamond shape — the final result will feel like a piece of textile art! 🧶🌿✨