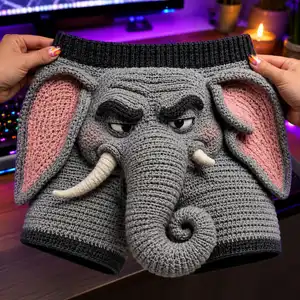
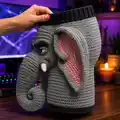
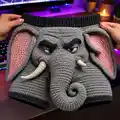
Create a bold, playful pair of novelty men's boxers featuring an expressive elephant face with a large curled trunk, floppy pink-lined ears, arched brows and chunky tusks. This detailed pattern walks you through building the 3D elephant face and integrating it into wearable crochet boxers, complete with ribbed waistband and leg openings. The finished piece is a fun, wearable amigurumi-style garment perfect for gifts or cosplay. Pattern includes step-by-step rounds, shaping notes and assembly tips.
Progress Tracker
0% Complete
— Notes & Gauge :
Info :
This pattern is worked in continuous rounds unless specified. Gauge: 16 sc x 20 rows = 10 cm in single crochet with 3.5mm hook using worsted weight yarn. Because this is a wearable item, check gauge carefully and change hook size as needed. The elephant face (head + trunk) is assembled separately and sewn to the front of the shorts. Use stitch markers at the start of every round and count frequently. Work tightly for amigurumi sections so stuffing does not show through.
— Head (Make 1) :
Round 1 :
6 sc in magic ring (6)
Round 3 :
(1 sc, inc) x 6 (18)
Round 4 :
(2 sc, inc) x 6 (24)
Round 5 :
(3 sc, inc) x 6 (30)
Info :
Change hook to 3.5mm now for main head shaping if you used a smaller hook for the magic ring. Keep tension even. This is the point to decide final size of head relative to boxer front.
Round 6 :
(4 sc, inc) x 6 (36)
Round 7 :
(5 sc, inc) x 6 (42)
Round 8 :
(6 sc, inc) x 6 (48)
Round 9 :
(7 sc, inc) x 6 (54)
Round 10 :
(8 sc, inc) x 6 (60)
Round 11-20 :
1 sc in each st (60)
Info :
Place safety eyes between rounds 14-15, approximately 14-18 stitches apart depending on desired expression. If embroidering eyes, mark position now with pins. Do not add washers yet if you are still stuffing through the opening — secure eyes before heavy stuffing.
Round 21 :
(8 sc, dec) x 6 (54)
Round 22 :
(7 sc, dec) x 6 (48)
Round 23 :
(6 sc, dec) x 6 (42)
Info :
Begin stuffing the head firmly but not overstuffed: add fiberfill in small batches to avoid lumps. Pay attention around eye sockets and cheeks to create a rounded brow area.
Round 24 :
(5 sc, dec) x 6 (36)
Round 25 :
(4 sc, dec) x 6 (30)
Round 26 :
(3 sc, dec) x 6 (24)
Round 27 :
(2 sc, dec) x 6 (18)
Round 28 :
(1 sc, dec) x 6 (12)
Info :
Fasten off leaving a long tail for sewing. Finish stuffing and close opening using yarn needle with ladder stitch to create a neat, round head. The head will be sewn onto the front panel of the shorts later; leave the bottom centered for trunk attachment.
— Forehead Ridges & Brow Detail (Make 1 big ridge + 2 brows) :
Round 1 :
6 sc in magic ring (6)
Round 3 :
(1 sc, inc) x 6 (18)
Round 4-8 :
1 sc in each st (18)
Info :
Work flat tube-like ridges by stitching in rounds; these are sewn above the eyes to create the furrowed forehead. For a pronounced ridge, stuff lightly and shape before sewing in place.
Round 9 :
(1 sc, dec) x 6 (12)
Info :
Make two eyebrow pieces in dark gray or black: use the same pattern but flatten and slightly curve them by sewing through several stitches on the underside to create a hooked brow. Leave long tails for sewing.
— Trunk (Make 1) :
Round 1 :
6 sc in magic ring (6)
Round 3 :
(1 sc, inc) x 6 (18)
Round 4 :
(2 sc, inc) x 6 (24)
Round 5 :
(3 sc, inc) x 6 (30)
Round 6 :
(4 sc, inc) x 6 (36)
Round 7 :
(5 sc, inc) x 6 (42)
Round 8 :
(6 sc, inc) x 6 (48)
Round 9 :
(7 sc, inc) x 6 (54)
Round 10 :
(8 sc, inc) x 6 (60)
Round 11-30 :
1 sc in each st (60)
Info :
The trunk is long — rounds 11-30 create the main length. Stuff lightly but evenly as you go; trunk needs structure but also flexibility to curl. Insert small amounts of stuffing every 4-6 rounds, pressing evenly to avoid lumps.
Round 31 :
(8 sc, dec) x 6 (54)
Round 32 :
(7 sc, dec) x 6 (48)
Round 33 :
(6 sc, dec) x 6 (42)
Round 34 :
(5 sc, dec) x 6 (36)
Info :
As you begin tapering, start curving the trunk gently by stuffing more at the inside curve. To achieve the curled tip shown, you will reduce to a narrow tube then form a tight spiral with slip stitches and stuffing to hold the spiral.
Round 35 :
(4 sc, dec) x 6 (30)
Round 36 :
(3 sc, dec) x 6 (24)
Round 37 :
(2 sc, dec) x 6 (18)
Round 38 :
(1 sc, dec) x 6 (12)
Round 40 :
Fasten off leaving a long tail for sewing. Stuff firmly and form spiral: wind the narrow end into a spiral around your finger and secure by sewing through rounds on the underside. Alternatively, use a short wire insert for a poseable curl (wrap wire ends in tape and cover with yarn).
— Tusks (Make 2) :
Round 1 :
6 sc in magic ring (6)
Round 3 :
(1 sc, inc) x 6 (18)
Round 4 :
(2 sc, inc) x 6 (24)
Round 5-8 :
1 sc in each st (24)
Info :
Work tusks in cream using a smaller hook (3.0mm to 2.75mm) for a denser texture. Stuff slightly for a firm but not bulky tusk. To create the tapered, slightly curved tusk shape, use hook size reduction for the last rounds or add a slight decrease pattern.
Round 9 :
(2 sc, dec) x 6 (18)
Round 10 :
(1 sc, dec) x 6 (12)
Round 12 :
Fasten off leaving long tail. Slightly bend the tusk by sewing a few stitches along the outer curve to make a graceful arc. Sew tusks to lower cheek area of the head at placement points described in Assembly section.
— Ears (Make 2) :
Inner Ear (Pink) Round 1 :
6 sc in magic ring (6)
Inner Ear Round 2 :
6 inc (12)
Inner Ear Round 3 :
(1 sc, inc) x 6 (18)
Inner Ear Round 4 :
(2 sc, inc) x 6 (24)
Inner Ear Round 5 :
(3 sc, inc) x 6 (30)
Inner Ear Round 6-8 :
1 sc in each st (30)
Inner Ear Round 9 :
(3 sc, dec) x 6 (24)
Inner Ear Round 10 :
(2 sc, dec) x 6 (18)
Inner Ear Round 11 :
(1 sc, dec) x 6 (12)
Inner Ear Round 12 :
6 dec (6) - Fasten off leaving long tail for sewing
Info :
Inner ear is worked relatively flat; do not stuff. Block slightly by pinning to a flat surface to get a pleasing rounded shape. Inner ear sits inside larger outer ear to give the pink inset.
Outer Ear (Gray) Round 1 :
6 sc in magic ring (6)
Outer Ear Round 2 :
6 inc (12)
Outer Ear Round 3 :
(1 sc, inc) x 6 (18)
Outer Ear Round 4 :
(2 sc, inc) x 6 (24)
Outer Ear Round 5 :
(3 sc, inc) x 6 (30)
Outer Ear Round 6 :
(4 sc, inc) x 6 (36)
Outer Ear Round 7 :
(5 sc, inc) x 6 (42)
Outer Ear Round 8-12 :
1 sc in each st (42)
Outer Ear Round 13 :
(5 sc, dec) x 6 (36)
Outer Ear Round 14 :
(4 sc, dec) x 6 (30)
Outer Ear Round 15 :
(3 sc, dec) x 6 (24)
Outer Ear Round 16 :
(2 sc, dec) x 6 (18)
Outer Ear Round 17 :
(1 sc, dec) x 6 (12)
Outer Ear Round 18 :
6 dec (6) - Fasten off leaving long tail for sewing
Info :
Join inner pink ear to outer ear by sewing pink piece onto the flat inside of the outer ear. Shape the ear flap by folding slightly and sewing a few anchoring stitches at the top and base so the ear hangs with a forward curve. Pin ears to head at rounds 5-8 on sides for natural droop before final sewing.
— Eye Details (Make 1 pair) :
Info :
Use 12mm safety eyes or embroider eyes. If using safety eyes: insert between head rounds 14-15. Place eyes approximately 14-18 stitches apart, adjust for expression. If embroidering: use white for sclera, black for pupil and small white stitch for highlight. Sew eye rims with dark gray to create heavy lids.
Round 1 (Eye Rim) :
6 sc in magic ring (6)
Round 3-5 :
1 sc in each st (12)
Info :
Sew rims over the top of the inserted safety eyes to create hooded eyelids. Use short eyebrow pieces to tilt the eyes and create the 'sussy' expression.
— Boxer Shorts Body (Make 1 - Front & Back as one tube) :
Info :
The shorts are worked in joined continuous rounds as a wide tube that will later be split into two leg openings. Start with worsted weight yarn in main gray. The circumference of the shorts will be 120 stitches to create an adult-themed novelty size. Adjust counts proportionally if you change gauge.
Round 1 :
6 sc in magic ring (6)
Round 3 :
(1 sc, inc) x 6 (18)
Round 4 :
(2 sc, inc) x 6 (24)
Round 5 :
(3 sc, inc) x 6 (30)
Round 6 :
(4 sc, inc) x 6 (36)
Round 7 :
(5 sc, inc) x 6 (42)
Round 8 :
(6 sc, inc) x 6 (48)
Round 9 :
(7 sc, inc) x 6 (54)
Round 10 :
(8 sc, inc) x 6 (60)
Round 11 :
(9 sc, inc) x 6 (66)
Round 12 :
(10 sc, inc) x 6 (72)
Round 13 :
(11 sc, inc) x 6 (78)
Round 14 :
(12 sc, inc) x 6 (84)
Round 15 :
(13 sc, inc) x 6 (90)
Round 16 :
(14 sc, inc) x 6 (96)
Round 17 :
(15 sc, inc) x 6 (102)
Round 18 :
(16 sc, inc) x 6 (108)
Round 19 :
(17 sc, inc) x 6 (114)
Round 20 :
(18 sc, inc) x 6 (120)
Round 21-40 :
1 sc in each st (120)
Info :
Work even to create the main torso area of the shorts. At round 30 you will position and sew the head panel to the front center: fold the tube flat and measure 28-30 rounds from the waist to where you want the top of the elephant's head to sit. Mark with pins before sewing later. Keep the last 10 rounds free from attachments while you add waistband ribbing later.
Round 41 :
Change to dark gray for waistband ribbing; work 1 sc in each st BLO (120)
Round 42-50 :
1 sc in each st BLO (120) - Continue ribbing, creating a stretchy band. Adjust number of rounds to match desired waistband height.
Info :
Make waistband elastic by working in BLO. For extra stretch, work alternating rows of sc and hdc in BLO, or insert a thin elastic band after finishing by folding the ribbing over and sewing down to create a casing if desired.
Round 51 :
Change back to main gray yarn. Work 1 sc in each st (120). Mark the center front using a contrasting scrap yarn — this is where the elephant head will be centered.
Info :
Before splitting for legs, ensure the height from waist to crotch is correct for intended wearer. Try on and pin if possible. The next step splits the tube into two leg openings by working each leg separately.
— Splitting Tube & Creating Leg Tubes :
Info :
We will divide the 120-st tube into two leg tubes of 60 stitches each. Mark the 60th stitch after the center front marker to find the beginning of the second leg. You will work each leg in joined rounds, rejoining at the crotch later if you prefer. For stronger structure, crochet a short gusset later.
Leg A Round 1 (pick up 60 sts) :
1 sc in each of next 60 sts (60)
Leg A Round 2-18 :
1 sc in each st (60)
Info :
Work leg A to desired length (18 rounds gives a short boxer leg). Add extra rounds for longer legs. Finish leg A by working 2 rounds of dark gray in BLO to create cuff trim: 1 sc in each st BLO (60) x 2 rounds.
Leg A Final :
Fasten off and leave long tail for sewing to inner crotch and smoothing seam.
Leg B Round 1 (pick up remaining 60 sts) :
1 sc in each of remaining 60 sts (60)
Leg B Round 2-18 :
1 sc in each st (60)
Info :
Work leg B symmetrically to leg A. Add 2 rounds of dark gray cuff in BLO matching leg A. Fasten off leaving long tail. Optionally close the inner seam between legs by sewing the front and back panels together for a finished crotch.
— Back Panel & Reinforcement (Optional) :
Info :
If you want a finished interior, work a back panel lining by cutting a piece of soft fabric or crocheting a second tube slightly smaller and sewing inside. This reinforces the heavyweight amigurumi face sewn to the front and protects the skin from seams.
— Brow & Cheek Sculpting (Facial Shaping) :
Info :
Use short tube ridges (made earlier) for the eyebrow ridges and forehead. Sew these above the eyes and sculpt cheeks by sewing small stuffed crescents under the eye socket area (make tiny crescent shapes of 12-18 sts that are lightly stuffed). This creates the heavy-lidded, sassy expression.
— Assembly & Placement Guide :
Info :
Before sewing, block and shape all pieces. Lay the boxer tube flat with center front marked (Round 51 mark). Position the head so that the top of the head aligns approximately 8-10 rounds below the waistband ribbing. The trunk should hang down the center front and, when curled, rest about 12-18 rounds below the head. Use pins to secure everything before sewing.
Info :
Sew the head to the front panel by aligning the neck opening to the marked area on the garment. Use mattress stitch or whip stitch with the long tail from the head for a neat join. Reinforce with extra passes through the garment fabric to ensure the head sits firmly and will not pull away during wear.
— Finishing Touches :
Info :
Sew tusks into lower cheek at rounds described in the Assembly section. Attach inner ear pieces to outer ears and sew ears to the head at the side seam (head rounds 5-8). Add blush to cheeks with soft pink yarn embroidery or fabric-safe blush. Attach eyebrow pieces above the eyes and secure lids around the top of the safety eyes. Weave in all tails and trim neatly.
Info :
Try on your boxers carefully to check comfort and placement. If the face feels heavy, sew a small reinforcement patch inside the shorts where the neck attaches. If using safety eyes, ensure washers are tight and covered by the internal lining if making for a child.
— Additional Decorative Ridges & Texture (Optional) :
Round 1 :
Use BLO single crochet rows around leg cuffs and waistband to create visible ribbing texture. Work 2-4 rounds in contrast color as desired (counts same as cuff circumference).
Info :
For trunk ridges, you can work 1-2 rows of reverse sc or hdc in the FLO at even intervals along the trunk while crocheting to simulate deep skin wrinkles. Mark those rounds and switch to FLO for the single row then resume normal sc.
— Optional Interior Casing for Elastic Waistband :
Info :
If you prefer an elastic waistband for extra comfort, fold the ribbing down to create a casing of approx 2 cm and hand-sew through the two layers leaving a small opening. Thread a length of 1 cm wide elastic through with a safety pin, stitch ends securely, and close the opening. Ensure elastic is comfortable and not too tight.
— Edge & Seam Details :
Info :
When sewing the head to the shorts, work through both the front fabric and the tail of the head in a mattress stitch to create an invisible seam. Pick up a few stitches on the garment between each stitch on the head to distribute tension evenly. Reinforce areas that will receive stress with an extra row of stitching behind the seam.
— Final Assembly Checks :
Info :
Check that tusks, trunk, ears and eyebrows are symmetrically placed. Sit the shorts on a mannequin or try on to see how the face falls when worn; adjust slight positioning by unpicking and re-sewing if necessary. Weave in and bury all ends securely.
This playful, sculptural project blends amigurumi and wearable crochet to deliver a statement piece full of personality. The detailed shaping of the trunk, tusks and brows makes each stitch a rewarding step toward a bold finished garment. Perfect as a quirky gift or a cosplay accessory, the Sussy Elephant boxers are as fun to make as they are to wear. 🧶🧡 Have fun with color choices and enjoy the sculpting process — your finished piece will be an eye-catching conversation starter! 🎭