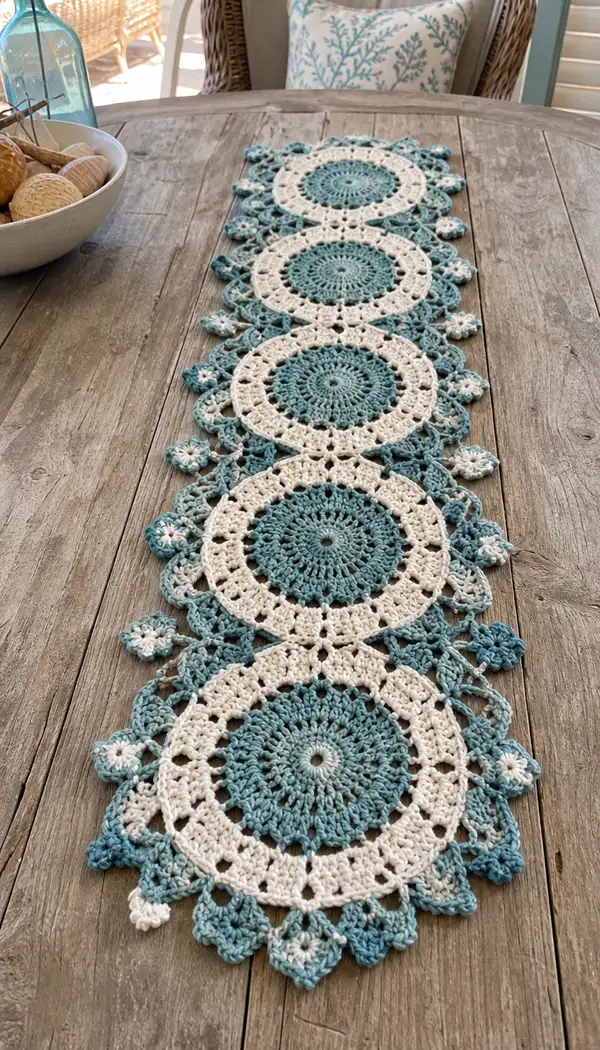
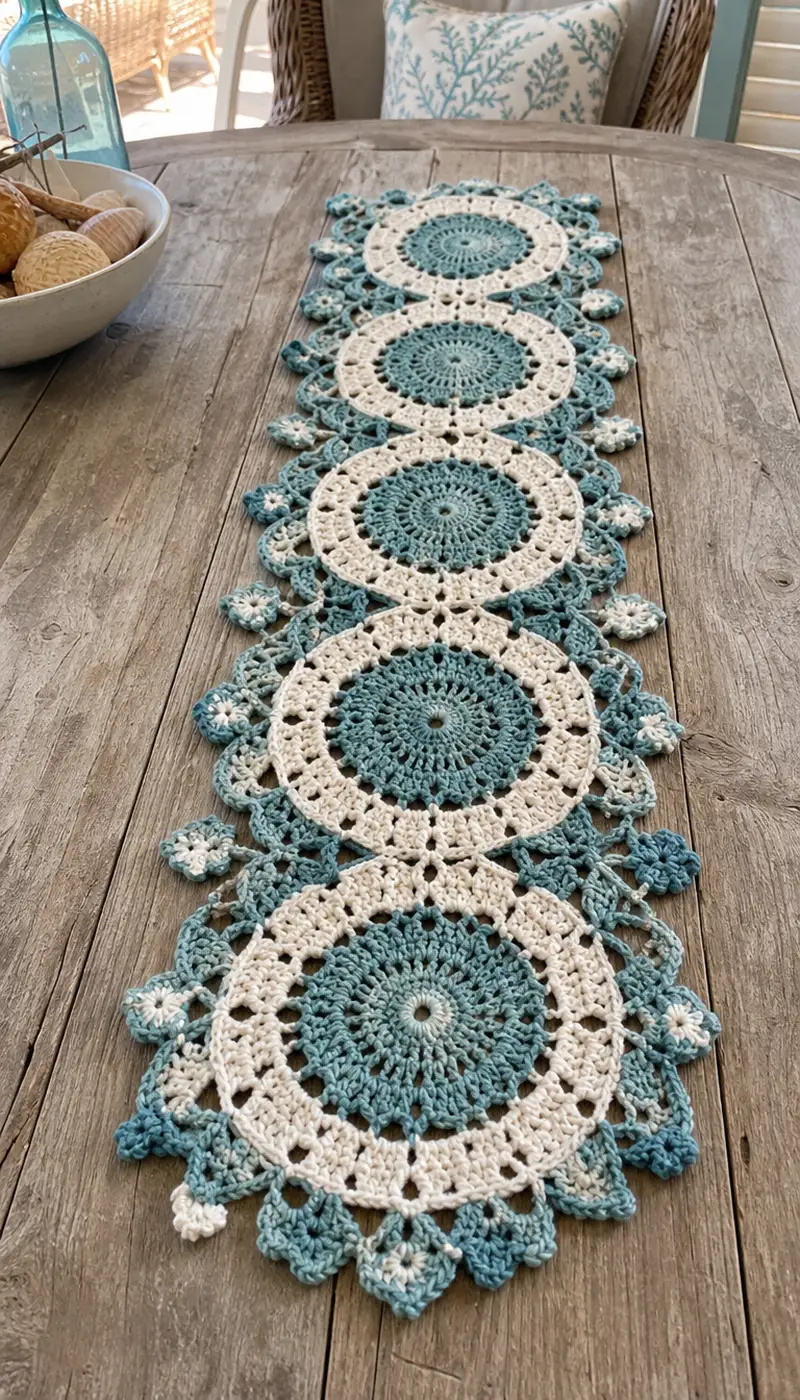
Create an elegant teal and ivory medallion table runner featuring five joined circular motifs with lacy shells and scalloped edges. This runner uses contrasting colors for a crisp center and soft outer details, finished with small floral join motifs. The project offers beautiful texture and a lightweight drape ideal for dining tables, buffets or hall consoles.
Progress Tracker
0% Complete
— Overview & Construction :
Info :
This runner is worked as 5 identical medallion motifs (Medallion 1 through Medallion 5) joined during the outer rounds with small two-tone floral joiners. After making and joining the five medallions lengthwise, a final edging unifies the whole runner. Work tightly enough so the lace holds shape but not so tight the stitches are crushed. Block motifs before final joining for best results.
— Medallion (Make 5) :
Round 1 :
With Teal. Make a magic ring. Ch 1, 8 sc in magic ring. Pull tight. (8)
Round 2 :
Inc in each stitch around. (16)
Round 3 :
(1 sc, inc) x 8. (24)
Round 4 :
(2 sc, inc) x 8. (32)
Round 5 :
(3 sc, inc) x 8. (40)
Info :
Keep stitches tidy and even. This early shaping builds the firm circular center that will give the motif stability. Use a stitch marker to mark the first st of each round.
Round 6 :
(4 sc, inc) x 8. (48)
Round 7 :
(5 sc, inc) x 8. (56)
Round 8 :
(6 sc, inc) x 8. (64)
Round 9 :
1 sc in each stitch around. (64)
Info :
At this point the medallion center is a flat disc. If your tension is tight, you may want to switch to a slightly larger hook for the lacy rounds to let the fabric relax and form smooth shells.
Round 10 :
Switch to patterning for texture: *3 sc in next 3 sts, 3 dc in next st*; rep from * to * around. Work into the stitch indicated for each element—this will create 16 small 3-dc cluster anchor points distributed evenly. (64 stitches worked into, counts maintained as 64)
Round 11 :
Ch 2 (counts as hdc), hdc in each of next 3 sc, then over the 3-dc cluster work: (hdc, ch 1, hdc) into the top of the middle dc to form tiny arches; *hdc in next 3 sc, (hdc, ch 1, hdc) in next cluster top*; rep around. (64 worked posts; 16 ch-1 spaces)
Round 12 :
Switch to Ivory. Join with sl st into last st of prev round if not already. Ch 1, sc in same st and in each st around to stabilize the color change. (64)
Info :
Change to Ivory at the back of the loop or with an invisible join to reduce visible tail on the right side. Carry the teal inside if you prefer fewer ends, or fasten off and weave tails later. Blocking now will help rings to sit flat before shell rounds are added.
Round 13 :
*Sc in next 3 sts, ch 3, sk next st*; rep from * to * around to create 16 ch-3 spaces evenly spaced. Sl st to first sc to join. (This produces 16 ch-3 arch spaces for shells.)
Round 14 :
Into each ch-3 space work shell: (sc, 4 dc, sc) in each ch-3 space. Sl st to join. You will have 16 shells around the medallion. (Shells anchored into 16 spaces)
Info :
Shells form the wide ivory ring visible in the photo. Make sure each shell is worked into its ch-space, not into the sc stitches between, so the shells sit with even negative space around them.
Round 15 :
Ch 1, sc in top of first sc of each shell and in the four dc group across the shell where it feels natural, placing 4 sc between each shell top to unify the round: essentially 1 sc in each post around. (64)
Round 16 :
Ch 2 (counts as hdc), hdc in next 2 sc, *ch 3, skip next 2 sc, hdc in next 3*; rep around creating a subtle openwork band over the ivory shells. Sl st to join. (Exact count: 64 worked posts and 16 ch-3 loops)
Info :
If you are making multiple color runners, change to Teal now for the outer scallops. The photo shows the broad ring in ivory with teal scalloped points outside; change color before the next round so the scallops form in teal.
Round 17 :
Change to Teal. Join with sl st and ch 1. Work into the ch-3 loops from previous round: *(sc, 5 dc, sc) all into same ch-3 loop (this creates a petal/point)*; rep around to make 16 petals. Sl st to join. (16 petals)
Round 18 :
Ch 2, hdc in same st, hdc in next 4 dc of petal, then at the petal tip work a small picot: *(ch 3, sl st into top of last hdc) to create a small raised point*; continue hdc down the other side of the petal and into the sc that anchors the petal. Rep for each petal to emphasize the scallop detail. Finish with sl st to join. (Petal count: 16)
Info :
These petals create the pronounced scalloped edge of each medallion. Work the picot gently—if you prefer a softer rounded petal, omit the picot and replace with 2 hdc into the tip instead.
Round 19 :
Ch 1, sc in each st around, placing 3 sc across each petal body (i.e., across the 5 dc cluster you previously worked), using 3 sc to anchor each petal so that the outer shape is even. Total anchors: 48 sc across petal bodies + 16 sc anchors = 64 approximate worked posts; keep the round tidy and even.
Round 20 :
Form small connector loops between petals: *ch 4, sl st into center base between petals (sk 2 sc if necessary to center the loop)*; rep around to form 16 loops. Sl st to join. These loops are where the small floral joiners will attach when joining adjacent medallions.
Info :
If this is your first medallion, lightly block it now to smooth scallops. Use pins in a circular arrangement and steam or wet-block if needed. Blocking helps ensure consistent spacing when you join medallions together later.
Round 21 :
With Teal, into each ch-4 loop work a small 5-stitch flower bud: sl st into loop, ch 1, (sc, ch 2, sc, ch 2, sc) all into the loop, sl st to secure. Fasten off the color if desired; leave tails to weave in. This creates the small two-tone floral joiners seen between scallops in the photo.
Info :
Fasten off and weave in ends for Medallion 1. If you plan to join medallions as you make them, leave the flower buds on Medallion 1 unfastened and attached to the medallion; you will join Medallion 2's buds to these in the joining rounds described below.
Info :
Repeat Rounds 1-21 for Medallion 2 through Medallion 5. For Medallion 2 onwards, join to the previous medallion during Round 20–21 as described in the joining instructions below. Make five identical medallions in total.
— Medallion 2 (Join to Medallion 1) :
Round 1-9 :
Work Rounds 1–9 exactly as Medallion 1 using Teal to form the center disc. (Round counts identical: up to 64 stitches by Round 9)
Round 10-12 :
Work the same texture rounds as Medallion 1 (Round 10–12) to prepare the base for the ivory ring. Maintain stitch counts and tension for consistency. (64)
Round 13-14 :
Switch to Ivory and form the ch-3 spacing and shell work exactly as in Medallion 1. Do not fasten off at end of Round 14 if you plan to join now. (16 shells)
Info :
Position Medallion 2 next to Medallion 1 so that petals/connector loops line up. You will join at four evenly spaced connectors between the two medallions (top, upper-mid, mid, lower-mid positions depending on visual alignment). Blocking both motifs first makes joining easier and neater.
Round 15 :
Work the sc stabilization round (same as Medallion 1). At the end of this round identify the connector loops on Medallion 1 that correspond to where Medallion 2's loops should be attached. Mark those 4 connector loop positions with pins.
Round 16 (Joining Info) :
Info :
Round 16 :
When you reach each ch-loop on Medallion 2 that aligns with Medallion 1's marked connector, join as follows: instead of ch 4 for a connector loop, ch 2, sl st into the corresponding loop of Medallion 1, ch 2 to complete your connector loop on Medallion 2 and pull both lit points snug. Continue around creating four joined connector loops in total (one every 4th loop approximately). Finish the round and fasten off or continue with petal rounds depending on your preference. This leaves Medallion 2 securely joined at discrete points and retains the same lacy spacing seen in the photo.
Info :
Sewing alternative: If you prefer not to join with slip stitches, place the two medallions right sides together and use a tapestry needle to whipstitch through corresponding loops for a nearly invisible join. Either method gives a stable connection; slip-stitch joining tends to lie flatter on the right side.
Round 17-21 :
Continue Rounds 17–21 (petals, picots and small flower work) on Medallion 2 exactly as for Medallion 1. When working the small flower bud into the connector loops, if you left Medallion 1 buds unsecured, work your bud so it also secures to the joined connector point (work the bud across both loops lightly so the two motifs are locked and the flower looks continuous).
Info :
Repeat the same joining method for Medallion 3 to Medallion 5, joining each new medallion to the previously completed one with 4 even slip-stitch connectors placed symmetrically along the length of the runner.
— Medallion 3 (Join to Medallion 2) :
Round 1-21 :
Work Rounds 1–21 exactly as for Medallion 1. Join to Medallion 2 during Round 16 in the same manner described for Medallion 2 joining to Medallion 1. Ensure spacing is consistent—use pins and measure center-to-center distance before joining so the runner remains even.
— Medallion 4 (Join to Medallion 3) :
Round 1-21 :
Repeat rounds as described for Medallion 1 and join to Medallion 3 using the same connector placement. Keep the runner flat—if you notice any twist, unfasten the last join and re-pin to align properly.
— Medallion 5 (Join to Medallion 4) :
Round 1-21 :
Work the medallion and attach to Medallion 4. For the final medallion, you may choose to finish off after Round 21 and weave in ends, or continue directly into the final runner edging while the motifs remain joined.
Info :
When joining Medallion 5, double-check the runner for symmetry. Make any slight adjustments before the final edging so the scallops line up evenly along both edges.
— Final Unified Edging (Work around entire joined runner) :
Info :
The edging unifies all five medallions, smoothing small gaps and tying together raw petal points. Work this edging after all medallions are joined and pinned. Use a continuous join-round approach: work around the entire length, working evenly into petals, connector loops and join seams to create a single decorative border.
Round 1 (Edging) :
With Teal, attach at any petal base at one end. Ch 1, sc in same st, sc evenly across the outermost edges of the petals and across the joins between medallions (where there may be two loops next to each other, work 2 sc to stabilize). Maintain a steady number of stitches per petal and per connector to keep the border even. Continue around the whole runner. Count the number of sc between major points to ensure symmetry on opposite sides. (Estimated worked posts for total runner depend on number of petals and joins—focus on even stitch distribution)
Round 2 (Edging) :
Ch 3 (counts as dc), *skip 1 sc, 5 dc in next sc (forming a larger scallop over each petal), skip 1 sc, sl st into next sc*; rep around along each petal edge. On joins between medallions, work a slightly reduced scallop (3 dc) to keep run length even. Finish with sl st to join and fasten off.
Round 3 (Edging Finish) :
With Ivory, join at a small connector point: *ch 1, sc around the base of each teal scallop to define the outermost edge; work a small picot (ch 3, sl st into top of last sc) on every third scallop to echo the photo's alternating small white points*. Fasten off and weave in all ends carefully, working tails into the runner to hide them behind outerwork.
Info :
For a crisper finish, block the entire runner after weaving in ends. Pin the edges to maintain scallop curves and allow to dry fully. A light starch will help the runner hold its shape for display on a dining table.
— Small Floral Joiner (Make many as needed) :
Round 1 :
With Ivory, ch 5, join with sl st to first ch to form small ring. (Optional: start with MR and 6 sc for a fuller center.)
Round 2 :
*Into ring make: ch 1, (sc, ch 2, sc) - repeat 6 times to form six small petals; sl st to join. Fasten off or change to Teal to highlight center as desired.*
Info :
Attach the floral joiner to connector loops between medallions as described in medallion joining rounds: either slip-stitch them across both connector loops or sew them with a yarn needle for a neat finish. The photo shows alternating light centers on small flowers; replicate by changing the inner color for visual contrast.
— Blocking & Finishing :
Info :
Once all medallions are joined and the edging is complete, pin the runner flat to a blocking board. Gently steam or wet-block according to yarn manufacturer instructions and let dry completely. Use fine pins to shape scallops and even spacing. If you prefer a firmer runner, apply a light starch to the dried piece and re-block briefly.
Info :
Weave in all ends with a yarn needle, hiding them under stitches on the wrong side. Trim any excess threads. Optionally add a couple of small felt pads on the underside to protect table surfaces from yarn dye transfer if using bright or untested yarns.
— Alternate Size & Customization Notes :
Info :
To lengthen the runner, make additional medallions and join them using the same sequence. To create placemats, make a single medallion and add additional rounds of shells and edging to increase diameter. Use thicker yarn and a larger hook to enlarge motifs, or thinner yarn and a smaller hook for a more delicate doily effect.
This teal and ivory medallion runner brings elegance and coastal charm to your table with gorgeous texture and repeatable medallions. Each motif is satisfying to make and beautifully stacks into a runner you can lengthen or shrink at will. The interplay of solid teal centers, airy ivory shells, and scalloped edges makes a statement while remaining light and delicate. Enjoy the serene color palette and the rhythmic satisfaction of joining medallion after medallion. 🧶🌊